Contents updated 5 July 2016.
The theme I created for my Secondary 3 NA (2016) students is 'Cracking'. Just journal. They do not make. Journal practice is more bare bone with only the essentials. Some pretty important research components are not in for now but students will get to do them when we come back again to beef up the contents.
In my usual way of facilitation I try not to specify how many pages or number of this in my classes and also do not specify a certain layout for any design components because I want my students' style and character to show in their design journal. To do that students get to to think and struggle a little. It takes some time for students to get used to this and as a result it is common for some students to not to do so well in the beginning. However it benefits the students in the long run.
This coursework example in this post is not an instructional guide but a brief record of sample whiteboard instructions. Process for development follows a set of Scheme of Work which teachers must adhere to. Do not expect to find anything complete here.
Click on the image for an enlarged version.
Below is a brief overview:

Step 1:
I always like students to begin with the definition of 'Innovation'. No matter what the theme will be. This is to get students to understand that product solutions we see and experience daily in this time of the century are all innovations of some sort. They MUST be. In other words, even if the students might find a problem worth solving, the product will very likely a modification or improvement of a current solution - whether directly or not.
Students, you may use physical or online dictionaries to define 'Innovation'. In my other classes I expect students to research and give pictorial examples of innovation based on their definition. Use of images and annotation are encouraged and are good supplements to written definitions.
A similar way of defining the word is now used to define the theme 'Cracking'. Read Step 1 above for tips and pointers to do this part. Notice if you search 'Cracking' you don't gain much because 'cracking' is an action. You should reduce 'Cracking' to 'Crack' and work from there. When you search 'Crack' you get all possible definitions of the word, then you think about the actions that comes from 'Cracking'.
Next use a mind-map to explore the the theme 'Cracking' as broadly as possible - at all times referring to the definition of 'Crack' or 'Cracking' for hints on what to identify and include in the mind-map. Use the unmistakable 5W1H technique.
(A) Explore the theme in a systematic manner. Begin with broad locations where the theme might take place (such as at home. in the school, etc.) to specific locations (such as the kitchen, toilet, bedroom, etc.). Note: Keep identified locations familiar and not places where you don't visit. Imagine a design situation in a context where you don't go or visit, how are you going to design and make a solution for that?
(B) Branch out from broad locations to identify more specific locations. For example, Home you have the bedrooms, kitchen, toilet, etc. Pick one specific location then recall or identify situations where the theme may take place. In this case, where do I experience or find 'Cracking' taking place in the kitchen.
For example: Home > Kitchen > you identify Eggs Crack. You will need to identify as many possibilities as possible that an egg may crack or you may crack an egg. What are they various possible accident scenarios? What the various ways to crack and cook an egg, etc. Record the process and note the problems, irritations, frustrations that can happen during the process.
(C) Finally it will be nice if the mind-map can end with consequences for the situations described.
You should at least have 5 practical situations that are well described and illustrated in your mind-map. The more comprehensive your mind-map is by describing the process, problem and consequences to a situation, the easier it will be later when you need to start identifying potential design situation or design opportunities.

Step 3:
Note that the Image Board section is stated as Step 3. But this does not mean you do this right after a mind map. If you already have a target user in mind from a selected Design Situation, it is always good to have an image board to show who these users are. You use the image board for a group of target users to be reminded about the design direction, form and style of your product at the Ideation and Refinement stage.
In an image you want to show who the target users are, their lifestyle, hobbies, likes, hangouts, etc. Everything that represents them. Usually only images to make up a collage would be sufficient for an image board. No description or annotations required.

Step 4:
After marking my students' work, I realised one of the worst identified situations are situations that rarely happens. One of my students selected and wrote this (unedited) design situation,
"While moving the TV after buying a new one, the TV is heavy, carrying the TV up to the table is difficult, causing it to drop, it would be nice is (he meant 'if') there is a object that could move the TV and elevate the TV".
That above situation is one that lacks careful considerations. How often does one buy a new TV? And with that very slim possibility how often do you then get to move that new TV and then drop it. And fast forward to ideation, what could be designed? Who's going to use it? How often? Who's going to buy a gadget to move new TV? Even the movers might not find this necessary.
It is the quality of an identified Design Situation and Need you should spend most effort on. Students need to consider "designability" factors in each situation before taking them on for consideration then on to Design Brief.
Identify and draft at least 5 design situations from your exploratory mind-map on the theme. The more situations you identify the better your chance at selecting the best product to solve and work on. Do not stop at 5 if you have more.
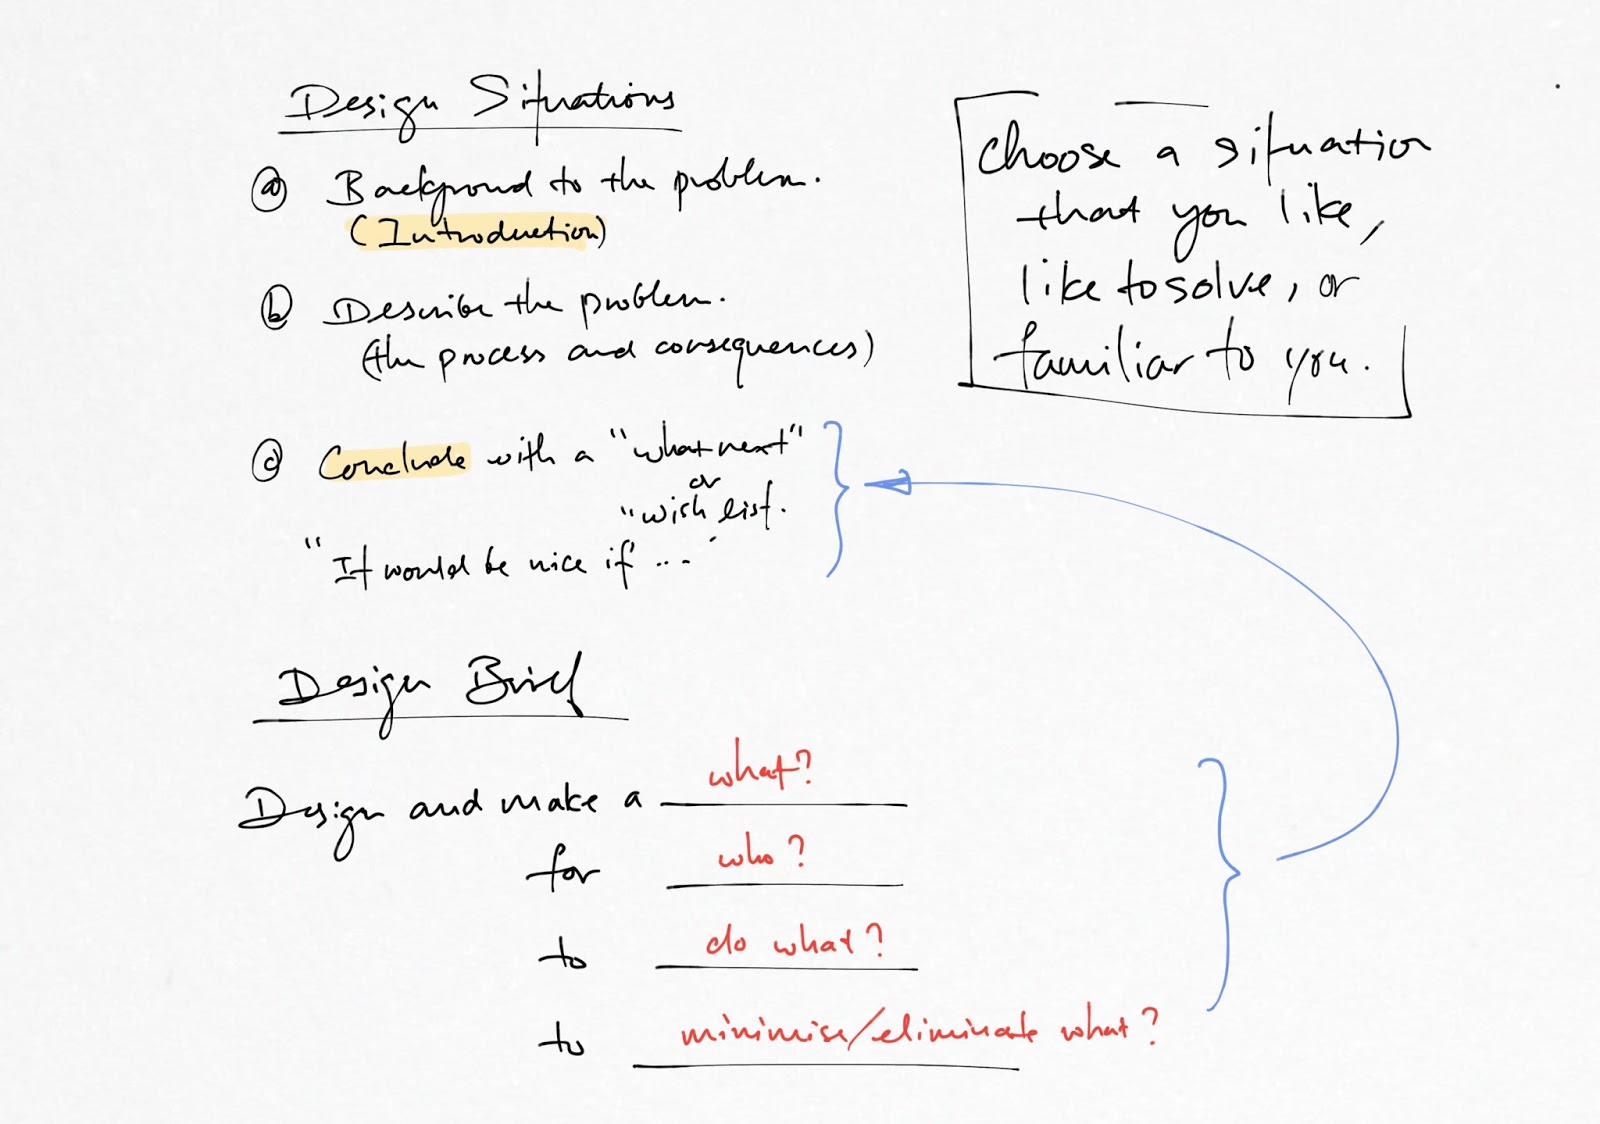
(A) You begin each Design Situation draft with an introduction to present a context to the problem.
(B) Next you describe the activities or processes that leads to a problem or frustration. Include the consequences here as well.
(C) You end with a 'wish list' by stating 'what next'. Now you identified and recorded a problem, what do you wish to see after that. I like to get students to end off by beginning with 'It will be nice if ...'. Here you write a statement how you would like the problem to be resolved (This looks like a Design Brief).
(D) Select one worthy and practical Design Situation and draft a Design Brief. The design brief is a concise statement that spells out what you want to do.
Step 5:
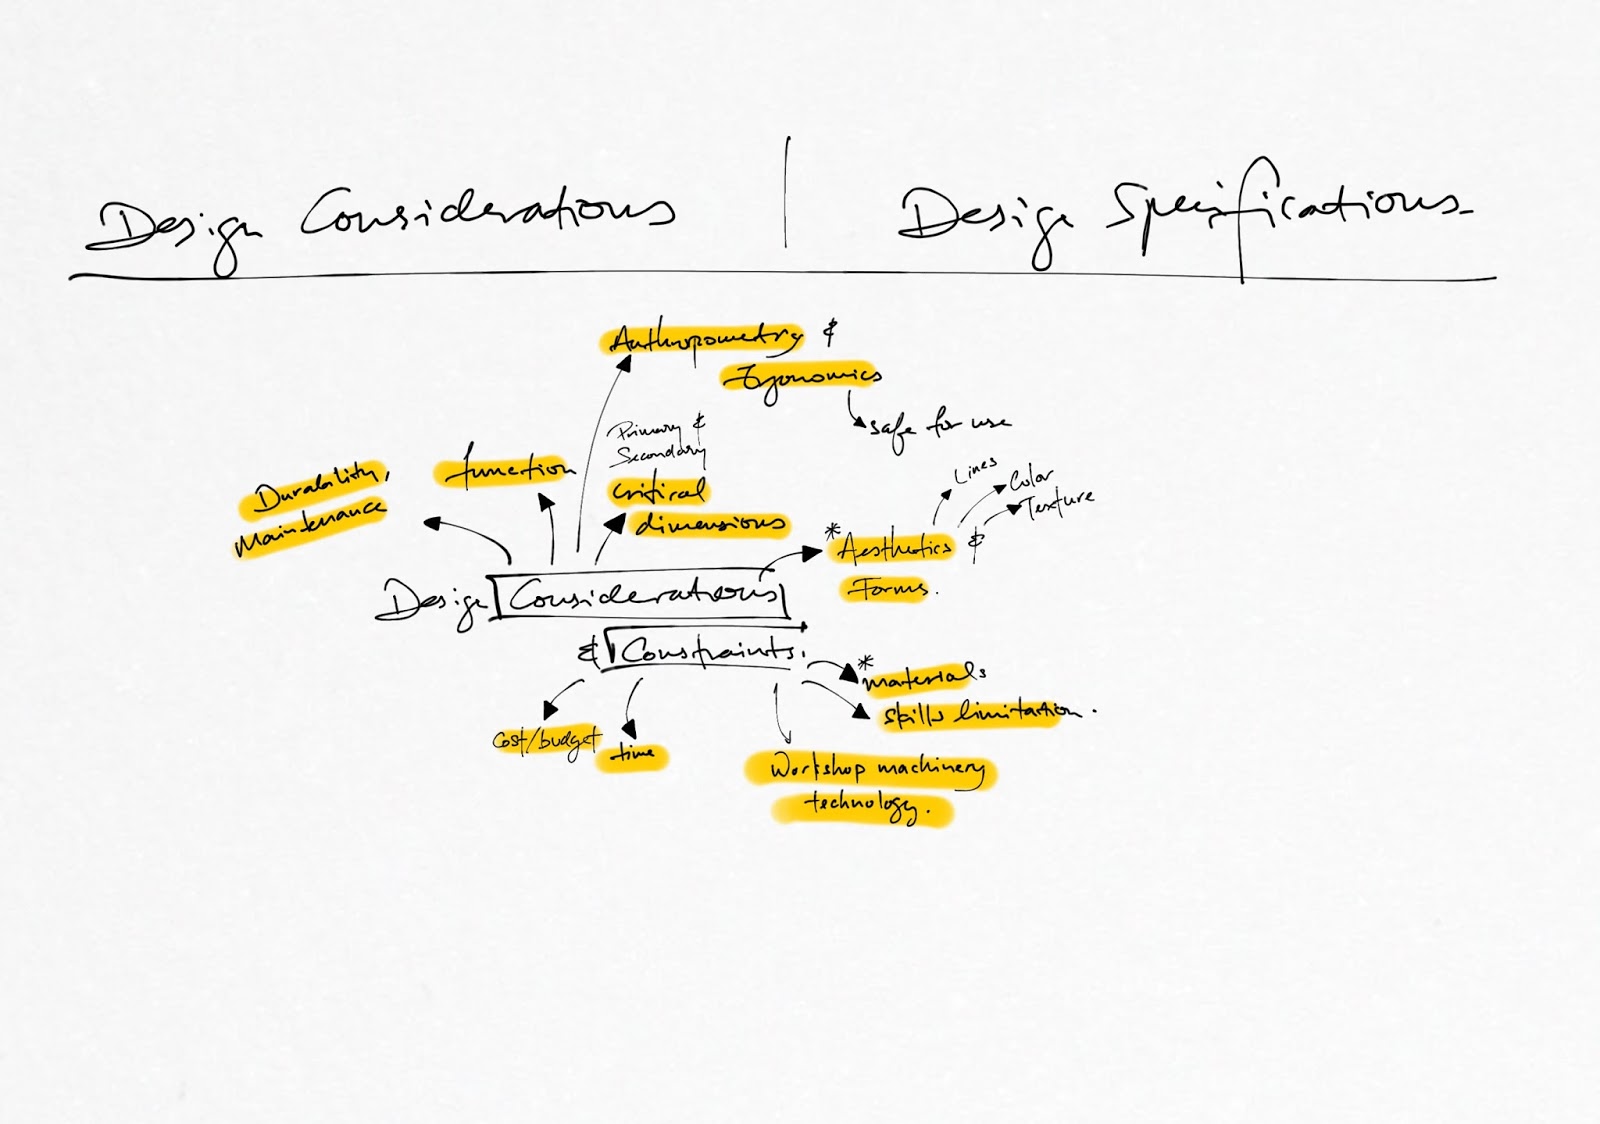
Now you have your Design Brief. In the Design Considerations & Limitations section, you begin by asking, 'I want to (insert your design brief here) what are the factors I must consider?'
A few generic factors are given in the example above. However you should branch out the mind-map specifying unique factors related to your chosen Design Situation.
For example, Home > Market to Kitchen > Eggs Crack > Knocks and impacts during transportation from market to home. (Extracted) Design Brief: A carrier to transport eggs home from the market that will protect eggs from cracking due to accidental impact.
Consideration Factor: 'Function'. I must consider
- '... the number of eggs to be transported in the new carrier.'
- '... how the eggs will be laid out in the carrier when I put the eggs in'.
- '... how the eggs can be protected from impact, or dropped from 1m to the ground', etc.
Step 6:
Once you have a list of Design Consideration and Limitation factors clearly stated, you can begin translating all of them into a list of Design Specifications.
Begin each of your Design Specifications with 'The product must.... '
Before you list any Design Specification points, anthropometric data, critical dimensions, research and study on existing products, expectations and behaviors of your target users, etc are expected to be completed.
You need these information in order for you to specify what you want your product to do in Design Specifications.
An example of other related research:
Transporting eggs from market to home. I must consider how many eggs to store in this new carrier design (Design Considerations, Functions). Before I can specify in my Design Specifications that 'The product must store 12 eggs' I must have the following researched:
- The number of eggs to be transported. 10? 12? 6? How did I get 12 eggs. Is that a standard? Or is that the number of slots you find typically in a fridge. Therefore 12? I may end up a modular design with options for 6 to 12 eggs, or a full carrier for 12 eggs.
- Critical dimensions of a typical egg. Which diameter along the profile of an egg do I need? What are the various standard egg sizes sold in the market?, etc.
Step 7:
Ideation. Use the list of Design Specifications to generate ideas at the Ideation stage.


Step 8: Concept Refinement and Development
A Decision Matrix to select the Best Idea from Ideation
Use a Decision Matrix table to select the most promising idea from Ideation for development.

Select about 4 ideas from Ideation and list them in a decision matrix table on the left hand column as shown above. e.g. Idea 1, Idea 2, ..., Idea 4.
At the top row of the decision matrix table list the attributes (e.g. ease of use, safety, attractiveness, etc) of the product. You extract these attributes from your list of Design Specifications.
Rating
For every idea, give a rating under each attribute from 1-4. '1' being the lowest (worst) and '4' the highest (best). E.g. Idea 1, based on 'Attractiveness' it is the least attractive of the four ideas so I give a rating of '1'.
Next, just below each attribute you include a weightage depending on how 'important' they are in comparison to the other attributes. I assign a rating from 1-5. '1' being the lowest (least important) and '5' the highest (the most important or critical).
To get the total score for each idea, multiply the weightage to the rating for each attribute, then add the total score for each idea. The idea that has the highest score will be selected for development.
The Decision Matrix approach is purely quantitative in nature where you assign a rating for each idea and end up with a total score for each idea. However, the idea with highest score may not be as desirable as it seems from your total. So you got to look at each idea again 'qualitatively' assessing non-tangible qualities like for example 'impression' and 'gut-feel' then make a final decision for your selection.
DEVELOPING 'SHAPE AND FORM'
Shape and form refers to the Aesthetics of the product. Shape and form determines how the target audience will be attracted to the product visually and then emotionally. So this stage of development is a very important stage that also determines if the product will or will not sell.

Step 1:
From the chosen idea (the idea with the highest score from your decision matrix), redraw the idea on a brand new page under the title 'Development - Shape and Form'.
Step 2:

For practice, and for better control and facilitation, I did not get my students to ideate based on their individual Design Brief. I gave them a new Design Brief (about storage for children) and students fine-tuned and customised a list of Design Specifications.
With that list of Design Specifications, I demonstrated on the white board how Ideation can begin. I picked a Specification point that says the product must resemble an animal that a child would like. We made a quick list on what animals a child might like and found several animal and animal storage references from the internet. I used those images as starters and began a drawing spree on the board. Creating, modifying and creating evolution from each ideas and then morphing ideas to create hybrids of others, etc. It was fun. It was hard to stop.

Above:
After an Ideation remedial session.
Ready to go for a break before starting another subject for them.
Below:
The best way to learn is to learn from the others. I brought my students on two occasions to view this year's Design & Technology Award Exhibition in the Science Centre. It was nice to hear from two awardees on their design journey and how they created their product. I think my students benefited a lot from the generous sharing and tips on how to complete coursework well.

Listening to the first presenter on Thursday 2 June 2016.

Photo with the winner. Thursday 2 June 2016.

Listening to the first presenter for Monday 6 June 2016. Two new students joined in today.
----------------------------------------------------------------------------------------------------
DEVELOPMENT
A Decision Matrix to select the Best Idea from Ideation
Use a Decision Matrix table to select the most promising idea from Ideation for development.

Select about 4 ideas from Ideation and list them in a decision matrix table on the left hand column as shown above. e.g. Idea 1, Idea 2, ..., Idea 4.
At the top row of the decision matrix table list the attributes (e.g. ease of use, safety, attractiveness, etc) of the product. You extract these attributes from your list of Design Specifications.
Rating
For every idea, give a rating under each attribute from 1-4. '1' being the lowest (worst) and '4' the highest (best). E.g. Idea 1, based on 'Attractiveness' it is the least attractive of the four ideas so I give a rating of '1'.
Next, just below each attribute you include a weightage depending on how 'important' they are in comparison to the other attributes. I assign a rating from 1-5. '1' being the lowest (least important) and '5' the highest (the most important or critical).
To get the total score for each idea, multiply the weightage to the rating for each attribute, then add the total score for each idea. The idea that has the highest score will be selected for development.
The Decision Matrix approach is purely quantitative in nature where you assign a rating for each idea and end up with a total score for each idea. However, the idea with highest score may not be as desirable as it seems from your total. So you got to look at each idea again 'qualitatively' assessing non-tangible qualities like for example 'impression' and 'gut-feel' then make a final decision for your selection.
DEVELOPING 'SHAPE AND FORM'
Shape and form refers to the Aesthetics of the product. Shape and form determines how the target audience will be attracted to the product visually and then emotionally. So this stage of development is a very important stage that also determines if the product will or will not sell.

Step 1:
From the chosen idea (the idea with the highest score from your decision matrix), redraw the idea on a brand new page under the title 'Development - Shape and Form'.
Step 2:
It is impossible to state in definite point what you should do about developing shape and form. Because it can range from the way the 'lines' flow in a product, to color choices and surface textures. But the basic idea is to refine the overall aesthetics (or attractiveness) better or as desirable as it can.
But a good way to start in no particular order of development is as follows:
- You can simplify the shape and profile (e.g. the profile of a Giraffe on both side of a storage box). Make it look less complex. Make the shape of the edges smoother, less jagged. More minimalist, etc. Look out for complex twist and turns of your initial profile that may be very tedious to shape and finish and then simplify.
- Modify the overall shape and profile by drawing parts bigger, smaller, taller, shorter, thinner or fatter. You may end up with quite a cute representation of, say, a Giraffe, which you would not thought of. In the example above, I made the neck of the Giraffe very long. I thought if I did that, the child would not be able to reach the head. But I quickly turned that into an advantage. I turned that into a 'Height Chart'. While the body of the Giraffe remains low enough as a storage space.
- On the right-hand-side of the example above, I took the original profile of a Giraffe and began exploring different representations of it while keeping its original form. I drew one that looks more angular with straight lines. Another one on the right more organic in nature. The one that looks more angular looks 'simpler'. I like the clean look compared with the more organic look.
- Draw your storage space wider. Draw your storage space taller. Thinner, fatter, etc. By doing this, you alter the overall appearance. You may end up with a FAT Giraffe. Quite cute. A TALL Giraffe where you can design additional storage space along the neck.
- Change a new animal shape if after modifying the storage space you find it no longer suits the shape of a Giraffe. Maybe a Hippo this time. In no time you may end up with a range of animal storage collection.
- Finally, developing Shape and Form is all about altering the shape, the lines, the overall proportion repeatedly until you find the right balance and feel. And one that you are sure will be attractive and suitable for your Target Audience.
Finish this component over a couple of A3 pages complete with annotations to explain each modification. As you develop and draw new ideas for Shape and Forms, you'll get better at drawing an improved version of your design. When you are done, select the best Shape and Form or you may combine a few good features to come up with a final shape, then redraw the final developed idea.
Step 3:
Do not forget that any D&T product must be made of resistant materials (Wood, Metal and/or Plastic). If the shape and form of your idea looks very organic, for example, like a real-life Panda bear, then that product cannot be realised in the workshop. You will need to transform that ideal shape and form into one made of wood, metal or plastic. That means more 'boxy'. And then refine the shape again using the two steps above.
DEVELOPING CONNECTION AND JOINTS
All products made of wood, metal or plastic are usually assembled from a number of loose parts that will require some form of jointing. Unless they are a solid material product like a brick or a paper weight. For this stage of development you are required to do the following:
- Identify the materials that your products will be made of. Entirely of wood, metal, and/or plastic or a combination of two or three. The following points assumes that a wooden carcase construction is required. I want to make a box to store toys in it.
- Identify the parts that require jointing. Highlight by drawing a circle around the areas and make a note that a suitable joint needs to be developed.
- Research suitable jointing methods (from your textbook or online) for the identified areas. Study the options and select at least two possible applications for your product.
- In this case, assuming a wooden carcase construction, my research focuses on different types of carcase construction. For each of the methods, you will need to study them. Take note of the (a) advantages and disadvantages for each methods, (b) the suitability for your product, (c) skills and complexity to make (compare with your current skill level), etc.
- Select and draw at least two most promising jointing method beside the highlighted area (see point 2). Include descriptions (annotations) for each of the jointing method, and show which method you have chosen. Give a good reason for your choice.
- Repeat Steps 1-5 for all other joints.
- Once you have finished all your decisions for the joints, redraw your final idea with all your recommended jointing methods included in the drawing. Annotate them.
- You may or may not modify the Shape and Form. But do so if necessary.
DEVELOPING FOR ERGONOMICS USING ANTHROPOMETRIC DATA
Stay tuned... Refer to "Picturiol Idea Generation and Development Post"
--------------------------------------------------
Design Journal Submission
1 Arrange your journal in the following order:
For semester 2 2016:
Design Brief
Design Considerations
Design Specifications
Ideas Generation (Toys storage for Children)
Decision Matrix
Development (Shape and Form)
Development (Jointing Methods)
Development (Using Anthropometric Data and Critical Dimensions to establish size)
...
...
2 Every page must have a heading that describes the main activity for the page. E.g. Ideas Generation. Include a sub-heading where appropriate to describe the detailed activity under the main heading.
E.g. Heading: Development: Jointing Method. If you are developing jointing methods for the box carcase, under the main heading add a sub-heading: Development: Jointing methods for Box Carcase. If you move on to develop other areas that require a joint, write another sub-heading to describe that.
3 For every development options explored,
a) there must be explanations to describe the respective features. Include Pros & Cons to compare one option with the other.
b) the selected option must be clearly highlighted. E.g. Butt Joint chosen for the box. Highlight the word Butt Joint and put a big 'tick' indicating a chosen option.
4 For every decisions made, include the reason for choosing the option instead of the other. e.g. Why you have chosen a Butt Joint instead of a Finger Joint construction.
5 Summarise all your decisions made under each development section before you move on to the next. Draw the updated developed product with it's latest features. e.g. Summarise all the decisions you made under development of jointing methods at the end of the section with a drawing of the product showing the latest features.


ReplyDeleteAwesome job on this article, looking forward to more from you.
case study writer