Need Help?

For students managing design work, sketching, deadlines, and creative pressure — and for educators seeking greater clarity in their teaching — this blog offers focused, practical support in Design & Technology, from visual communication and design process thinking to digital fabrication. For those seeking more tailored support, I am also available for student consultations and teacher workshops. Since 2007, DesignJournalSOS has helped readers navigate real classroom challenges with grounded strategies and insight. Have a question or topic you’d like explored? Your reflections are welcome — they help keep this space alive and growing. Copyright © 2007–2026 Daniel Lim
Showing posts with label 3D Design. Show all posts

02 June 2026

3D Printed Pencil Extenders: A Simple Lesson in Design Thinking, Sustainability, and Iterative Problem Solving

Once upon a time, pencils used to be nice and long. As they serve as tools for ideas, sketches, and notes on paper, they gradually become shorter over time. Eventually, even the smallest hands can no longer hold a pencil that has been reduced to a tiny stump steadily enough to do its work.

But that doesn't mean we retire them. At least, I don't.

Pencil extenders can easily be bought from stores. However, with 3D printers and modelling software at our disposal, we can put our heads together and make our own.

Figure 1a shows a pencil holder I made quite some time ago. As students use the pencils, however, they gradually become shorter and shorter—to the point where some are simply too short to be used comfortably.


Figure 1a                      Figure 1b

That inspired me to design pencil extenders and, subsequently, a holder for them (see Figure 1b), allowing these pencils to continue serving their purpose for as long as possible.

The images that follow (see Figure 2) are screenshots of the pencil extender holder model from Tinkercad, alongside photographs of the finished 3D print doing its job. If you're interested in the design process behind the pencil extender itself, you can read about it here: Click HERE.


Figure 2

Learning Point

So what's the point of showing you this?

Design doesn't stop at any stage. Every solution solves a problem within a particular context. As you may already know, every solution often leads to a new problem, a new design challenge, or even an opportunity to extend the original idea.

In this case, I had my pencils neatly lined up and ready for students to use. But what happens when they become too short? I created an extender for each one so they could continue to be used. Then another question emerged: if full-length pencils deserve a holder, why should these shortened pencils in extenders be left lying around? They deserve storage too.

Figure 3 shows the complete setup—from brand-new pencils to those nearing retirement and now fitted with extenders.

Figure 3

What do you think comes next?

  • What new design opportunities do you see? 
  • What potential improvements or extensions can you foresee?

Have a go. Let me know in the comments what you think.

----------------------------------------------------------------

Like my contents? Support me, support my work? Buy me a Coffee? https://www.buymeacoffee.com/mrdanielsos

----------------------------------------------------------------

#3DPrinting #3DPrinted #PencilExtender #PencilHolder #DesignThinking #IterativeDesign #ProductDesign #DesignProcess #DesignEducation #STEMEducation #STEAMEducation #MakerEducation #MakersGonnaMake #DigitalFabrication #CADDesign #Tinkercad #3DDesign #EducationalTechnology #EdTech #TechnologyEducation #DesignAndTechnology #DTEducation #ClassroomInnovation #TeachingDesign #LearningByDoing #ProblemSolving #CreativeThinking #InnovationInEducation #SustainableDesign #ReduceWaste #CircularDesign #Upcycling #Reuse #Sustainability #StudentLearning #EngineeringDesign #RapidPrototyping #3DPrinterProjects #MakerSpace #DesignChallenge #Prototype #IndustrialDesign #EducationBlog #TeacherLife #TeachingAndLearning #FutureReady #HandsOnLearning #CreativeEducation #Innovation #DesignInspiration

02 December 2025

Tinkercad 3D Design & Print - Pencil Extender

A pencil extension gives life to ... ... pencils. Pencils that are too short to be practically held. 

One way is to buy a pencil extender, but, it is way more cool to design and print one yourself. And that's what I did.

However, that being said, one can always improvise and use any available material(s) such as rolled paper at the end of a short pencil and some tape. But if you have access to a 3D printer and a free platform like Tinkercad, that'll make it look much cleaner and more product-'designerly'.

Below you'll see the 3D model of the pencil extender and the actual product in use. The extender has slotted 'windows' on both sides so users can 1) see where the end of the pencil is, and 2) use the slot to 'dig' an ultra short pencil out if the entire pencil is stuck in the holder. 

A regular pencil stays nicely in the holder, however I still use tape to bind the opening of the holder to make a tighter fit, so the pencil may be more stable when it's being used.


In design, there will be iterations. No matter how well the thought or plan is. As much as I wanted the pencil to work first time it is printed, reality is far from the truth.

I eventually went with version 3 (the image below shows up to version 2) where I continually modified the hole and the side gaps of the holder, with more aesthetic refinements. 


So here you have it.  A short pencil extender. And now all pencils are loved till they are no more.

#pencils #productdesign #productinnovation #innovation #creativity #pencilextender #designandtecnology #technology

Like my contents? Support me, support my work? Buy me a Coffee? https://www.buymeacoffee.com/mrdanielsos

20 June 2025

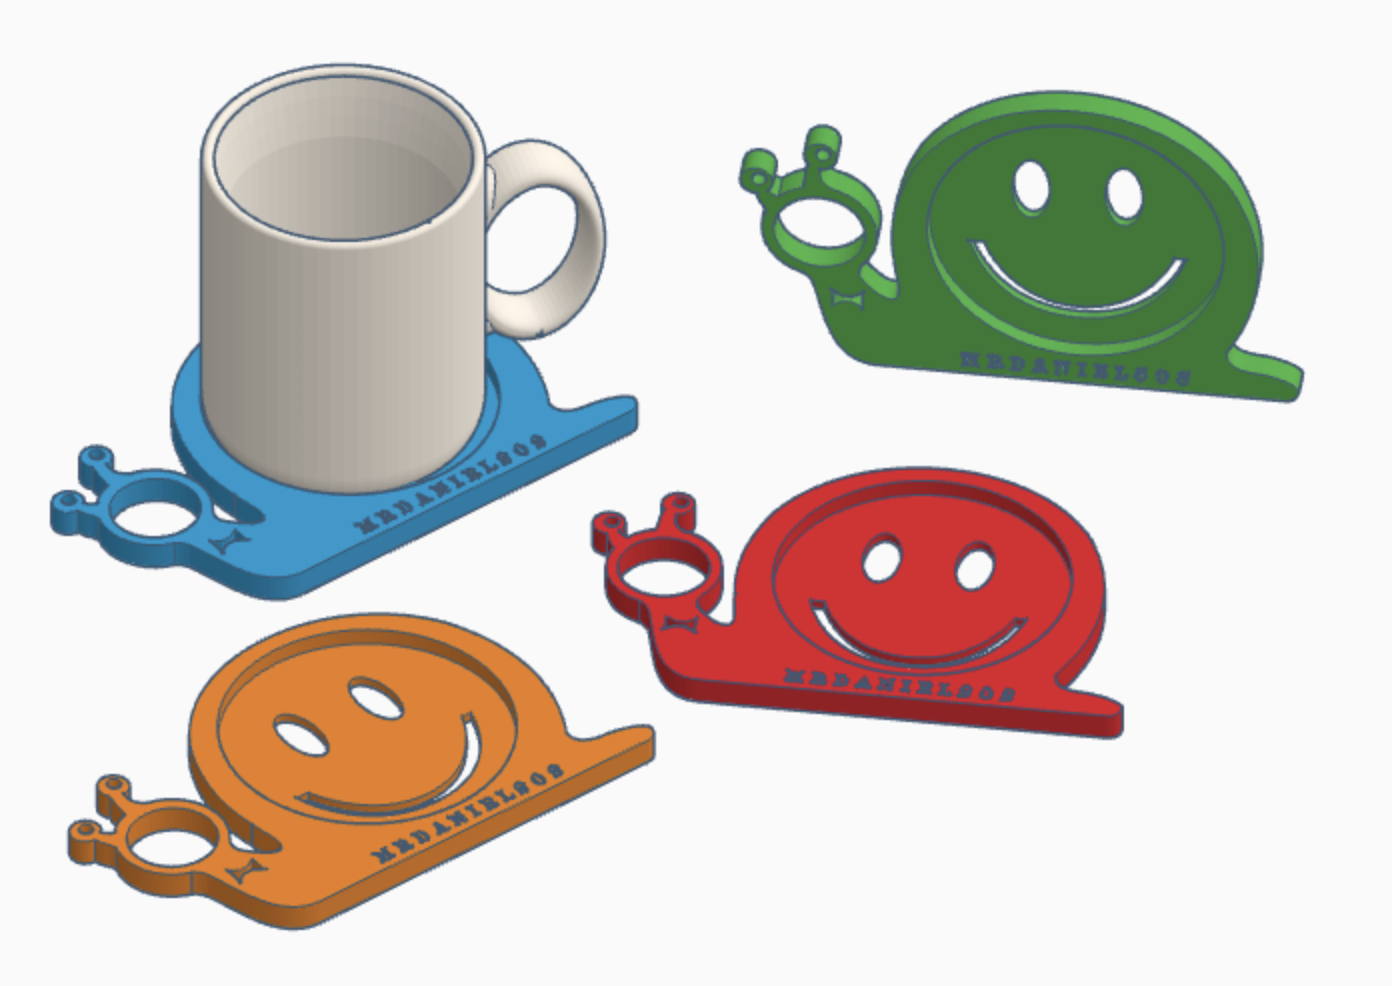
Design a Snail Cup Coaster with Tinkercad with the "Sketch" Tool

SNAILS Coaster Design on Tinkercad

The thought about making a snail coaster is not new. About a decade or more ago I designed a snail coaster and had it cut out with a laser cutter. Which was used a a door gift to all the participants in a Design & Technology teachers conference. 

SNAILS again

Here again I thought of snails when I begin tinkering with Tinkercad. Some things never change.

Don't they look so cute when you have a family of them?


TOP VIEW

45 Degrees View


How Do I Make This Profile in TInkercad? 

I am guessing you want to know how I made this. If you used Tinkercad you'll quickly understand that this snail profile will be extremely tricky if you use the basic combining shapes method. Not only that - you may go crazy.


Glad that I found the "Sketch" tool. This tool is an incredible feature. I cannot NOT use it as soon as I learned about what it is and what it can do in Tinkercad. While it's features with the pen tool cannot be compared with the likes in Adobe Illustrator - however once it's limitation & simplicity is understood - more complex shapes can easily be created.

Several layers of "sketch" took place to create the final snail coaster profile I was looking for. 

Something that was impossible for me in Tinkercad is now possibilities only limited by my imagination. 

------------

Want to learn Tinkercad and start designing? Feel free to contact me at mrdanielsos@yahoo.com.sg for more details.

Like my contents? Support me, support my work? Buy me a Coffee? https://www.buymeacoffee.com/mrdanielsos
 

How to Design & Print a Clipboard & Pencil Holder with Tinkercad

What do you do with a clipboard?

You write.

What do you write with? A pen or a pencil.

Since I often draft my work with a pencil, I thought—why not make my own clipboard pencil holder?


Modelling the Idea

In the example above, you’ll see how I like to model my designs. I copy and paste each iteration as I go, partly to document the process and partly to save time—if I need an edit, a spare part or want to revisit an earlier design, it’s just a copy-paste.

It also makes for a clean presentation. You can easily follow the steps of the clipboard pencil development.


Functional Iteration: Add a Grip Gap

One of the key refinements was adding a gap to improve the pencil’s grip. Unfortunately the PLA filament does not have the elasticity to flex. And so I ended up with a full ring design.

Put to Other Use?

Interestingly, I  also played around with placing it in different locations—on the side of the table, for example—where it worked surprisingly well.


Let's get that thing to work. The Hexagon Problem

Here’s where things got tricky.

The pencil slots were intentionally designed as hexagonal meant to match the cross-section of a typical pencil. I accounted for the exact dimensions of the pencil in my 3D model—but forgot about tolerance.

The 3D printer has a 0.4mm nozzle. That means it will print 0.2mm both sides of the printer head. As a result, the pencil didn’t fit, the hole was too small. After widening the hole by 0.4mm and more, it fit but was still a little loose. 

If I were to redesign the slot, I’ll make it round.


This clipboard pencil holder works just as expected. It fitted perfectly with the double clip. It’s magical when the pencil seem to float behind the spine of the double clip. Taking the pencil out and putting it back is a breeze. Overall I quite like the outcome. 


Above: Close-ups of the back view

Lesson Learned: Prototype the Pencil Slots First

Here’s a key insight from the process:

Next time, I’ll isolate and print just the part that holds the pencil—and do it in a range of slightly different profiles (round, hexagon, and so on) and sizes. That way, I will be able to test all the options at once and pick the best fit before embedding it into the full design. This will save filament, time, and frustration.


Your Turn

I hope you enjoyed this creation.

If it sparked your curiosity, why not try designing your own clipboard pencil holder? It doesn’t have to be based on mine—but feel free to borrow the idea and evolve it into something that fits your way of working.

And if you do, I’d love to see what you come up with. Share your designs with me! 

------------

Want to learn Tinkercad and start designing? Feel free to contact me at mrdanielsos@yahoo.com.sg for more details.

Like my contents? Support me, support my work? Buy me a Coffee? https://www.buymeacoffee.com/mrdanielsos