Need Help?

For students managing design work, sketching, deadlines, and creative pressure — and for educators seeking greater clarity in their teaching — this blog offers focused, practical support in Design & Technology, from visual communication and design process thinking to digital fabrication. For those seeking more tailored support, I am also available for student consultations and teacher workshops. Since 2007, DesignJournalSOS has helped readers navigate real classroom challenges with grounded strategies and insight. Have a question or topic you’d like explored? Your reflections are welcome — they help keep this space alive and growing. Copyright © 2007–2026 Daniel Lim
Showing posts with label General Processes. Show all posts

12 July 2016

Pictorial Idea Generation and Development (Using SCAMPER)

Updated on 2nd August 2016

This post is an extension and a supplement to "Coursework Experiential Journal Component 2016 Example" that was originally created as a guide and reference material for my Secondary 3NA student mini coursework. I will not repeat information I have already posted previously.

What you'll see in this post are pictorial/visual examples on Ideas Generation and Development (and refinements) in a design journal. The examples do not represent any complete section of a journal. They serve as a starting point - an example - a demonstration - a suggestion - a recommendation - etc. to show what sort of contents may go into, say development, and how you can present your research and information in the journal. 

Use them as a reference and a guide to start or to improve your journal. Make informed choices on your own on what your takeaways should be after looking at the materials in here. Do not copy. 

If you find this helpful, I would love to hear from you. If you have suggestions, please do not hesitate to link up with me.

----------------------------------------------------------------------------------------------------
Idea Generation / Ideation

Use of photos and images are starter and triggers for more ideas. In this case images of animals. Design Brief is about a storage solution that will appeal to children, that will motivate them to keep their toys.


----------------------------------------------------------------------------------------------------
Development / Refinement (Using SCAMPER)

Refining Shape & Form of a selected idea / concept. Some suggested ways that may help you start the process. Interestingly I use S.C.A.M.P.E.R. for this. Now you know S.C.A.M.P.E.R. need not be used only for ideation, but a great tool for development too.


---------------------------------------------------------------------------------------------------
Development / Refinement

Refining Jointing Methods on the various parts of the selected idea / concept. Some suggested ways that may help you start the process.


A quick summary on the decisions made for refinement of shapes & forms is quickly drawn at the top of the page. Three areas are then identified that require decision on the most suitable type of jointing methods. 


The page above shows examples on how options for different types of joints can be presented in the journal.


It's always a good practice to summarise all of your decisions every sections. (Above) To have a clearer overview of what I have done so far about jointing methods for the whole product, I consolidate decisions about the types of jointing methods selected for the various parts and draw them as a complete product..

---------------------------------------------------------------------------------------------------
Development / Refinement

Refining Overall Size and Proportions based on Anthropometric Data and Critical Dimensions. 


 To develop the storage size and dimensions , the product height, overall size and other detailed sizing of the other parts of the product, I identified and made a list on the areas that I need to decide on. Then proceed to work out each of one of them using researched Anthropometric data as well as Critical dimensions.

---------------------------------------------------------------------------------------------------
Development / Refinement

Stay tuned for : materials, etc...

---------------------------------------------------------------------------------------------------

26 September 2013

Making process of the Lady Bug Tea Light Holder - Shaping to Dry Assembly.


This publication shows the making process of the Lady Bug Tea Light Holder - from Shaping to Dry Assembly. This includes tools involved. It is assumed that marking out and general shaping is completed. 'Finishing' is not included.

20 March 2012

How Does a Facilitation on Processes for Making Look Like?

I've begun afternoon consultations for my Secondary TWO students.

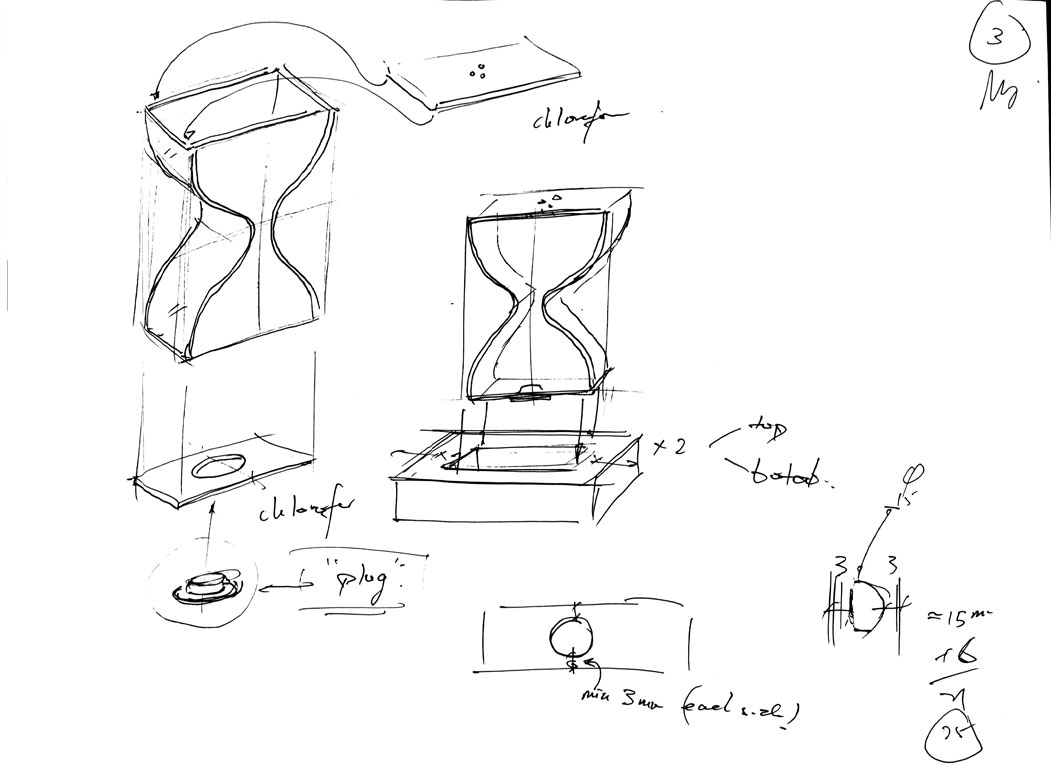
Below you'll see how I facilitated 2N1 Angeline Salt & Pepper Storage over a time period of 30 minutes or so. Angeline final concept (not shown), was a skinny (side-view) 'hour-glass' shaped holder made of acrylic, and wood at the top and bottom as support. However there were difficulties in working out how to develop the parts to dispense Salt or Pepper, for re-fill and to able to keep all the little parts intact all the time.

Page 1:

My first task was to help Angeline understand different possible ways to construct the 'hour-glass' concept. She already had it worked out from a series of idea generation and refinement rounds to come out with the two flat 'hour-glass' panels cut out from a single acrylic sheet and covered using a formed acrylic strips at both open-ended sides.

At Secondary TWO, I would expect she might have some technical difficulties in actually making it work. So in the example above, I started clarifying how the base of the holder may be constructed from a single piece of Jelutong wood, which in turn depends on the width of the 'hour-glass' design. And put a note for her that we need to consult the Workshop Instructors to see if 'cutting' a rectangular slot in the wood is possible.

We also discussed that the allowance left after 'cutting' from the slot to the edge of the wood cannot be too thin as that would make the stucture weak. We need to work out the width of the 'hour-glass first'.

Page 2:

Forming the curved acrylic strip shape to fit the sides of the 'hour-glass' needs to be planned carefully. Making use of Angeline's original process to construct the 'hour-glass' the process was further refined including other possible ways to construct it. Throughout page 2, the emphasis is on how formers (a male and a female) could be used to create the exact curve she needs for both sides of the 'hour-glass'.

When you see #1, #2, and so on in page 2, those were referring to the steps I drew on paper as I described how each process can be completed to create the formers needed, and at the same time aims to cut-out the 'hour-glass' shaped design - all in a single process.

It is important to make sure that the shape of the former has exactly the same curvature on both ends on the 'hour-glass' shape. That is why the wooden former and the acrylic 'hour-glass' shape is cut together. Both the former wood and acrylic can be secured together using double-sided tape.

Page 3:

Finally we come to the part to talk about Salt or Pepper dispensing and how to go about making that. The simplest soluton is to find some sort of 'plug' which can be found in some medication bottles, e.g. the PiPa Gao bottle (in Chinese 枇杷膏). That can go to the bottom part. The top part is another similar acrylic strip with tiny drilled holes for 'dispensing'.

Measuring the diameter of the 'plug' will lead you to the width of the bottom 'plug' acrylic strip. After explaining the rationales about giving allowances from the drilled hole to the edge of the acrylic, the width of the bottom 'plug' acrylic strip is quickly worked out.

The rest of the dimenions on the hour-glass body is left to Angeline to work out on her own.

Conclusion:

That was one happy successful consultation session. Angeline was able to show her understanding from the discussion and this is possible because she had already been working on the processes of making for some time. A lot of thoughts were evident through her design journal especially at the refinement phase. The details of measurements and how a single acrylic sheet could be subdivided to maximize material usage, etc is impressive for a 13 year old.

My job was to help her refine and shorten the processes by introducing alternative techniques and approaches that she might not have thought of. Sometimes radically changing the processes.

In the end, Angeline still got to make a decision on the final processes.

Those were my drawings all right... but Angeline would need to bring that home, recall our discussions and come out of her own version.

That's quite a challenge. But I believe with Angeline's keen attitude, the Hour-Glass Salt & Pepper Holder will surely turn out just as designed.

09 June 2011

General Processes - Spray Painting on Wood Surface

General Processes

Pre-Check
  • Check if your workpiece is best painted before or after jointing. If you get that wrong, the process of spray painting for the subsequent layers will become a nightmare.
  • Ensure that the surfaces for spray painting is well finished (sanding), dry and and cleaned of wood dust.
  • Note surfaces or edges that will be covered or out of sight, you need not spray paint those areas.
  • If you have to drill holes or cut a rebate joint somewhere in your workpiece, get it done before spray painting.
Step 1: Part 1 of 2 Preparation for Location and Supports
  • Locate a well-ventilated designated area suitable for spray painting.
  • Prepare a few waste blocks of wood to support and elevate your project. A turntable will be perfect.
  • The turntable or the blocks of wood will also enable you to turn your project around during spray painting without touching your project.
Step 2: Part 2 of 2 Preparation for Spray Can

  • Shake the can for two full minutes once you hear the mixing ball begin to rattle.
  • Before you start spaying on your workpiece, it is a good practice to spray first on a piece of scrap material. to make sure the paint is coming out in the way it is meant to.
Step 3: Spray Painting

  • Maintaing a distance of about 300mm from the spray nozzle to the project.
  • Select a starting point on one end and spraying across your project in one sweeping motion.
  • Do not hold down the spray button continuously, when you are at the end of the first pass release the spray button.
  • Always be mindful and maintain a constant distance from the item being painted.
  • Overlap each pass by about a third to keep paint finish even and consistent.
  • Continue in this fashion until entire project has one coat of paint.
  • Allow paint to dry for the recommended amount of time before adding a second coat.
Repeat Step 3 if necessary.

Tips:
Apply each coat of paint in thin coats to avoid runs or drips.

Note:
Unlike lacquring on on wood, there is usually no need to sand the surface before applying the next coat.

08 June 2011

General Processes - Jointing Multiple Layers with Multiple Dowels


Example using a Typical Photo Frame Project:
You want to join a piece of clear acrylic to a wood with 4 dowels to make a photo frame. So that the clear acrylic cover can be removed to add or change photos. You want to place one dowel in each corner. How do you install the dowels and make sure all the holes are aligned?
Note: This section assumes that the student is able to prepare and get ready the wood and acrylic material for the next stage. It also assumes that the student is able to mark out both wood and acrylic proficiently.
Step 1: (Marking Out)
  • Use double-sided tape to tape the acrylic sheet to the wood.
  • Avoid taping where the holes will be drilled.
  • Mark out the positions for each of the 4 holes with an 'x'.
Step 2: (Preparation to drill)
  • By now you should have worked out the length of each dowels based on the thickness of your wood and acrylic.
  • If the diameter of each of your dowels is 6mm, the get ready a 6mm diameter drill bit.
  • Install the drill bit to the drilling machine.
  • Get ready 4 dowels that is already cut to length.
How to get the length of each dowels?
  • 2/3 the thickness of the wood + thickness of acrylic sheet + how much you want the dowel to protrude out of the acrylic sheet.
Tips:
  • If you are unsure if your dowels will be tight fit on your photo frame, test using waste acrylic and wood. (see step 1 for preparation)
Step 3: (Drilling Procedure)
  • Secure your combined work piece (see step 1) on the drilling machine with an F-Clamp.
  • Set the drill bit to the required depth.
  • (To drill a through hole, see 'tips' just below this step)
  • Drill the first hole and install a dowel.
  • Drill the second hole diagonal to the first hole and install a second dowel.
  • Repeat the process until all holes are drilled.
To appreciate why you need to do the above, mark out and try drilling four holes individually on an acrylic sheet and wood one after the other. Put them together and try putting in the second dowel. How's that?
Tips:
  • If you plan to drill through the holes, i.e. you want to expose the dowels on the other end of your photo frame, you need to place a piece of waste wood below your workpiece. Drill through your workpiece into the waste wood.
  • This is to minimize splitting (on the wood part) at the other end of the drilled hole.
To appreciate why you need to do the above, try clamp a waste wood suspended on a machine vice without a waste wood below. Drill through. You will know what I mean.
Step 4: (Finishing)
  • Split both the clear acrylic cover and the wood for finishing separately.
  • Finish both the clear acrylic cover and the wood respectively with your desired finish.
The end.

General Processes - Working with Acrylic

General Processes:

Pre-Check
Make sure all parts given to you are 'square'. That means the edges are 90 degress to each other before you start marking out.

Marking Out (After you got your freshly cut acrylic sheets)

1) Mark out all parts with lines for sawing, or trimming, or bending with a pencil and mark the centres of curves (radius) and holes to be drilled with an 'x'. Mark out all the positions for screws and/nails nails.

Tips:
  • Do not tear the protective paper away from the acrylic yet. The paper surface is for you to draw and mark out.
  • If you plan to have screws to join acrylic to wood, work out the correct length, type of head, and the diamter & depth of the pilot holes to drill on the acrylic. Generally if you want the surface to be 'flushed', use a Countersunk Head Screw. If you do not mind the screw head popping out of the surface, use a Round Head Screw.
  • Make sure that you do not screw too close to the edge of the acylic. At least 10 - 15 mm away from the edge is a good guide. But that will depend on your application.
  • For bending, the marking-out lines should be 'dashed-lines'.
  • For circles or radiuses, the marking-out lines should be 'centre-lines' cutting through the centre (or 'x').

Drilling
2) Drill all the holes first.

Tips:
  • If dowels are required, make sure you check that the diameter of the dowels matches the diameter of the drill bit. To check if the fit nicely, try it on a piece of waste acrylic.
  • If you require a flat hole, use a Forstner Bit instead of a Drill Bit.
  • If you require a large hole and not even the Forstner Bit can create it, consider using a Hole Saw instead.
Sawing & Trimming
3) Saw / Trim curves using the Scroll Saw (concave or convex curves) or a Hacksaw (for long straight cuts). For external curves, the Circular Sanding Machine may be used.

Edge Finishing (Part 1 of 3: Filing)
4) File the edges with the correct files. (see 'Important' just below).

Tips:
  • Holes cut out with a drill bit or a hole saw need not be filed extensively. The curved surface are already perfect as it is. If need to, file lightly to get rid of the burrs, or use a Wet & Dry paper instead.
  • Always use the right file for your work. Generally a Half-Round file for curve edges, and a Flat File for straight edges and for rounding off corners.
  • The objective of filing is to take away large scratches from the edges from saw cuts. So make sure at the end of your filing, inspect the edges for remaining deep scratches.
  • Round the edges for aesthetics. It usually works.
Dry Assembly (to test if parts fit)
5) Dry fit all your parts, check that they are OK. If not ok, modify or re-do. Tips: Don't join them with Chlorofoam yet!

Tips:
  • Important!: If bending is required, make sure you complete your finishing process first.
Edge Finishing (Part 2 of 3: Wet & Dry Paper)
6) Prepare acrylic edges for polishing using the Wet & Dry Paper.

  • IMPORTANT: If you are joining edges, you MUST NOT sand the edges to be joined! It will not fit after that.
Edge Finishing (Part 3 of 3: Polishing with the Buffing Machine)
7) Finish the edges of the acrylic on a Buffing Machine till shine.

Jointing (also see 'Bending & Forming')
8) Acrylic to Acrylic: Butt-join acrylic parts using Chlorofoam. Use tapes to sequre the parts if necessary.

Note:
  • Make sure the edges for jointing is straight, not filed, and not polished.
Others:
  • Acrylic to Wood: Jointing using Wood Screws, or Bolts and Nuts, etc.
  • Acrylic to Metal: Machine screws or Rivets, or Bolts and Nuts, etc.

Bending & Forming (also see 'Jointing')
9) Bending acrylic on the Strip Heater: For straight bends.


Tips:
  • Plan the steps before hand how you want to bend your acrylic.
  • Use a piece of paper to rehearse if you are unsure.
  • Use formers (of various bending angles) to help you achieve accurate angles while bending.
  • If there is no formers available, design and make them before bending.
10) Forming acrylic can be done using the Oven, the Vacuum Former, or the Blow Moulding machine.


Tips:
  • Plan the steps before hand how you want to form your acrylic.
  • Use formers to help you achieve accurate shapes and forms while bending.
  • If there is no formers available, design and make them before bending.
What if your project has both Jointing and Bending and/or Forming?
  • You have to plan the sequence well on which to complete first before the other.
Additional Notes
  • You will notice that finishing your acrylic edges is put before jointing, bending or forming.
  • The reason is because once you join, bend or form, it is more difficult to file and polish.
  • If in doubt... alway ask.

General Processes - Working with Wood

General Processes:

Pre-Check
Make sure all parts given to you are 'square'. That means the edges are 90 degress to each other before you start marking out.

Marking Out (After you got your raw materials)
1) Mark out all parts with lines for sawing and trimming with a marking knife, mark the centres of curves (radius) and holes to be drilled with an 'x'. Mark out all the positions for screws and/nails nails.

Tips:
  • If you have screws or nails in your joints, work out the correct length, type of head, and the diamter & depth of the pilot holes to drill. Also make sure that you do not screw or nail too close to the edge of the wood.
Drilling
2) Drill all the holes first.

Tips:
  • If dowels are required, make sure you check that the diameter of the dowels matches the diameter of the drill bit. To check if the fit nicely, try it on a piece of waste wood.
  • If you require a flat hole, use a Forstner Bit instead of a Drill Bit.
  • If you require a large hole and not even the Forstner Bit can create it, consider using a Hole Saw instead.
Sawing
3) Trim (concave or convex) curves using Scroll Saw (if wood is thin) or Tenon saw (for straight cut). For external curves, the Circular Sanding Machine may be used.

Dry Assembly (to test if parts fit)
4) Dry fit all your parts, check that they are OK. If not ok, modify or re-do.

Tips:
  • Don't join them with PVA and nails yet or screws yet!
Finishing (Part 1 of 2: Sanding Preparation)
5) Sand surfaces and edges smooth using Glass Paper (aka sand paper).

IMPORTANT:
  • If you are joining edges, you MUST NOT sand the edges to be joined! It will not fit after that.
Tips:
  • Round the edges for aesthetics. It usually works.

6) Join parts using PVA and and Panel Pins or Screws.

Note:
  • When using screws no PVA glue is required. Because one of the reasons for using screws instead of nails is so that the parts can be taken apart later on.
  • If you use nails (and PVA glue), then you are prepared for a permanent joint.
Finishing (Part 2 of 2: Spray Paint or Lacquer)
7) Finish as desired (spray paint or lacquer).

Tips:
  • Always spray paint at least 300mm away from the object.
  • Test spray in thin air before applying your coat. This procedure is used to get rid of blogged droplets.
  • Lacquer on a clear sunny day instead of a rainy and humid day.
  • Use spray lacquer to achieve even coat on surface.
  • When using brush for lacquer, always ensure thin coat for every layer of coat.
  • Allow coats (spray paint, spray lacquer or brush lacquer) to dry completely in cool and dry places before applying the next coat.
  • Drying time varies with types of coats. Generally up to 2 hours is required to ensure surface is completely dry.
  • Sanding is required for the first 3 coats of lacquer. But use very old and used glass paper.
  • For really glossy surfaces, up to 10 coats of lacquer is needed.
  • Use the drying time in between lacquer to update your journal or complete the other parts of your project.
Special Note:
  • Sometimes it is necessary to join (step 6) first before sanding (step 5).
  • Sometimes it is necessary to join all parts (step 6) before the applying the finishing coat (step 7).
  • It all depends on the nature of the project.

If in doubt... alway ask.