Need Help?

For students managing design work, sketching, deadlines, and creative pressure — and for educators seeking greater clarity in their teaching — this blog offers focused, practical support in Design & Technology, from visual communication and design process thinking to digital fabrication. For those seeking more tailored support, I am also available for student consultations and teacher workshops. Since 2007, DesignJournalSOS has helped readers navigate real classroom challenges with grounded strategies and insight. Have a question or topic you’d like explored? Your reflections are welcome — they help keep this space alive and growing. Copyright © 2007–2026 Daniel Lim
Showing posts with label Product Design. Show all posts

02 December 2025

Wooden Metatron Standing Clock - Adobe Illustrator and Laser Cut

Availability of technologies like the laser cutting machine with illustration softwares (the Adobe Illustrator) has made design and prototyping the Archangel Metatron Standing Clock an easy affair.


The Archangel Metatron Standing Clock was almost designed rom scratch. I got the Metatron sacred geometry online and had it vectorised. 

I held the naked clock mechanism on one hand, and visually determined a nice mounting height with a steel rule from the table top. The spine, was designed as I measured (and noted) the dimensions of the clock mechanisms case. There, was where I figured out details of holding, securing, and how it may stand on two layers of a rounded base. Decisions about the final dimensions are scribbled on scrap paper (below left).


So what inspired the act to design, and make? Firstly my living room is missing a clock. Secondly I wanted to see how quickly I can create one. Thirdly, a Metatron geometry reminds of balance and harmony in the universe. 

#metatron #archanglemetatron #clock #clockdesign #standingclock #designandtecnology #productdesign #lasercutting #adobeillustrator #innovation #creativity #time

Support me, support my work? Buy me a Coffee? https://www.buymeacoffee.com/mrdanielsos

22 June 2025

Dog Note and Pencil Holder – From Sketch to 3D Print with Tinkercad


Every students’ first idea about what they want to design and make. 

But how can pencil holders be out of the ordinary, not the usual box and slot type?

Ideas Generation


First steps to ideas generation is always the exploration stage. 

Nothing fanciful at this stage. I’m just exploring how to hold a piece of papers starting with a simple block. It’s not a time to think about shapes and forms now unless the challenge is ‘form before function’, which is not the case now.

Using block as a starter helps me focus better on the function - about how to make things work. About how to make holding a piece of papers effective, easy, and maybe fun.

Ideas about using curved slots to hold paper is not new in my experience. I’ve explored ways to hold notes quite extensively 10 years back. I will not be repeating them here but you can find various posts related to note holders here

But I’ll give you a quick summary about the curved slot concept. 

Paper tends to want to stay flat when you bend it. 


That’s the elasticity in the structure of paper. Making use of this principle, I figured out if I have a narrow curved slot compared with a straight one, the paper can be held in place as it tries to straighten out but couldn’t. It’ll remain ‘stuck’. On the other hand, it’ll slide out easily if it’s a straight slot.

Exploring more Ideas into the Refinement and Development Phase

In this series of sketches I’ve ventured into shapes and forms. Borrowed from the profile of a dog and the idea that the dog is bringing the owner ‘newspapers’ from the door, this is the familiar “Meaningful Design” design teaching approach back in 2009 where I presented in the MOE Design & Technology Conference 2009 to share the concept of bringing ‘meaning’ into ‘designs’ - where design tells a story. You can find the post here.

Before this students’ work in D&T had been craft like, mainly functional ornamental works which I find lacking thoughts, emotions, and any fun at all.

The Final Concept Ready for Rapid Prototyping


I drafted the final concept in various perspectives while working out if the idea would work in real life. By this time I’ve already gotten the critical dimensions of a typical pencil. Worked out a rough form and proportion of the design. 

I’ve always emphasised with my students it is very important to include the items to be held when presenting their ideas. Most students would draw a holder, but without the items they are intended to hold. This way of designing has several problems:
  1. You cannot gauge if the holder will be the right size without the items drawn in, proportionately.
  2. You cannot tell if the product would work because there is no context to the holder. It is holding nothing.
  3. You will always have the illusion that it will work.


To build the form of the dog, building it one block at a time will take too long. Making slots at the mouth will involve multiple steps that require many steps with negative cuts. With the ‘Sketch’ tool, the profile of the dog can be sketched out easily.

The image on the left shows shadows (translucent orange) of ‘hole’ shapes used to cut the other slots in the design.

Tinkercad Model Breakdown


Above Left: Here you can see the 3D model of the dog profile and its respective ‘hole’ shapes for the pencil and paper slots.

Above Right: That is another variation using the same dog profile from the left. In this design I cut a circular top for a pencil to rest on, instead of putting it through a vertical slot.

In this example I’ve shown that once you have a base design, you can then copy and modify it later into other variation. This step is useful if you want to test different design configurations or to find out which works best.

Contextual Presentation
 

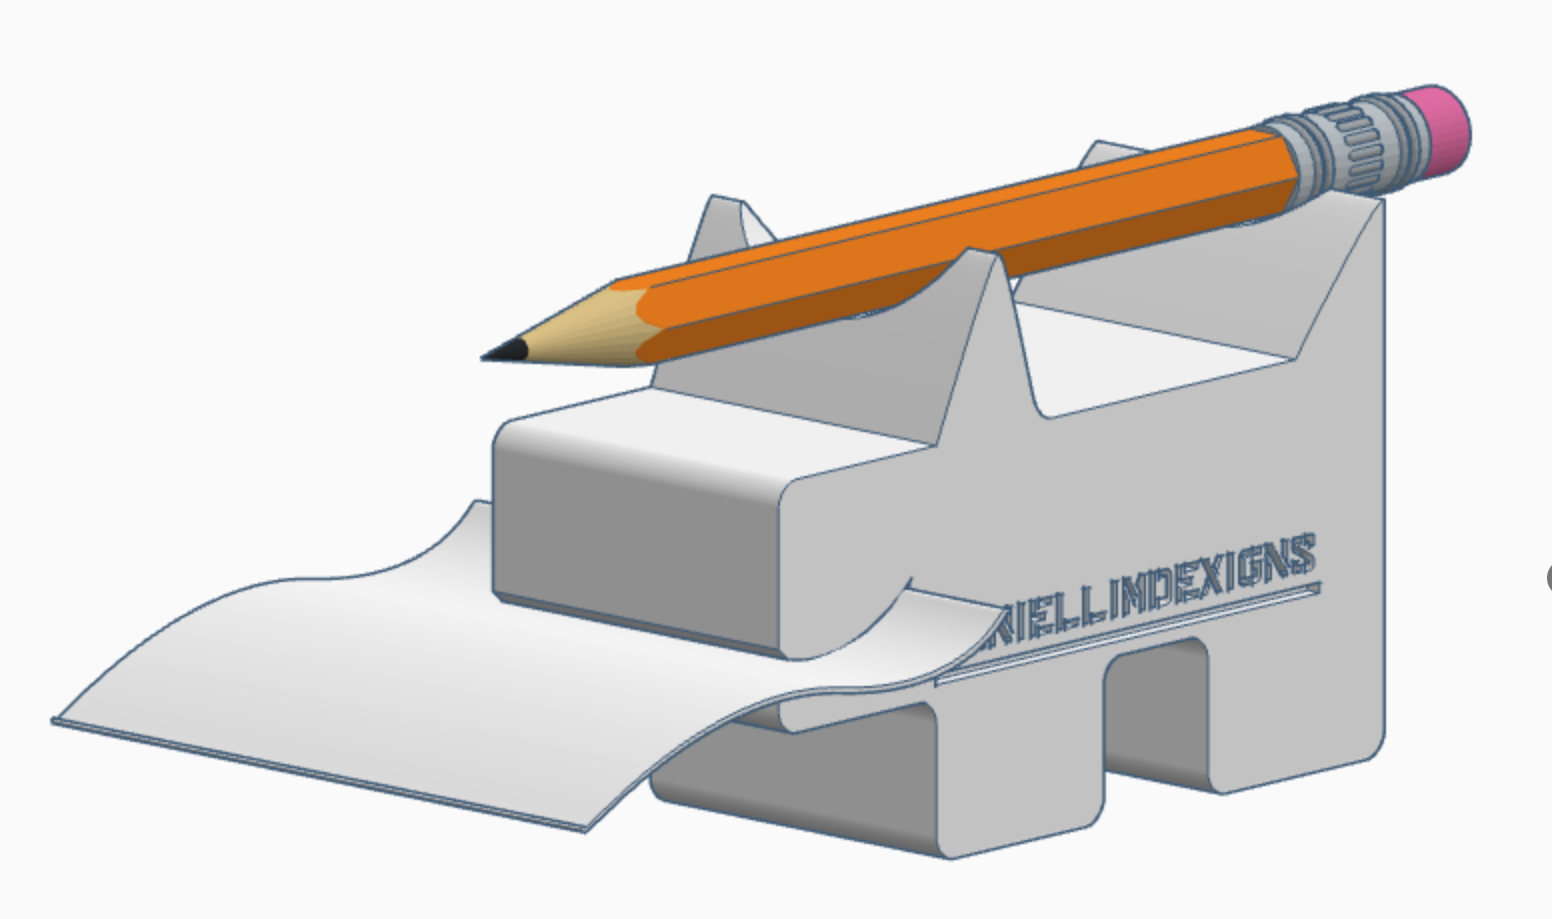
A quick model mock up of how the holder may look like with its respective items. I found the pencil from the search function. And I used the sketch function to draw the paper.


Two variations of the Doggy Note & Pencil Holder

Conclusions

The moment of truth - if the idea or concept works or not - is in the 3D print out. 

I made a couple of iterations to the gap of the mouth to make the paper ‘stick’ better and not slide out too easily. A curved gap of about 1mm is good but printing the holder vertically posed challenges to the horizontally orientated mouth. The top curve will need to be supported. I chose the ‘tree’ support from the print bed. 

The larger curved slot at the back are for additional papers, and that too cannot be too wide. If the gap is too wide the stack of papers will feel loose on the holder. Mine is about 4mm wide at the back. Trying to store a few pieces of papers on any gaps more than 4mm wide, even if it is curved, will feel weak as far as grip is concerned.

Overall, the prints turned out quite well. What I need to work on next are 3D printing settings to optimise print time and print quality.

I hope you like this post. Let me know what you think. Or share with me what you would like to see in my future posts.

#3Dprint #tinkercad #productdesign #pencilholder #noteholder #innovation

Like my contents? Support me, support my work? Buy me a Coffee? https://www.buymeacoffee.com/mrdanielsos

20 June 2025

Design a Snail Cup Coaster with Tinkercad with the "Sketch" Tool

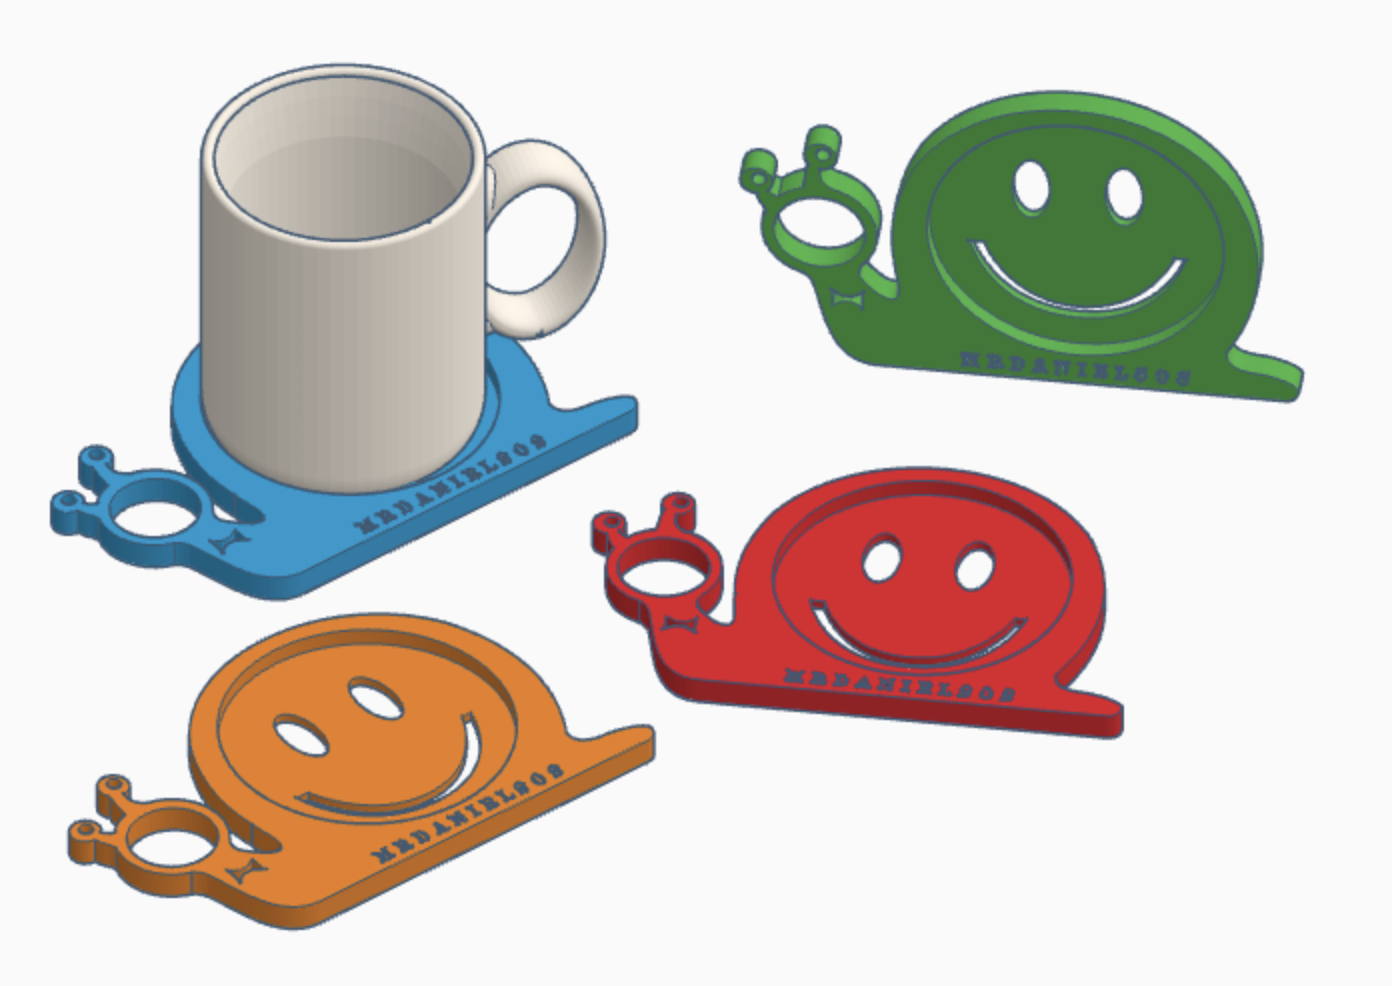
SNAILS Coaster Design on Tinkercad

The thought about making a snail coaster is not new. About a decade or more ago I designed a snail coaster and had it cut out with a laser cutter. Which was used a a door gift to all the participants in a Design & Technology teachers conference. 

SNAILS again

Here again I thought of snails when I begin tinkering with Tinkercad. Some things never change.

Don't they look so cute when you have a family of them?


TOP VIEW

45 Degrees View


How Do I Make This Profile in TInkercad? 

I am guessing you want to know how I made this. If you used Tinkercad you'll quickly understand that this snail profile will be extremely tricky if you use the basic combining shapes method. Not only that - you may go crazy.


Glad that I found the "Sketch" tool. This tool is an incredible feature. I cannot NOT use it as soon as I learned about what it is and what it can do in Tinkercad. While it's features with the pen tool cannot be compared with the likes in Adobe Illustrator - however once it's limitation & simplicity is understood - more complex shapes can easily be created.

Several layers of "sketch" took place to create the final snail coaster profile I was looking for. 

Something that was impossible for me in Tinkercad is now possibilities only limited by my imagination. 

------------

Want to learn Tinkercad and start designing? Feel free to contact me at mrdanielsos@yahoo.com.sg for more details.

Like my contents? Support me, support my work? Buy me a Coffee? https://www.buymeacoffee.com/mrdanielsos
 

How to Design & Print a Clipboard & Pencil Holder with Tinkercad

What do you do with a clipboard?

You write.

What do you write with? A pen or a pencil.

Since I often draft my work with a pencil, I thought—why not make my own clipboard pencil holder?


Modelling the Idea

In the example above, you’ll see how I like to model my designs. I copy and paste each iteration as I go, partly to document the process and partly to save time—if I need an edit, a spare part or want to revisit an earlier design, it’s just a copy-paste.

It also makes for a clean presentation. You can easily follow the steps of the clipboard pencil development.


Functional Iteration: Add a Grip Gap

One of the key refinements was adding a gap to improve the pencil’s grip. Unfortunately the PLA filament does not have the elasticity to flex. And so I ended up with a full ring design.

Put to Other Use?

Interestingly, I  also played around with placing it in different locations—on the side of the table, for example—where it worked surprisingly well.


Let's get that thing to work. The Hexagon Problem

Here’s where things got tricky.

The pencil slots were intentionally designed as hexagonal meant to match the cross-section of a typical pencil. I accounted for the exact dimensions of the pencil in my 3D model—but forgot about tolerance.

The 3D printer has a 0.4mm nozzle. That means it will print 0.2mm both sides of the printer head. As a result, the pencil didn’t fit, the hole was too small. After widening the hole by 0.4mm and more, it fit but was still a little loose. 

If I were to redesign the slot, I’ll make it round.


This clipboard pencil holder works just as expected. It fitted perfectly with the double clip. It’s magical when the pencil seem to float behind the spine of the double clip. Taking the pencil out and putting it back is a breeze. Overall I quite like the outcome. 


Above: Close-ups of the back view

Lesson Learned: Prototype the Pencil Slots First

Here’s a key insight from the process:

Next time, I’ll isolate and print just the part that holds the pencil—and do it in a range of slightly different profiles (round, hexagon, and so on) and sizes. That way, I will be able to test all the options at once and pick the best fit before embedding it into the full design. This will save filament, time, and frustration.


Your Turn

I hope you enjoyed this creation.

If it sparked your curiosity, why not try designing your own clipboard pencil holder? It doesn’t have to be based on mine—but feel free to borrow the idea and evolve it into something that fits your way of working.

And if you do, I’d love to see what you come up with. Share your designs with me! 

------------

Want to learn Tinkercad and start designing? Feel free to contact me at mrdanielsos@yahoo.com.sg for more details.

Like my contents? Support me, support my work? Buy me a Coffee? https://www.buymeacoffee.com/mrdanielsos