Design & Technology made teachable — practical strategies, visual thinking, and digital fabrication for today’s D&T classrooms. Built on two decades of experience across mainstream, ASD, and international schools.
The Grid Method is one of the best method to copy a final 2D design onto a 2D workpiece.
Or practically of ANYTHING on ANYTHING.
Some examples are for common mini-projects like a candy dish, a coaster, or some simple profile designs like a Pencil Holder etc.
Why it is important to copy a final design accurately? Why can’t we just draw it on the workpiece directly.
You see, you spent a great deal of time and effort developing and fine-tuning your design. To where it is right now. How your design looked now is probably it’s best. The next best kindest thing you can do for yourself is to copy it as accurately as possible. So you end up with a design profile how you exactly want it. Not something out of shape or inaccurate.
Watch the demonstration on how to use the Grid Method:
Extra Notes:
The Grid Method is therefore your best bet.
NOT the Geometric Shape Method.
The Negative Space Method ‘may’ be somewhat applicable.
Design Needs and Opportunities: Commonly attempted as “Problem(s) Situation”.
Design Needs and Opportunities, are they they same? Or are they not.
I’ve gone well past the way of identifying Design Needs with problems, but I won’t be surprised this might still be what everybody else is doing. I find this not fruitful.
So what is the problem when one tries to identify Design Needs, but treats it as identifying problems? The problem with this is there is hardly any ‘problems’ you can identify today.
At least not so easy. If you do, you WIN big time. Otherwise what can we do if we don’t go around searching for problems?
Follow this video chat to find out more:
We innovate. We strive to change things a little bit here and there. Make some improvements from the previous versions, etc. We find things to innovate, or further innovate.
If you find a Need for an improvement (a genuine one), you have a meaningful DesignOpportunity. This will lead to a meaningful project, for yourself.
If you like the video and my contents, please Subscribe, LIKE and Share.
Let me know in the comments what else you like to learn and watch.
In both in the ideation and development phase of the design process you’ll get the opportunity to think of alternative ideas. And this is NOT an option even though you may think to do that, we are at the ideation phase, not development.
Let me propose to you that in the development phase you will still need to generate possibilities, but this time, your end goal is different. In Ideation your end goal is to have options and alternative ideas or broad concept of a solution, of which you can choose the best - for development.
In this video, I chat about Development:
When you are at Development, you explore options, but you refine and fine-tune with the end goal of choosing the fastest, most efficient, the best way to make and to finish. The most suitable material and jointing method - and the quickest and cheapest and the easiest, etc. Without any compromise to the desired functionality and aesthetics.
In development your drawing style changes too. Sketches become more drawing like. More precision drawings. With dimensions. Technical drawings, view and section views start to populate the page rather than free flowing arty sketches. More presentation like drawings with bold outlines or extra emphasis, etc.
If you like the video and the contents I produce, please Subscribe, LIKE and Share. Tell me what you like to watch and learn in the comments below.
If you like the video and my contents, please Subscribe, LIKE and Share.
Let me know in the comments what else you like to learn and watch.
The Ideas Generation phase is probably one of the most challenging phase in the design process.
Just like if you get the initial design need wrong, the whole project is practically rubbish. How you start your ideation will determine the quality of the end of Ideation.
A common problem a student have when at the Ideation phase is not knowing what to do next after they draw an idea. Especially when a great deal of effort had been spent thinking, critic, refine (ALL IN THE AIR) and then finally at the end of the dream, a highly detailed drawing becomes the first idea. In that piece of A3 paper; ONE idea is all you got.
How can you elaborate on an idea once you have drawn the first one?
Four Steps to Elaborate an Idea using a Note Holder Example
In this video I show you FOUR simple steps you can elaborate an idea beginning with twoprompting questions. Use this strategy and never get stuck ever again. You might end up not being able to stop. Because before you were blank, now triggers appear from everywhere for new (improved) versions of the previous one(s).
If you like the video and my contents, please Subscribe, LIKE and Share.
Let me know in the comments what else you like to learn and watch.
I often hear questions and confusions about Ideas Generation and Development. How do I know if I am Ideas Generating and how do I know if I am Developing ideas. How do I do them?
Well as the titles imply, “Ideas Generation” taken literally means you produce lots of ideas. You ‘generate’ them. Many. Think of it as Sketching and Exploring many ideas.
Here you ask lots of questions that will prompt you to think and sketch many possibilities. Different ways to function. Some minor improvements and then next one. Next one. Next one. Next one. Creating lots of wonderful creative alternatives.
Those that works those that not. Who cares. That’s Ideas Generation.
“Development” does not sound anything like exploratory any more, does it? When you develop, you refine. Fine-tune. When you work on details, you won’t be in the playful discovery mode like you would in Ideas Generation. You pay more attention to details. And work towards finalisation and a final concept ready for presentation and prototyping.
If you like the video and my contents, please Subscribe, LIKE and Share.
Let me know in the comments what else you like to learn and watch.
If you have problems drawing / sketching or copying something you like and never seem to get its proportions right, you’ve come to the right place.
The ability to copy shapes of a reference effectively is a skill everybody can learn.
Three Painless Ways to Copy an Image or Photo Reference
You can of course use your own trial and error approach. With some luck you may end up something decent. If that is what you want, this tutorial is not for your.
“I cannot draw”. Really? Not even a square? A triangle? A rectangle? A circle or an oval? If you can draw these, you can draw practically almost anything.
Everybody can sketch and draw. You cannot, because you have not yet learn how.
In this video tutorial I show you three easy ways you can learn immediately and start copying something. You will not believe suddenly you can actually sketch or draw. All you need to have is someone who will give you some tips and secrets of the trade. And this is what I am doing here.
Watch the video. Follow the steps and practice once on your own. You may cry out loud, “Why didn’t anybody tell me about these before.” Well, now you can.
You will learn about
1) The Geometric Shape Method
2) The Grid Method, and
3) The Negative Space Method
Extra comments:
The Geometric Shape Method is most useful in the Design & Technology Coursework Journaling context. Very versatile and quick approach that does not limit you to only copying a reference, it enables you to also be able to produce new sketches very quickly.
The Grid Method is good for transferring a final Developed 2D profile on a work piece. You see, after development with all proportions and dimensions confirmed, you want to plot an exact copy of the profile on the work piece. The Grid Method does that perfectly. You may also use the Grid Method to quickly transfer a profile to the next for refinement or development.
The Negative Space Method is practically unheard of in the Design & Technology world because it is more ART related method. This method is perfect both for outdoor sketching and for copying an image quickly without loosing too much control over accuracies.
The Negative Space Method allows the sketcher or artist to quickly block out external spaces outside the focus area. To quickly establish the proportions and shapes of the focus, without actually drawing them. The Negative Spaces almost instantly create the profile within. Details can then be added after that.
But there is nothing that stops you from using the Negative Space Method in the context of D&T. You need to have a good repertoire of skills. Then you will know when to employ which.
If you like the video and my contents, please Subscribe, LIKE and Share.
Let me know in the comments what else you like to learn and watch.
In this video I chat about practical tips and guides related to sketching ideas with the items to hold or store, or anything.
A common problem and sight in students’ journal when they sketch or draw, more often than not, they do not get the relative size and proportions right. Lacking of an awareness is one possibility.
Example of a Paper Clip Holder
Look at the example above, can you find the paper clips? Do you have an idea how BIG this Eiffel Towel will be in real life? For a Paper Clip holder the design is an oversize. An overkill. But I can almost guarantee that the student who sketched this would not have any idea that it is so.
Sketches usually show UNUSUALLY OVERSIZED HOLDERS with extremely tiny items, whatever they may be, that the holders are supposed to hold.
Watch the “Design & Coursework Chat” video to learn about what’s going on. How to identify out of proportion sketches when the size of the holder does not match the items to be held. How to overcome this? What are some general tips and guides to overcome this common problem.
If you like the video and my contents, please Subscribe, LIKE and Share.
Let me know in the comments what else you like to learn and watch.
Practical tips and insights on how to Generate Ideas starting with Shape Borrowing - Just the way how Mr Daniel would do it.
This example is a student’s work and he was clearly stuck. I took his paper and did a photocopy and attempted a re-work. To show you how mrdanielsos would have done it differently. And effectively.
How go go from ‘STUCK’ to ‘FREE FLOW’
Student wants to design and make something that can wipe a table dry instantly. I did not know why he chose a snail toy for a start. Obviously because of this choice, he did not know what to do next.
I can fully understand because the paper seemed blank. Lacking in clarity. etc. In this video, I will show you from start to finish how I would get out of this predicament of getting stuck with this seemingly impossible starter with a snail toy for a product to dry a table.
What you’ll see and learn from this video is done LIVE on the spot without pre-preparation or plans. I am approaching this as if I am actually trying to ideate on the spot.
In this video you will learn how to set your ideation page clearly. What you need to state in advance. What you need to know. How to make use of your Design Specifications and Product Research to your advantage. The SCAMPER technique will also be explained and I’ve used ‘Combine’ and ‘Eliminate’ in this video. I also spoke briefly about ergonomics and anthropometric and how they will include the size and form of the design. You will also learn what you can do after you have drawn a solution (or an idea). What to do next? What questions to ask? How to ask questions? etc.
If you like the video and my contents, please Subscribe, LIKE and Share.
Let me know in the comments what else you like to learn and watch.
The Product Research (Analysis) activity using the P.M.I. method is one of the most frequently used strategy in Design and Technology Coursework Journaling.
The three acronyms (P.M.I.) form Plus, Minus and Interesting makes it very easy to apply and analyse or study an existing product. In the video I break the P.M.I component down and suggests a more effective way to use the PMI by not considering the ‘M’Minus of the PMI. You can but I’m say you need not. But if your teacher insists, then DO. It’s no big deal.
In the video I also try to explain the differences between Plus and Interesting. A little nuance I discovered which many students (and teachers) find VERY challenging to differentiate, and tell apart when they try to analyse or study an existing product using P.M.I..
What makes the product Good but not (yet) Interesting. I’ve noted the Good but I cannot find anything Interesting. This looks Interesting but I’ve already noted it as Good. HELP!
If this sounds like you, you cannot miss this CHAT on ‘Product Research (Analysis) using the P.M.I. (Plus, Minus, Interesting) Method ‘ on Design & Coursework Chat. Look out for the other videos in the playlist on Design Problem and Situations, and How you can use the 5Whys.
If you like the video and my contents, please Subscribe, LIKE and Share.
Let me know in the comments what else you like to learn and watch.
3-Dimensional drawings are as essential as 2-Dimensional ones in presenting ideas in the Ideation and the Development stage in the coursework.
They are also useful in helping research come alive where you can use them effectively, e.g. in illustrating how products works, etc. However, it is good to note that 2D sketches are quicker in presenting initial ideas in the beginning. the 3Ds can come in a little later to compliment and enhance the visualcommunication.
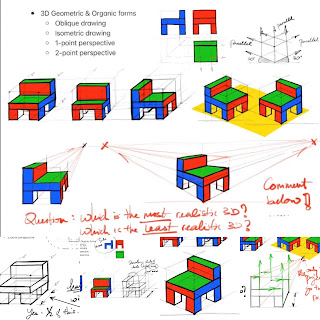
Types of 3-Dimensional Drawings
Which type of 3D drawings to use in your coursework depends on your ability to sketch them fluently. The 2-Point Perspective drawings are the most realistic amongst the rest, but they require more experience in sketching to be able to apply that technique quickly and. effectively. After all when you are actually DOING your coursework (especially if you are doing it as a graduating student) I don’t suggest you will be learning how to draw a 2-point perspective as you make your way through the journal.
The learning part must come well before you plan to employ them in your coursework. So if you are a graduating student and if the Isometric Drawing is the best you can perform, then use that. And forget about the 1-Point perspective. Leave the 2-Point out. Don’t even think.
However if you are a keen student and you knew about all these cool techniques you can use, the oblique drawing is one of the simplest BUT the least realistic. Next is the Isometric drawing. The 1-point perspective is one step better than the Isometric. And of course the ultimate will be the 2-point perspective drawing. Look at the image above. And see for yourself which is the most and the least realistic type of drawing. And which do you want to MASTER for your graduation coursework.
Above: Video and music ONLY
Below: Video, music AND Voice-Over
The voice-over edition you will hear me chat about common mistakes along with important tips & guides when you learn to draw these 3-D drawings
Learn all the basics and master them.
After that you can bend and break the rules, whichever you pleased.
Subscribe to the youtube channel if you think that is useful. Let me know what you wish to watch and learn.
If you like the video and my contents, please Subscribe, LIKE and Share.
Let me know in the comments what else you like to learn and watch.
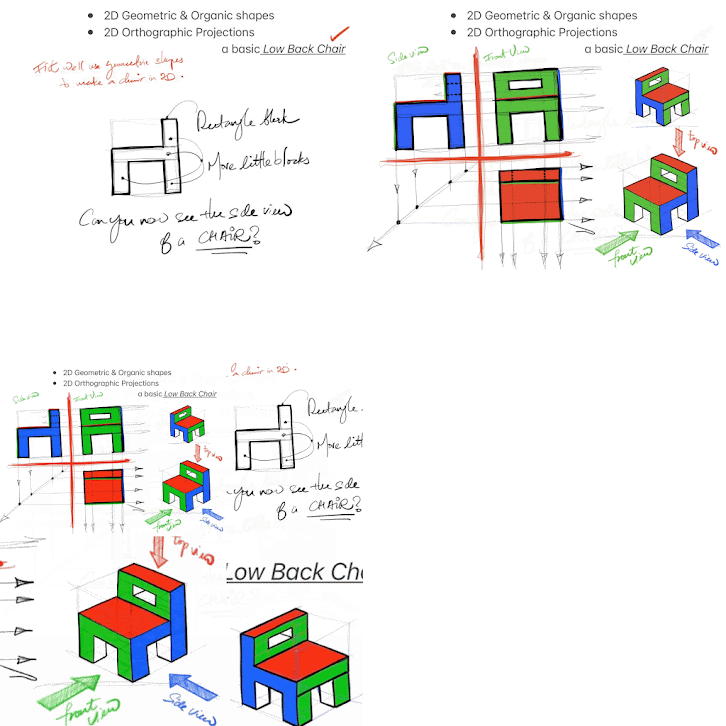
The need for an orthographic projection is a slightly more advance step into the design process. However the orthographic projection can also be very effectively used to quickly illustrate an idea in different views.
Using a 2-dimension approach to do that can speed up the process of drawing, yet achieve a similarly good objective. This approach to using orthographic projections at the early stage of design may be useful for students who may not be able to sketch in 3D quickly yet.
So putting on paper in 2D views to illustrate an idea first is a good strategy. Once that is done the student may wish to work out later how a 3D presentation can be done.
To produce an orthographic projection, since you will notice it is a 2D sketch or drawing, you will require again various combination of blocks to help you establish the relationship between parts of the objects before you draw the object as a whole. The need for guidelines cannot be further emphasised.
Many students draw without using any guidelines. These sketches were never good. If there are they will be VERY rare.
Subscribe to the youtube channel if you think that is useful. Let me know what you wish to watch and learn.
If you like the video and my contents, please Subscribe, LIKE and Share.
Let me know in the comments what else you like to learn and watch.