Need Help?

For students managing design work, sketching, deadlines, and creative pressure — and for educators seeking greater clarity in their teaching — this blog offers focused, practical support in Design & Technology, from visual communication and design process thinking to digital fabrication. For those seeking more tailored support, I am also available for student consultations and teacher workshops. Since 2007, DesignJournalSOS has helped readers navigate real classroom challenges with grounded strategies and insight. Have a question or topic you’d like explored? Your reflections are welcome — they help keep this space alive and growing. Copyright © 2007–2026 Daniel Lim
Showing posts with label Presentation Drawing. Show all posts

11 March 2013

Fish Note Holder - Design Refinement and Development Demonstrations

The two links are demonstrations on a 'Fish Note Holder' featuring the following topics: 
  • Design Refinements and Developments 
  • Working Drawing (based on ratios rather than on dimensions) 
  • (Simple) Presentation Drawing 
  • A Pictorial Presentation of the Making Process. 

Design Refinement and Development + Working Drawing + Presentation Drawing

Making Process (Realization)

23 July 2012

Presentation Board | Presentation Drawing | Working Drawing Overall (Planning) Starter Kit (2012)

 Once again it is the time of the year when you need to tidy up and present your ideas in the form of Presentation Boards. I won't write too much about the components you need here because those information can be found in your coursework instructions and your teacher would have reminded you enough of what is required.

I have a similar Presentation Boards Draft Layout post last year, this year I demonstrated in class again how I would draft and plan the layout of my stuffs in the three A2 sized presentation boards. The difference between last year's example and this is an additional draft step before the actual drawings are being placed according to the initial layout.

Note that the drafts below are all sketched on A4 sized paper.

How to read the rest of this post: 
All the 'Fig. _ a's are the first-cut draft
All the 'Fig. _b's are the second-cut draft (that shows more details and information)

---------------------------------------------------------------------------------------------------
Fig. 1a: Draft for First Board
Design Need, Design Brief, Design Specifications, Presentation Drawing.

The Design Need, Brief and Specifications should be a direct extraction from your Design Journal. So not much needed to be said here. On how to write and ensure a good design need/situation, click "here".
Please make sure you grammer is checked.

In Fig. 1a you see a draft layout on where I want to place the informtion.


Fig. 1b: Fine-Tuned Draft for First Board
Presentation Drawing

 Fig. 1b shows a draft layout of the contextual presentation drawing. So when it is time for me to put things together, I will use this draft as a guide. The end product may look slightly different as you twitch or modify the details but at least I have a starter and that sort of forced me to think through what I wanted. It is not a good thing to be thinking from scratch when you are actually working on the final piece. That is no planning and do not expect a good piece of work for that kind of effort.

---------------------------------------------------------------------------------------------------
Fig. 2a: Draft for Second Board
Working Drawing Components


Fig. 2b: Fine-Tuned Draft for Second Board
Working Drawing Components

Fig. 2a shows a draft layout for all my working drawing components. Note that it is cricitcally important that you KNOW exactly what type and what number of drawings you have related to working drawing that you want to show in your Presentation Board. Otherwise there is no way you can plan a layout like in Fig. 2. You will find yourself adding parts of drawings which you did not plan for (or vice versa) and you end up with lack of space, or too much white space. Know what you have and intended to present also helps you to plan the size of each drawings to be place within the A2 (or A3) space.

In the end, all working drawing components must look balance relative to each other. i.e. you do not want to end up with a humongous Isometric Presentation of the product with a tiny Orthographic Presentation in a little corner, or a GIANT sized Material List in the mist of tightly packed and tiny Part Drawings, etc. In order to avoid this situaton, you got to plan.

That is what the drafts are for. Do it.

Fig. 2b shows a slightly more detailed presentation where I begin drawing very quicky (doodling if you may like) the product, the parts and components as it is on a new paper. This level of details enable me to gauge the relative sizes of each drawings to the others. And if I need to resize or rearrange some of them, I will continue to draw drafts on a new piece of paper or I may choose to modify directly on this second draft until I get the balance and arrangement right.
---------------------------------------------------------------------------------------------------
Fig. 3a: Draft for Third Board
Remainder of Working and Presentation Drawing Components


Fig. 3b: Fine-Tuned Draft for Third Board
Remainder of Working and Presentation Drawing Components

This last draft as shown in Fig. 3a contains notes about what to include for the remaining of the working and presentation drawings. This final bit will ensure I present my project as comprehensive as possible by maximizing what space was available. But that does not mean you take up every white space. (Note: It is not necessary to cover up every inch of space. Rather it is better to be able to 'plan' space in your presentation boards so that it does not look cluttered).

In Fig. 3b (the last board), I have selectively planned to show different views or perspectives of my product, show the product in other contextual usages, show the product rendered in different colors or tones, or even show the product in different usage stages, etc. You may also choose to show some steps and proceduces when the product is being used or before and after use, etc.
---------------------------------------------------------------------------------------------------

Conclusion

It might be timely to note now that there is no right or wrong or standard way to present your ideas in your Presentation Drawings or the Presentation Board as a whole. 

Your Presentation Board should be fine as long as the components are presented neatly, clearly and correctly (eps. the drawings, and for example drawings standards adhered to in working drawings), the information presented is clear and easy to understand and does not invite questions due to vagueness in presentation. Finally, do not forget to refer back to the criterion for submission and make sure you have all the components in and well done.

18 July 2012

Tissue Dispenser Standard Project (Part 2): 'LID' Design Development + Working Drawing + (Simple) Presentation Drawing

Fig. 1: Developement (Page 1)

Borrowing the shape and from from the (most popular vote) selected concept, the next stage after Idea Generation is the Development Stage. Here once again I make use of my two stage process, i.e. dealing first the Functionality part, and then later the Aesthetical aspect of the design.

First I 'copy' the chosen concept (See Fig. 1 above) , draw it over the dispenser, then assign parts to be seperately developed and combined later. In Fig. 1 you will see the functional development of the 'Lid' part. I had a hole drilled at the back of the dispenser, so at the back of the lid I must make sure it is not covered. In the lower section of Fig. 1 you see that I am beginning to develop the 'face' - the Aesthetical aspect.

Fig. 2: Developement (Page 2)

Fig. 2 (above) shows a somewhat developed 'face' that has become the face of a cute dog. Notice there is also some refinement on the 'ear' to make it a little curvy rather than straight down. The nose is now a solid wood part to be pasted on the face.

Within Fig. 2 you also find the second phase of development on the 'tray'. The tray will be used to store a wallet. The shape and form is now modified into the form of a 'crown'.

Thus the project is named 'KING DOG' as a result.

Fig. 3 (below) shows a very quick paper model cut and place on top of the tissue box dispenser. From the paper or cardboard model, the design and refinement decsions can be further fine-tuned and re-iterated until the most convincing shape, form and functionality is achieved.

Fig. 3

Now, the devepment phase is far from completed. There are still many other aspects that needed to be worked out. For example, the finalized size, dimension and making methods for each parts. The color choice. The overall proportion to the product as a whole needed to be accounted for - from which the final dimensions may change again. There will be several rounds of iterations between overall sizes, material usages. making methods, etc before the final decisions of the final product is reached.

Once decisions are made for the number of parts required, the sizes and dimensions for each part and its materials and color choices, details for marking out and the making methods, the project is now ready for 1) Working Drawing and 2) Production Planning and 3) Realisation.
Fig. 4: Working Drawing for the Lid and Tray Design

Assuming the project is now developed and the necessary critical decisions are already being made. Fig. 4 (above) shows a sample of how the working drawing fror the Lid and the Tray design may look like.

Fig. 6: Simple Presentation of the Completed Product

Nothing beats a final rendering of the product in use and showing how it could be used. Fig. 6 shows a very simplified presentation of the Tissue Dispenser in its Front View, followed by a 3D drawing showing how it might be used: Where the tissue paper packet is going to come out, and where the wallet and the phone is going to be placed. Short of how to replenish the tissue paper packets when supply runs low. But that one I hope you will be able to manage. Right?

26 June 2012

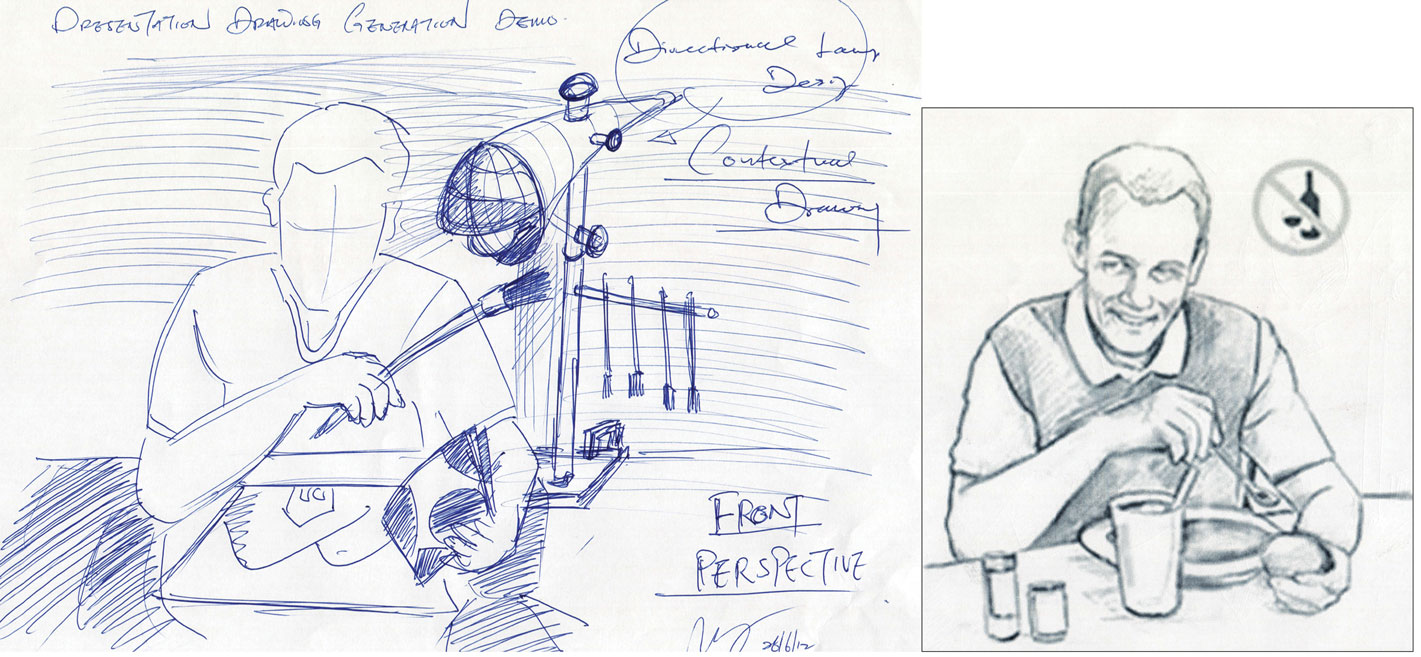
Presentation Drawing in Drawn in Sub-Context & in Context - With Human Figure Interaction


Another example of a sub-contextual drawing (LEFT) making use of an image resource (RIGHT) from the internet. Note I do not draw the face. I like to leave it 'faceless' so that the figure can represent anyone.

To do this, I made use of the image resource, place a piece of paper over it to trace the main elements and omit the unnecessary parts. Alternatively you can use your reference to 'redraw' it on a new paper. Finally draw in the product used in its context.

Note that all drawings should present the same perspective.

The example above is a step better than the previous. The presentation is not only drawn in context - you can easily recognize a home (or a room) with the addition of the window and curtains in the background. To enhance your presentation, you should also consider include some shading or coloring.

12 April 2012

Presentation & Working Drawing - A Simple Version

First of all, let me clarify why the title reads '... Simple Version'. In the GCE 'N' and 'O' Level Requirement, students are expected to produce a presentation drawing that is drawn in context. That is to say the product illustrated with user interactions within the proposed environment.

However, for my students in Secondary Two, the requirement for their presentation drawing is much simpler. As long as they can illustrated their design showing clearly the product in use, that is a good job done.

Below are examples which I showed my students in class what the hand-in quality of their presentation drawing and the working drawings should be like.

I did not follow use the students' theme 'Dining Experiences' cause I didn't want them to 'copy' my demonstrations. Rather to learn to design independently and with full autonomy.
A Sample of a Fish Note Holder Presentation Drawing

Nothing special here. Just the proposed product. Holding what it is intended for - business card or notes. Presented on a table. The students are free to add colors to it to enhance their presentation.


A Sample of a Fish Note Holder Working Drawing

Nothing special here again. In fact that is almost a complete working drawing. Shown in the example above are the basic essentials of a working drawing. 1) An Isometric View of the product with all the parts labeled, 2) An Orthographic Projection of the product to show the various dimensions and finally 3) A Material List.

Noticed in the Working Drawing sample I added a base to it. I did this because there are some students with more than one part to their design. So in the demonstration, I hope to cater to their needs by simulating an additional piece.

IMPORTANT:
The material list shown above is not entirely correct. It was deliberate.
Why not you spot what is wrong?

21 July 2011

Presentation Drawing in Drawn in sub-Context - With Human Figure Interaction


Difficulty drawing human figures? Fret not. There is always the internet with lots of resources.

But do remember copyright issues. So do not simple copy and use images without permission from the owners. Alternatively, use images from Yahoo image search with filters to locate Creative Commons images. Those images are free for copying and use.

An alternative would be to use an image as a reference, and then draw it out on your own. Making modifications and eliminating unnecessary details. I find using internet images as a reference to draw objects, figures or even hands very useful since I admit I am not good at drawing figures or hands interacting with objects.

Many students failed to draw decently. I can confidently say almost none draw with a reference.

Now I'll explain why I call the above 'sub-Context'. The full contextual illustration shows the user, using the product in its intended environment. The example above did not show the intended environment.

18 July 2011

Presentation Board | Presentation Drawing | Working Drawing Overall (Planning) Starter Kit (2011)

(Almost) Everything required within your Presentation Boards.

Note the different types of drawing techniques employed to communicate your ideas when you present them in your presentation boards. Note also the timing shown in the image above is for illustration purposes only.

Presentation Board Layout Planning (I) - Drafting

Presentation Board Layout Planning (II) - more details shown

Tips:
It is always good to list out what you wish to include in your
1) Presentation Drawing
2) Working Drawing

The expectation for Presentation Drawing is
a) Competent graphic presentation,
b) with all detail showing contextual use of design solution

The expectation for Working Drawing is
a) Detailed working drawing
b) with material list.
c) Drawing standards must be adhered.

Material Surface Illustration Starter Kit


Drawing your product used in context is not just about drawing proportionately, to scale and rendering.

The ability to Illustrate the correct material representing surfaces of wood or acrylic is equally important. Within this example, there is also some tips on how to illustrate a 3D organic surface using isolines (or contour lines).