Need Help?

Struggling with design work, sketching, or managing academic pressure? Whether you're a student balancing deadlines with creativity or an educator seeking clarity in your teaching approach, this blog offers focused, practical support in Design & Technology — from visual communication to process thinking and digital fabrication. Since 2007, Design Journal SOS has helped readers overcome real classroom challenges with grounded strategies and insight. 💬 Have a topic you're curious about? Or found something here that helped you? I welcome your questions and reflections — they keep this space alive and evolving. 🔗 Follow for updates: Facebook /designjournalsos (Copyright © 2007–2025 Daniel Lim)
Showing posts with label Shapes and Forms. Show all posts

24 February 2022

Three Easy Ways to Copy 2D Images, Shapes and Photo References

If you have problems drawing / sketching or copying something you like and never seem to get its proportions right, you’ve come to the right place. 

The ability to copy shapes of a reference effectively is a skill everybody can learn. 

Three Painless Ways to Copy an Image or Photo Reference

You can of course use your own trial and error approach. With some luck you may end up something decent. If that is what you want, this tutorial is not for your.

“I cannot draw”. Really? Not even a square? A triangle? A rectangle? A circle or an oval? If you can draw these, you can draw practically almost anything.

Everybody can sketch and draw. You cannot, because you have not yet learn how

In this video tutorial I show you three easy ways you can learn immediately and start copying something. You will not believe suddenly you can actually sketch or draw. All you need to have is someone who will give you some tips and secrets of the trade. And this is what I am doing here.


Watch the video. Follow the steps and practice once on your own. You may cry out loud, “Why didn’t anybody tell me about these before.” Well, now you can. 

You will learn about

1) The Geometric Shape Method

2) The Grid Method, and

3) The Negative Space Method

Extra comments:

The Geometric Shape Method is most useful in the Design & Technology Coursework Journaling context. Very versatile and quick approach that does not limit you to only copying a reference, it enables you to also be able to produce new sketches very quickly.

The Grid Method is good for transferring a final Developed 2D profile on a work piece. You see, after development with all proportions and dimensions confirmed, you want to plot an exact copy of the profile on the work piece. The Grid Method does that perfectly. You may also use the Grid Method to quickly transfer a profile to the next for refinement or development.

The Negative Space Method is practically unheard of in the Design & Technology world because it is more ART related method. This method is perfect both for outdoor sketching and for copying an image quickly without loosing too much control over accuracies. 

The Negative Space Method allows the sketcher or artist to quickly block out external spaces outside the focus area. To quickly establish the proportions and shapes of the focus, without actually drawing them. The Negative Spaces almost instantly create the profile within. Details can then be added after that.

But there is nothing that stops you from using the Negative Space Method in the context of D&T. You need to have a good repertoire of skills. Then you will know when to employ which.

If you like the video and my contents, please Subscribe, LIKE and Share. 

Let me know in the comments what else you like to learn and watch.

FOLLOW and LIKE on Facebook to get updates as soon as a new post is up: https://www.facebook.com/designjournalsos

Support my work? Buy me a Coffee? https://www.buymeacoffee.com/mrdanielsos

18 February 2022

Sketching & Drawing 1: Drawing and Practicing 2D Geometric and Organic Shapes

In this post I will show you how you can practice and draw basic 2D Geometric and Organic Shapes. Drawing in 2-dimension is important as it helps you sketch an idea quickly without needing to go into 3D forms (yet). An orthographic projection is an example of 3 times of 2D views of the same object.

2D geometric shapes are shapes you can put an established geometrical name to it like a ‘square’ or a ‘triangle’.

2D organic shapes are simply a combination of 2 or more 2D geometric shapes, to make something no longer just a ‘square’ or a ‘triangle’. 


Geometric shapes are not limited to a square, a triangle and an octagon. After you watched the video, go ahead practice and draw more variety of shapes on your own. Draw different size and proportions. Draw lots of them.

IMPORTANT NOTE: At this stage it is good to begin anything with a (lightly sketched) basic block. Of which you can use it to transform into other shapes of your choice. Make use of markers and guides to help you start and end a slope / curve, etc.


How you arrange those geometric shapes matters. You may end up something very random. Just having fun creating different shapes. Or you can skilfully plan those shapes to make up an image that you wish to draw, e.g. a bird, a chair or anything in 2-dimensions.


If you like the video and my contents, please Subscribe, LIKE and Share. 

Let me know in the comments what else you like to learn and watch.

FOLLOW and LIKE on Facebook to get updates as soon as a new post is up: https://www.facebook.com/designjournalsos

Support my work? Buy me a Coffee? https://www.buymeacoffee.com/mrdanielsos

12 July 2016

Pictorial Idea Generation and Development (Using SCAMPER)

Updated on 2nd August 2016

This post is an extension and a supplement to "Coursework Experiential Journal Component 2016 Example" that was originally created as a guide and reference material for my Secondary 3NA student mini coursework. I will not repeat information I have already posted previously.

What you'll see in this post are pictorial/visual examples on Ideas Generation and Development (and refinements) in a design journal. The examples do not represent any complete section of a journal. They serve as a starting point - an example - a demonstration - a suggestion - a recommendation - etc. to show what sort of contents may go into, say development, and how you can present your research and information in the journal. 

Use them as a reference and a guide to start or to improve your journal. Make informed choices on your own on what your takeaways should be after looking at the materials in here. Do not copy. 

If you find this helpful, I would love to hear from you. If you have suggestions, please do not hesitate to link up with me.

----------------------------------------------------------------------------------------------------
Idea Generation / Ideation

Use of photos and images are starter and triggers for more ideas. In this case images of animals. Design Brief is about a storage solution that will appeal to children, that will motivate them to keep their toys.


----------------------------------------------------------------------------------------------------
Development / Refinement (Using SCAMPER)

Refining Shape & Form of a selected idea / concept. Some suggested ways that may help you start the process. Interestingly I use S.C.A.M.P.E.R. for this. Now you know S.C.A.M.P.E.R. need not be used only for ideation, but a great tool for development too.


---------------------------------------------------------------------------------------------------
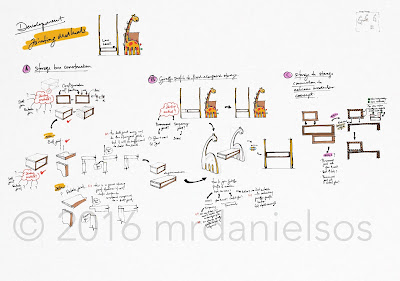
Development / Refinement

Refining Jointing Methods on the various parts of the selected idea / concept. Some suggested ways that may help you start the process.


A quick summary on the decisions made for refinement of shapes & forms is quickly drawn at the top of the page. Three areas are then identified that require decision on the most suitable type of jointing methods. 


The page above shows examples on how options for different types of joints can be presented in the journal.


It's always a good practice to summarise all of your decisions every sections. (Above) To have a clearer overview of what I have done so far about jointing methods for the whole product, I consolidate decisions about the types of jointing methods selected for the various parts and draw them as a complete product..

---------------------------------------------------------------------------------------------------
Development / Refinement

Refining Overall Size and Proportions based on Anthropometric Data and Critical Dimensions. 


 To develop the storage size and dimensions , the product height, overall size and other detailed sizing of the other parts of the product, I identified and made a list on the areas that I need to decide on. Then proceed to work out each of one of them using researched Anthropometric data as well as Critical dimensions.

---------------------------------------------------------------------------------------------------
Development / Refinement

Stay tuned for : materials, etc...

---------------------------------------------------------------------------------------------------

15 September 2011

Dollar Key Tag Project - Part 3 - Refinement (Development)

Dollar Key-Tag Refinement (Development) 


The example below is taken from my demonstration in class 1N1
Note 1: Here is a summary of some factors that should be considered when you refine your concept.

Before you could refine a concept, you should first select one out of the many you are drawn in the Idea Generation stage. Hopefully as you generate ideas in the earlier stage, you would have been modifying, combining, morphing and improving the concepts along the way. 
Note 2: It is good to keep your focus and refine (develop) your concept on factor at a time. You should also remember to refer to your Design Specifications where you list out the specifics what they product must do. The above example shows you a demonstration on working on weak areas, sharp edges or corners, and finding the best position for the coin. Keep on drawing fresh new ideas as you work along the first two factors. You will find your concept evolving.
Note 3: The next few focus refinement points are improving the overall shape and proportions, followed by exploring the best position for the key ring. Try different shapes and size configurations until they look right. Your first concept may look right in the beginning. But it is still good if you would have a go at exploring some minor variations. The outcome may surprise you! I changed the sizes and positions of the eyes. And it ended up one big and small eyes do look better than both equal size. That also helped me make a major decision that one of the claws would hold a coin and the other the keyring. 


Finally, nothing beats being able to simplify the concept. Find any features (e.g. shapes or method of construction) that looked complicated. Look out for the potential to simplify the project so that it still looks more desirable, easier to manage and make, and takes lesser time.  
Note 4: Always remember to go back to your Design Specifications. I have a restriction on material size. So remember to draw your latest development back into the actual working size to gauge how it might actually look like. Alternatively you may want to cut out a paper model for evaluation. Make any necessary fine-tuning after that. Both on the model and in your design journal. Notice I have also reduced the body size. It is now slimmer than before. I'll continue to develop (refine) it as long a time allows me to do so before I see you all again for the next lesson.
------------------------------------------------------------------------------------------------------------

The examples below are demonstrations in class 1N2
The steps and descriptions would be similar to the ones above.


Refinements on weak points, rounding off potential sharp edges and looking out for the best coin position.
Refinement on the overall shape and proportions and the position of the key ring. Simplifying the profile of the concept if possible but without compromising the functionality and aesthetics desirability.
Finally, the refined concept is drawn to scale within the perimeters of the actual work piece. Here further refinement may be required to ensure that everything is in place. Make sure the coin can move freely in and out of its entry point.

The Grid Method is used to transfer the scaled concept on the acrylic work piece later.

17 January 2011

Shapes and Forms - the Difference Between Them


All objects are made up of a combination of shapes and forms. So it is necessary to first understand what shapes and forms are and later learn how they are used to make beautiful objects.

The animation shows the difference between a shape and a form. You may be interested to know that both shapes and forms can either be geometric or organic.