Need Help?

Struggling with design work, sketching, or managing academic pressure? Whether you're a student balancing deadlines with creativity or an educator seeking clarity in your teaching approach, this blog offers focused, practical support in Design & Technology — from visual communication to process thinking and digital fabrication. Since 2007, Design Journal SOS has helped readers overcome real classroom challenges with grounded strategies and insight. 💬 Have a topic you're curious about? Or found something here that helped you? I welcome your questions and reflections — they keep this space alive and evolving. 🔗 Follow for updates: Facebook /designjournalsos (Copyright © 2007–2025 Daniel Lim)
Showing posts with label Orthographic. Show all posts

18 February 2022

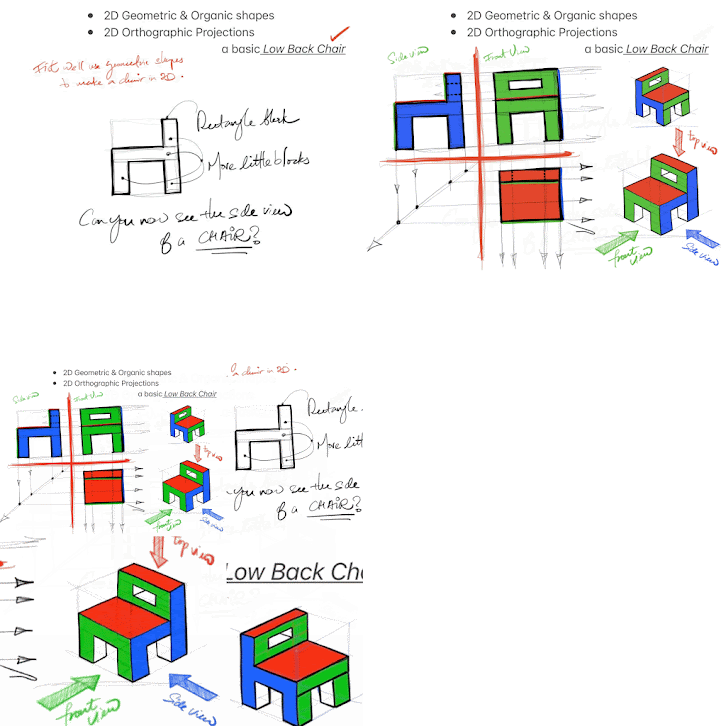
Sketching & Drawing 2: Basic 2D Orthographic Projection (example: A Low Back Chair)

The need for an orthographic projection is a slightly more advance step into the design process. However the orthographic projection can also be very effectively used to  quickly illustrate an idea in different views. 


Using a 2-dimension approach to do that can speed up the process of drawing, yet achieve a similarly good objective. This approach to using orthographic projections at the early stage of design may be useful for students who may not be able to sketch in 3D quickly yet. 

So putting on paper in 2D views to illustrate an idea first is a good strategy. Once that is done the student may wish to work out later how a 3D presentation can be done.


To produce an orthographic projection, since you will notice it is a 2D sketch or drawing, you will require again various combination of blocks to help you establish the relationship between parts of the objects before you draw the object as a whole. The need for guidelines cannot be further emphasised. 

Many students draw without using any guidelines. These sketches were never good. If there are they will be VERY rare.


Subscribe to the youtube channel if you think that is useful. Let me know what you wish to watch and learn.

If you like the video and my contents, please Subscribe, LIKE and Share. 

Let me know in the comments what else you like to learn and watch.

FOLLOW and LIKE on Facebook to get updates as soon as a new post is up: https://www.facebook.com/designjournalsos

Support my work? Buy me a Coffee? https://www.buymeacoffee.com/mrdanielsos

15 February 2022

Improve my SKETCH!

One of the most common problems students have: Coming up with a decent sketch of anything. 

Does that sound like you?

Have difficulty working out proportions and perspectives?

Always cannot get your sketches or drawings right?

See what can be done to SUPERCHARGE your drawing(s)


If you like the video and my contents, please Subscribe, LIKE and Share. 

Let me know in the comments what else you like to learn and watch.

FOLLOW and LIKE on Facebook to get updates as soon as a new post is up: https://www.facebook.com/designjournalsos

Support my work? Buy me a Coffee? https://www.buymeacoffee.com/mrdanielsos


18 August 2016

Working Drawing: How to Draw Dimension Lines for Orthographic Projection in PowerPoint 2013

You asked for it. So here it is.

This video tutorial shows steps to draw dimension lines and arrows in a Microsoft PowerPoint 2013. It assumes you already have a First Angle Orthographic Projection (either hand drawn or via Google SketchUp) image ready for import into the Powerpoint slide.


Create Presentation Board using Microsoft Office PowerPoint 2013. (Click here).
(DIGITAL) How to draw Phone Holder in Google SketchUp 8 (Click here).
(ANALOG) How to draw Isometric / Orthographic view for Phone Holder (Click here).

15 August 2016

Phone holder Isometric | Orthographic | Assembly

In this document, I show how I 

a) Draw an isometric drawing of a phone holder. Label the parts and use the references in a Material List.


b) Use an overlay over the isometric drawing drawn in (a) to draw an assembly (exploded) drawing. I roughly marked the key points on the overlay and then rule them over to finish.


c) Draw a First Angle Orthographic Projection of the Phone Holder.


Note: It is actually easier to complete the First Angle Orthographic Projection first. You can then use the dimensions to draw on an isometric surface for the top profile. Use of the grid method is another convenient alternative. In this example I drew the isometric drawing first. 


You may also use 3D softwares to help you achieve the same effect see '

Step by step guide to draw a phone holder using Google SketchUp 8.'


View PDF steps for the above examples below:


Step by step guide to draw a phone holder using Google SketchUp 8.

I am not a pro. This is my first time drawing on Google SketchUp 8. So you might find faster and a more efficient way to draw those features of this two parts phone holderThis phone holder has a top wooden part to prop a phone at 30 degrees from the vertical and an acrylic formed bottom. Two screws jointing the two materials from the bottom are not show in this tutorial.


An example of an Isometric view for Labeling of Parts and Material List references

An example of First Angle Orthographic Projection for dimensions

An example of Presentation Drawing showing only the solution and the product in use

.....................................................................................................................................

3D softwares like the Google Sketchup 8 is an excellent tool to produce and render drawings quickly. Very handy when it comes to creating 3D Isometric, 3D Assembly (or Exploded) Drawings and 2D Orthographic views to be included in your Presentation Boards. Not forgetting you can also use the same model together with the wealth of 3D warehouse to create your contextual presentations.

However, one must understand that using digital software for drawings are but an extension of our analogue drawing abilities. Drafting, preliminary ideas and the initial stages of refinement still require a substantial amount of quick and successive sketches with annotations. The software like the Google Sketchup 8 is good for presenting an end product after the refinement stage.

I  prefer to draw by hand if given a choice for Isometric and Orthographic Projections and whatever is necessary. It's not difficult actually.

Click below and you will find a PDF format for the steps to draw the smart phone holder.

Click below and you will find a YouTube video of the same steps to draw the smart phone holder.


Analog Drawing of the Phone Holder here: 

Phone holder Isometric | Orthographic | Assembly

23 July 2012

Presentation Board | Presentation Drawing | Working Drawing Overall (Planning) Starter Kit (2012)

 Once again it is the time of the year when you need to tidy up and present your ideas in the form of Presentation Boards. I won't write too much about the components you need here because those information can be found in your coursework instructions and your teacher would have reminded you enough of what is required.

I have a similar Presentation Boards Draft Layout post last year, this year I demonstrated in class again how I would draft and plan the layout of my stuffs in the three A2 sized presentation boards. The difference between last year's example and this is an additional draft step before the actual drawings are being placed according to the initial layout.

Note that the drafts below are all sketched on A4 sized paper.

How to read the rest of this post: 
All the 'Fig. _ a's are the first-cut draft
All the 'Fig. _b's are the second-cut draft (that shows more details and information)

---------------------------------------------------------------------------------------------------
Fig. 1a: Draft for First Board
Design Need, Design Brief, Design Specifications, Presentation Drawing.

The Design Need, Brief and Specifications should be a direct extraction from your Design Journal. So not much needed to be said here. On how to write and ensure a good design need/situation, click "here".
Please make sure you grammer is checked.

In Fig. 1a you see a draft layout on where I want to place the informtion.


Fig. 1b: Fine-Tuned Draft for First Board
Presentation Drawing

 Fig. 1b shows a draft layout of the contextual presentation drawing. So when it is time for me to put things together, I will use this draft as a guide. The end product may look slightly different as you twitch or modify the details but at least I have a starter and that sort of forced me to think through what I wanted. It is not a good thing to be thinking from scratch when you are actually working on the final piece. That is no planning and do not expect a good piece of work for that kind of effort.

---------------------------------------------------------------------------------------------------
Fig. 2a: Draft for Second Board
Working Drawing Components


Fig. 2b: Fine-Tuned Draft for Second Board
Working Drawing Components

Fig. 2a shows a draft layout for all my working drawing components. Note that it is cricitcally important that you KNOW exactly what type and what number of drawings you have related to working drawing that you want to show in your Presentation Board. Otherwise there is no way you can plan a layout like in Fig. 2. You will find yourself adding parts of drawings which you did not plan for (or vice versa) and you end up with lack of space, or too much white space. Know what you have and intended to present also helps you to plan the size of each drawings to be place within the A2 (or A3) space.

In the end, all working drawing components must look balance relative to each other. i.e. you do not want to end up with a humongous Isometric Presentation of the product with a tiny Orthographic Presentation in a little corner, or a GIANT sized Material List in the mist of tightly packed and tiny Part Drawings, etc. In order to avoid this situaton, you got to plan.

That is what the drafts are for. Do it.

Fig. 2b shows a slightly more detailed presentation where I begin drawing very quicky (doodling if you may like) the product, the parts and components as it is on a new paper. This level of details enable me to gauge the relative sizes of each drawings to the others. And if I need to resize or rearrange some of them, I will continue to draw drafts on a new piece of paper or I may choose to modify directly on this second draft until I get the balance and arrangement right.
---------------------------------------------------------------------------------------------------
Fig. 3a: Draft for Third Board
Remainder of Working and Presentation Drawing Components


Fig. 3b: Fine-Tuned Draft for Third Board
Remainder of Working and Presentation Drawing Components

This last draft as shown in Fig. 3a contains notes about what to include for the remaining of the working and presentation drawings. This final bit will ensure I present my project as comprehensive as possible by maximizing what space was available. But that does not mean you take up every white space. (Note: It is not necessary to cover up every inch of space. Rather it is better to be able to 'plan' space in your presentation boards so that it does not look cluttered).

In Fig. 3b (the last board), I have selectively planned to show different views or perspectives of my product, show the product in other contextual usages, show the product rendered in different colors or tones, or even show the product in different usage stages, etc. You may also choose to show some steps and proceduces when the product is being used or before and after use, etc.
---------------------------------------------------------------------------------------------------

Conclusion

It might be timely to note now that there is no right or wrong or standard way to present your ideas in your Presentation Drawings or the Presentation Board as a whole. 

Your Presentation Board should be fine as long as the components are presented neatly, clearly and correctly (eps. the drawings, and for example drawings standards adhered to in working drawings), the information presented is clear and easy to understand and does not invite questions due to vagueness in presentation. Finally, do not forget to refer back to the criterion for submission and make sure you have all the components in and well done.

26 June 2012

Working Drawing Components


A Working Drawing has the following usual components:
  1. An Isometric Drawing showing the Part Numbers (or Part Labels).
  2. An Exploded View (or Assembly Drawing) showing where the parts go and their fixtures.
  3. An Orthographic Projection (First Angle) showing the overall and necessary minor dimensions.
  4. If you can afford space for Part Drawings or useful Sectional Views to be included, go ahead and do so. Otherwise you must at least have those in of your development phase. Just think about the part drawings as a summary of your conclusions on the physical product project. Showing all the details, positions, trim lines and dimensions. (Note: Production Sequences and a Gantt Chart Production Plan need not be present in your presentation boards, however they MUST be included at the end of your development phase.
  5. A Material List showing all the Part Numbers, the Materials used, the Dimensions and the respective Quantities.
Some Tips and Pointers:
  1. Isometric Drawings: If the product has several components, especially those with components within each bigger component, you may consider drawing those components and label them seperately. It is impossible to draw all of them within (with lots of hidden lines) and attempt to number them off. That will be VERY messy and impossible to read. Finish off with a neat Exploded Drawing to show how each components come together.
  2. Exploded Views: As long as the parts are aligned consistently (Isometric or Oblique) your exploded view should look neat. Not all parts can be aligned straight to its connection point. In this case you can draw your component slightly off, but use lines to create a 'path' to lead it to the connection point. The example above has everything aligned. For an 'off' example click here. In the linked example you will find a dowel that is not aligned.
  3. Orthographic Projection: Leader lines should not touch the main drawing and should have a lighter line weight than the object. A good guide would be at least 10mm away from the drawn object. Spacing between dimension lines to the next should be consistent. A good guide would be at least 5mm away from the drawn object. Dimensions are usually written 'on' the dimension line. For vertical dimension lines, the dimensions are usually written on the left of the line following the orientation of the line.
  4. Material List: Most common mistake is the written dimension. Lenght = the longest or the largest dimension. Followed by Width and the smallest dimension is the Thickness. It is worthy to note that numbering in the material list goes from '1' from the base up.
  5. Do give a name for your project to be included as a 'Heading' for your Material List. Rather than "Material List' as your heading.

18 July 2011

Presentation Board | Presentation Drawing | Working Drawing Overall (Planning) Starter Kit (2011)

(Almost) Everything required within your Presentation Boards.

Note the different types of drawing techniques employed to communicate your ideas when you present them in your presentation boards. Note also the timing shown in the image above is for illustration purposes only.

Presentation Board Layout Planning (I) - Drafting

Presentation Board Layout Planning (II) - more details shown

Tips:
It is always good to list out what you wish to include in your
1) Presentation Drawing
2) Working Drawing

The expectation for Presentation Drawing is
a) Competent graphic presentation,
b) with all detail showing contextual use of design solution

The expectation for Working Drawing is
a) Detailed working drawing
b) with material list.
c) Drawing standards must be adhered.

Working Drawing Starter Kit

Sample (Draft) Working Drawing Layout.

Plan before hand where you want to place your information on your A2 Presentation Board. You may use an A4 or A3 paper to draft out where you want the necessary drawings to be. Use that draft to create your actual Working Drawing.

Sample - Orthographic Projection and dimensioning

An orthographic projection is drawn to scale. Remember to adhere to standard rules for type of line works, placement of arrows, leader lines, dimensioning circles and radius and inputting numbers, etc.