Need Help?

Struggling with design work, sketching, or managing academic pressure? Whether you're a student balancing deadlines with creativity or an educator seeking clarity in your teaching approach, this blog offers focused, practical support in Design & Technology — from visual communication to process thinking and digital fabrication. Since 2007, Design Journal SOS has helped readers overcome real classroom challenges with grounded strategies and insight. 💬 Have a topic you're curious about? Or found something here that helped you? I welcome your questions and reflections — they keep this space alive and evolving. 🔗 Follow for updates: Facebook /designjournalsos (Copyright © 2007–2025 Daniel Lim)
Showing posts with label oblique drawing. Show all posts

20 May 2022

The Obliques: Quick & Fun Practice Time Fillers

Need a filler to engage a class? This activity can easily use up an hour.

Nothing vey fanciful or complex. But an excellent opportunity to reinforce linework in drawing. That is light lines for drafts lines and finishing off with darker outlines. Good time to remind students to hold their tools firm but light. Relaxed.

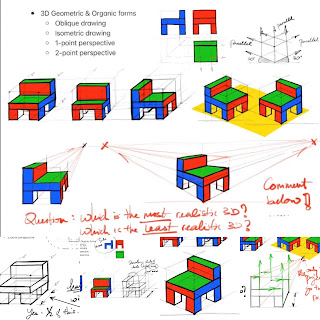
A quick introduction to what an oblique drawing is if students are not familiar with it. You can do a quick demo showing first a 2D square. Then tell them you can magically turn it into a 3D object with a few more lines.

Otherwise if the students had already done it before, I am sure there will always be learning opportunities and techniques to correct. If the students are really quick, the teacher may proceed with building and ‘cutting’ blocks to produce replicas of daily objects like tables and chairs, etc. 

For the advanced maybe introduce shading techniques or shadows. 

So even the simplest of forms - the oblique - can be quite complex.

The following is a quick 1hr example:


Students often attempt a drawing without first drawing some guidelines. Which is fine actually if they student can product a decent drawing. (Who’s going to say what is right or wrong, if a student can product exactly what it should be using any techniques he wished, even if ‘wrong’ or not the type taught in class). However it is good practice to learn how to begin drawings with guides. Drawing blocks before adding details. 

In the above example, I showed (see bottom right) a typical attempt when one draws an oblique triangle profile ‘eyeballing’ the inclined lines. It is very difficult to get an accurate representation that way. (Again not that one cannot). My ‘wrong’ example ended up decent. But it could have been worst.

Drawing light blocks that will encompass the form (in this case a triangle) enables the points to be marked out on the sides of the ‘box’ or on any extra guides, so that start and end lines (or curves) can be connected accurately in a 3D form. Projected correctly.

The second half of the filler activity can be a little bit of fun. Slightly more advanced where students can start building up blocks like Lego. Build upwards, downwards and side ways. Using a variety of proportions.

The more advanced students may wish to shape the blocks making them into triangles or more complex ‘cuts’ like a “V” groove or a square depression, etc. Teachers may need to do a quick demo for them.

If you like the full course on how you can make use of Oblique Drawings for practice, head down to the video below.


Let me know in the comments what else you like to learn and watch.

FOLLOW and LIKE on Facebook to get updates as soon as a new post is up: https://www.facebook.com/designjournalsos

Support me, support my work? Buy me a Coffee? https://www.buymeacoffee.com/mrdanielsos


22 April 2022

Drawing & Sketching Practice - 3D Oblique Geometric & Organic Forms

This is the the simplest of all 3D forms. The oblique drawing. If you can draw a shape, you can draw oblique. Simply adding a third dimension at 45 degrees to the horizontal. 


In this video I’ll show you how you can learn about the concept of an Oblique Drawing and how to practice with a variety of oblique blocks. Then we move on to drawing oblique shapes and forms. 


For the last bit, we always need some fun. I’ll show you how you create 3D Oblique building block structures.

Full “Drawing & Sketching” YouTube Playlist HEREhttps://youtu.be/wwgXIVYCeuY

……………………………………………………..

Let me know in the comments what else you like to learn and watch.

FOLLOW and LIKE on Facebook to get updates as soon as a new post is up: https://www.facebook.com/designjournalsos

Support me, support my work? Buy me a Coffee? https://www.buymeacoffee.com/mrdanielsos


20 February 2022

Introduction to 3D Drawings for Coursework: Oblique | Isometric | 1-Point & 2-Point Perspective Drawings

FOLLOW and LIKE on Facebook to get updates as soon as a new post is up: https://www.facebook.com/designjournalsos

.............................................................

3-Dimensional drawings are as essential as 2-Dimensional ones in presenting ideas in the Ideation and the Development stage in the coursework. 

They are also useful in helping research come alive where you can use them effectively, e.g. in illustrating how products works, etc. However, it is good to note that 2D sketches are quicker in presenting initial ideas in the beginning. the 3Ds can come in a little later to compliment and enhance the visual communication.


Types of 3-Dimensional Drawings

Which type of 3D drawings to use in your coursework depends on your ability to sketch them fluently. The 2-Point Perspective drawings are the most realistic amongst the rest, but they require more experience in sketching to be able to apply that technique quickly and. effectively. After all when you are actually DOING your coursework (especially if you are doing it as a graduating student) I don’t suggest you will be learning how to draw a 2-point perspective as you make your way through the journal.

The learning part must come well before you plan to employ them in your coursework. So if you are a graduating student and if the Isometric Drawing is the best you can perform, then use that. And forget about the 1-Point perspective. Leave the 2-Point out. Don’t even think.


However if you are a keen student and you knew about all these cool techniques you can use, the oblique drawing is one of the simplest BUT the least realistic. Next is the Isometric drawing. The 1-point perspective is one step better than the Isometric. And of course the ultimate will be the 2-point perspective drawing. Look at the image above. And see for yourself which is the most and the least realistic type of drawing. And which do you want to MASTER for your graduation coursework.

  
Above: Video and music ONLY

Below: Video, music AND Voice-Over 

The voice-over edition you will hear me chat about common mistakes along with important tips & guides when you learn to draw these 3-D drawings 

Learn all the basics and master them. 

After that you can bend and break the rules, whichever you pleased.

Subscribe to the youtube channel if you think that is useful. Let me know what you wish to watch and learn.

If you like the video and my contents, please Subscribe, LIKE and Share. 

Let me know in the comments what else you like to learn and watch.

FOLLOW and LIKE on Facebook to get updates as soon as a new post is up: https://www.facebook.com/designjournalsos

Support my work? Buy me a Coffee? https://www.buymeacoffee.com/mrdanielsos

07 January 2015

Secondary ONE - 2015 - "A (Simple) Wood Note Holder (Starter) Project" & Drawing Practice

......................................................................................................................

For 'N' and 'O' Level students looking for the complete Design Journal self-help links please click here or scroll down to "Design Journal 2015 | Complete Set of Post links for Design Journaling from Beginning to the End".

......................................................................................................................

Welcome to "A (Simple) Wood Note Holder (Starter) Project" for my 2015 Secondary ONE classes. Here I share my planning processes and what my students get to do from beginning to the end. 

If there must be a Lower Secondary Coursework to be done, I always like to begin with building the necessary skills and competency before the designing phase actually begin. Many students dread the Idea Generation stage because they struggle with drawing. When it comes to Development, students struggle again because they have no experiences of the challenges and limitations on working with tools and materials. Therefore could not develop their ideas meaningfully. Come the realization phase and the students are smacked with another completely new sets of skills which they had never acquired. As a result students had to learn alongside making attempts on their actual hand-in project. There is hardly any room for risk taking, making mistakes and learning from them.

In my class, I prefer to have my students experience making. To have a feel of the tools, machines and handy-skills required of their final individual project through kicking off a simple project. To prepare my students to be more competent and confident for the Idea Generation and Development phase, I get my students to learn and practice basic drawing skills.

PART A: First off "A (Simple) Wood Note Holder (Starter) Project"


Fig. 1

What you see in the image above (Fig. 1) is a mini note holder which I planned according to the necessary skills I wish my students to experience and learn in advance, and in turn to be useful before they begin Idea Generation. There is no way any student can appreciate design if he did not know first how materials are processed or how relevant tools are being used. Only when he had the experience, the designing stage can be done with its limitations and challenges in mind. 

Students get to learn the following skills as they make this project:

  1. Marking out. The image named as Fig. 2 below is an example I drew on the white board. The blue lines are added along the way as I show my students the stages of marking out on their piece of block. I draw on the board, then demonstrate on my little block. Students can refer either to the board for the marking positions or they can take a peek at my block once I am done. There is no need to mention any dimensions when I get my students to mark out. I simply use geometries. I say 'half of this'. Then 'another half of this', etc. as they mark out.
  2. Shaping (I). Students took turns to use the scroll saw to cut out two curved slots. I took this opportunity to explain why I designed the slots to be 'curved' instead of straight slots for holding a piece of paper in it.
  3. Shaping (II). A few steps forward, students learn to make use of a piece of Glass Paper (Sand Paper) to not only smooth the surfaces along the grain, they learn to use the glass paper alongside with blocks and/clamping on a vice to create curved edges to improve the overall aesthetics.
  4. Drilling. Due to time, I fixed the 3mm drill bits and adjusted its drill depth in advance. I then explained how a drill bit is fixed, how I get the depth of the hole fixed, and the relevant stuffs about drilling. Students get to use the drilling machine to drill a 3mm hole by learning to secure their work piece on a vice accurately, and in turn securing the vice with a F-Clamp. 
  5. Finishing (I): Students learn the names of the sand paper and the different grades of them. How to make use of other objects to achieve sanding in different parts and in various obstructed surfaces, etc. They'll learn about sanding along the grains and why it is preferred that way.
  6. Finishing (II). A few steps forward (again). Students learn the value of finishing their project either with (spray) paints or with Lacquer. I explain to them the process of finishing and when it is best done.
  7. Wire Bending: This may not be a critical skill in making. However, the students will learn about dexterity, hand-eye coordination to bend a piece of wire into the shape that is required - that will hold a piece of paper secure.Similar skills can be transferred if they wish to include wires in their personal projects later on.

Fig. 2


PART B: Drawing Practices

Fig. 3 shows a (WIP) sample set of progressing drawing skills which I planned to introduce to my students.

                             
Fig. 3

This will be a simplified drawing competency building for my Secondary One students this year. More updates later when I begin teaching them in class. That will be from week 4 onward. Basically the following are the steps:

Students learn progressively:
  1. Drawing parallel lines in all directions. (Fig. 4).
  2. Drawing parallel lines varying distances in all directions and all variations.(Fig. 4).
  3. Drawing blocks of various shape and orientation. Bearing in mind parallel lines. Bearing in mind also first off are light guide lines, followed by heavier lines to lock in shape.(Fig. 4).
  4. Drawing double parallel crosses. In preparation for Orthographic Projection placements. Double up as more practices for line drawing.(Fig. 4).
  5. Drawing in a block in Orthographic Projection.(Fig. 4).
  6. Drawing Oblique blocks in all possible sizes and orientation.(Fig. 4 & 5).
  7. Drawing Oblique miscellaneous shapes (Triangles, Rectangles, Squares, Octagons, etc.) in all possible sizes and orientations. Bearing in mind (again) parallel lines.(Fig. 5)
  8. [TEST] Drawing "A (Simple) Wood Note Holder" in Oblique. (Fig. 6).
  9. Making use of Oblique principles to draw complicated objects. (Fig. 7).
  10. Transforming Oblique into 1-Point Perspective Drawings. (Fig. 8).
Note: The baseline is that the slowest group must at least be competent up to skills shown from Fig. 4 to Fig 5a and able to draw the note holder show in Fig. 6Steps 9 & 10 (Fig. 7 & 8) onward should be reserved for classes that has proven to be ready for more and for fast learners only. 

      Fig. 4 
  
Fig. 5 


Fig. 6


    Fig. 7

Fig. 8

Ideally, once both Part A and B are completed, students will be more equipped and ready to tackle the requirement to sketch in the Idea Generation Phase, and have better ideas on 'how-to' develop and 'how-to' plan to make their idea and how much time is required. If the students already know how long it will take him to create a certain form using a certain method through the practices, he will be able to keep that in mind, and develop his idea according to his time allocated and how quickly he can finish them.

Till then, leave me a note if this is useful. Feel free to provide feedback or email me if you need any clarifications.

Classroom worksheets for 'Basic line work confidence and oblique drawing worksheet for upload' can be found here:


Please email mrdanielsos@yahoo.com.sg for a copy + terms and conditions for use.