Need Help?

Struggling with design work, sketching, or managing academic pressure? Whether you're a student balancing deadlines with creativity or an educator seeking clarity in your teaching approach, this blog offers focused, practical support in Design & Technology — from visual communication to process thinking and digital fabrication. Since 2007, Design Journal SOS has helped readers overcome real classroom challenges with grounded strategies and insight. 💬 Have a topic you're curious about? Or found something here that helped you? I welcome your questions and reflections — they keep this space alive and evolving. 🔗 Follow for updates: Facebook /designjournalsos (Copyright © 2007–2025 Daniel Lim)
Showing posts with label Attribute Listing. Show all posts

30 June 2017

Pictorial Idea Generation and Development

This post is an extension and a supplement to "Coursework Experiential Journal Component 2016 Example" that was originally created as a guide and reference material for my Secondary 3NA student mini coursework. I will not repeat information I have already posted previously.

What you'll see in this post are pictorial/visual examples on Development (and refinements) in a design journal. The examples do not represent any complete section of a journal. They serve as a starting point - an example - a demonstration - a suggestion - a recommendation - etc. to show what sort of contents may go into, say development, and how you can present your research and information in the journal. 
 
Use them as a reference and a guide to start or to improve your journal. Make informed choices on your own on what your takeaways should be after looking at the materials in here. Do not copy. 
 

If you find this helpful, I would love to hear from you. If you have suggestions, please do not hesitate to link up with me.
 
Topics you'll find below:
1) Ideas Generation (SAMPLES) using Existing Products as Starter/Inspirations [Updated 39 June 2017]
2) Selecting (SAMPLES) Best Idea for Development (using Decision Matrix) [Updated 39 June 2017]
3) DEVELOPMENT [SHAPE AND FORM] [Updated 39 June 2017]
4) DEVELOPMENT (SHAPE & FORM and FUNCTIONALITY [Updated 27 July 2017]
5) DEVELOPMENT (Determine SIZES with CRITICAL DIMENSIONS) [Updated 28 July 2017]
6) DEVELOPMENT (Determine SIZES with ANTROPOMETRIC DATA) [updated 28 July 2017]
 
Ideas Generation (SAMPLES) using Existing Products as Starter/Inspirations
(email me for more details to learn about using Existing Products as Starter/Inspirations for Ideas Generation)
 

First two images shows ideas generation using existing products as initial source of inspirations. Existing products used have nothing to do with stationary holders.

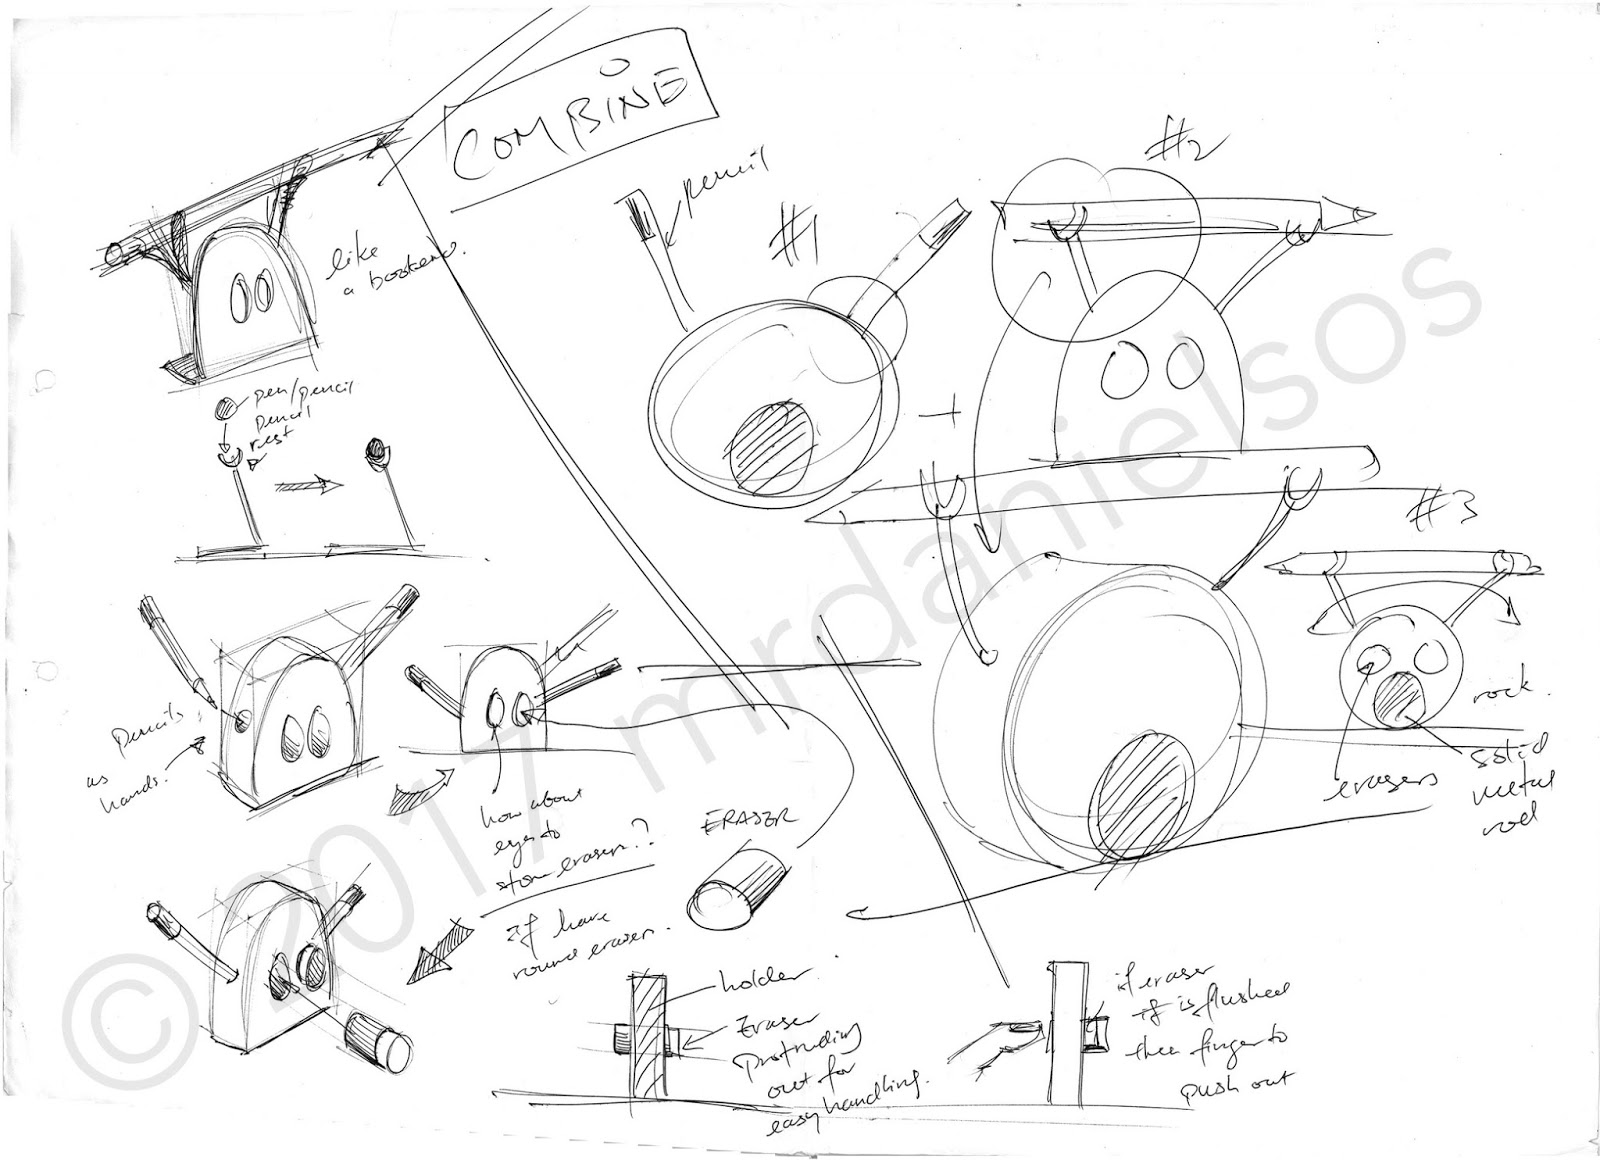
Image above shows ideas combined to create a new hybrid. This is one of the outcomes you want to have when generating ideas. Combining ideas can give you unexpected interesting solutions.
 
Selecting (SAMPLES) Best Idea for Development
(using Decision Matrix)
(email me for more details to learn about using the above)
 
 
The Decision Matrix is one of the most convenient way to select a best idea from a few good ones. Here I selected five ideas for consideration where one of them will be selected for development. I set a few criterion what makes up the attributes for considering the best idea. Then use weightage and ratings for each idea for computation.
 
 
The above example shows Idea 4 scoring the highest.
Idea 4 will be redrawn for development. See below.


Development (SAMPLES) using Attribute Listing / Morphological Method
 
DEVELOPMENT [SHAPE AND FORM]
 
(email me for more details to learn about using the above)


Attribute Listing or Morphological Analysis (and also SCAMPER) are not just Ideation tools. They can also be used for refinement purposes.
 
Individual parts / features are selected one at a time to make changes one change at a time. E.g. I pick the body to make changes to shapes and forms. Then I refer to the Morphological table and looked under, say 'Shape', that could be circle, square or a triangle, etc. I proceed to change the body cross-section to the various shapes - just to see how my original selected idea might look like with different cross-sectional shapes. At this moment I would also need to consider the overall functionality as while you change anything, in this case the cross-sectional shape, the change will affect the way it works (or how it will be holding/storing the pens or pencils) or how the 'legs' should be installed, etc.
 
When developing a product's shape and form you MUST always keep in mind the idea of working towards finalising (e.g. the shape, size, dimensions, colors, jointing methods, etc) a solution in mind. This is NOT like in the exploratory mode when you were generating ideas earlier on.

Above is an example of my student's chosen idea for development. I made use of the attributes for each part of the object (in this case the difference parts of the fish) and made a couple more refinements on its shape and form. NOTE: What is not shown in the above example are placement pens and pencils within each possible variety of shapes. You should put them in.
 
DEVELOPMENT (SHAPE & FORM and FUNCTIONALITY)
 
Shown on the right is a sample of how I draw a decision in Isometric 3-dimensions.
 
Developing a solution's shape and form without considering its functionality is quite useless. A simple way to consider functionalities is to draw your pens or pencils and/or rulers into your proposed holders (or whatever you may be designing for)  in every iterations that you make along the way. Doing so enables you to think about how effective the new solution are holding or storing the items. And in turn may inspire you to make further changes or improvements to the shape and form to achieve better functionalities. - see image below. [Updated 26 July 2017]
 
Note that other aspects like ergonomics, sizes, materials, jointing methods, etc. that will come into play whenever any shapes and form is changed is not specifically discussed here. However you should start to consider them simultaneously if these considerations appear as you develop the product.  For example, the moment I change the inverted triangular cross-section body into a rounded rectangular cross-sectional body, it may require a change of materials or jointing methods. Further development by making it a laminated piece also require decisions of materials. If there will be a change of materials there might be a change of the way of jointing. etc.  [Updated 27 July 2017]


The image above is an extension of further refinement focusing on the main body of the holder. And showing how any changes in shape can affect functionality (and also the choice of materials and manufacturing methods).
 
DEVELOPMENT 
(Determine SIZES with CRITICAL DIMENSIONS)
 
Use of Critical Dimensions
There will come to a point in the development phase where it's time to work out the dimensions of each parts and eventually the overall dimensions of the product. There are three possible ways you can obtain those data:
 
1) Use of Critical Dimensions (i.e. the objects that the product is holding/storing/interacting with) to determine the sizes of space needed, leading to the sizes of the parts making up the solution.
2) Use of Anthropometric Data (i.e. the measurement of relevant body parts and its relative end positions) to determine the critical height (e.g. for the height of a seat, or for the tallest shelve, etc.) of certain parts/features or the overall (max. or min.) dimensions of a solution.
3) Use of the area / volume of the Environmental Space of which the product will be used or placed. Usually you'll have a maximum or minimum allowable space for the new solution. This can be a good starter to set a minimum or maximum size for your new solution.
 
In the example above, I know I need to place some pencils. So I use the diameters of my pencils laid side by side to determine the width of the storage space. I want to stack the pencil up to maximum 2 layer. So I use twice the diameter of a typical pencil to determine what the minimum height of the 'side panels' should be. Which I eventually round it off to 20mm.
 
To get Critical Dimension data, you simply measure off (and take average of similar ones) relevant features of the items that is going to be held or stored. In this case the average diameter and length of a pencil seemed very critical for me to determine the area of the 'body' and the height of the 'side panels' (to prevent the pencils from falling off sideways.
 
I found a tabulated table from the internet and used that as my reference. (Note that I acknowledged the source.) [Updated 28 July 2017]
 
DEVELOPMENT 
(Determine SIZES with ANTROPOMETRIC DATA)
 
Use of Anthropometric Data
There are times where anthropometric data will be required for determining sizes. Especially where user interaction is the primary function of the solution. A good example will be designing of a Hammer. You'll need an average data surrounding the internal diameter of a grip and the width of a palm in order to decide on optimum diameter of the handle of the hammer. You may also have to differentiate male and female body dimensions depending on who your target audience is. Or even more detailed to determining dimensions from a particular age group and sex (e.g. Adult (30-40yo) - Male, Elderly (65-75yo) - Female) and even to where he/she comes from (e.g. Asia, European countries, etc). For classroom practice, use your classmates as your model and average.

The example shown above is not complete. I want to make use of Anthropometric Data to decide on the best overall size for my new solution. So that if I need to move it around, it will be comfortable to be picked up with my bare hands. The size and weight must feel right. Which part of my body should I measure? Can you work it out on your own?

Compare the result with data and size decision made using Critical Dimension data. Combine both data together to get a conclusive optimum overall size. [Updated 28 July 2017]

Conclusion:
A decision will have to be made for every stage of refinement, be it shape and forms, proportions, size and dimensions, jointing and construction methods, colors, or finishing, etc. Eventually at the end of the development phase, you will have all the information and data ready for producing your working drawings and production schedule.

26 February 2015

Idea Generation Techniques - Which and When to Use?

1) For 'N' and 'O' Level students looking for the complete Design Journal self-help links please click here or scroll down to "Design Journal 2015 | Complete Set of Post links for Design Journaling from Beginning to the End".


3) Click 'here' for "Secondary ONE - 2015 - Design Journal - A Pen/Pencil + Note Holder".
------------------------------------------------------------------------------------------------------

In the Singapore Design & Technology Syllabus, there are a few Idea Generation Techniques mentioned and taught from the textbook. They are
  1. Attribute Listing.
  2. Morphological Analysis.
  3. Relay Thinking.
  4. Shape borrowing (found in the lower secondary textbook).
  5. The S.C.A.M.P.E.R. technique.

I will not repeat what you can find online or from the textbook on what they are and how the various techniques can be used. But you'll find my 'reviews' on the techniques of which I hope you can end up making a better choice on which and when to use for your coursework. 

Avoid the one method fits the whole class pitfall. e.g. everybody use 'shape borrow' or everybody use 'morphological analysis'. Every project is unique and should be approached with the most appropriate techniques. This is the same with choice of 'research' and 'decision making' techniques throughout your design journal.

Back to Ideas Generation Techniques Review:

(1) & (2)  Attribute Listing and the Morphological Analysis
I am not a fan of both Attribute Listing and the Morphological Analysis as I find them producing very mechanically random 'fast-food' styled outcomes. Though you can use them to produce hundreds and thousands of hybrid ideas which are just a little different from the next, they are not useful for the unmotivated and lowly engaged students. The morphological and attribute listing technique both require highly motivated and engaged students to evaluate, synthesize and make meaning out of the various random outcomes - which many are either not ready for the required thinking efforts that comes after or they simply do not have the caliber to wrap the ideas up into something more practical for refinement.

However it doesn't mean you avoid them. You can use them in the beginning to generate some initial ideas to kick-off the process especially if you do not know what to do and which ideas to begin with. By all means make use of the two techniques but you must understand the respective functions and what outcomes you are expected to end up with.

(3) Relay Thinking
This method of idea generation is fun and it is collaborative by nature. It is useful to gain new insights and perspectives from your friends for your project and to find out what other interesting ideas may evolve from your initial ideas they can think of which you did not. At the end of the session, you can then evaluate and select potential ideas or concepts to be included in your Ideas Generation section. 

(4) Shape Borrowing
This is perhaps one of the most commonly used technique for the lower secondary projects. It is very widely and effectively used in real world design examples where great products are outcomes from borrowing shapes, forms and functional concepts from nature. This technique is great - if you know what it is for and what you will be getting out of it. Otherwise this process if attempted will be as mechanically meaningless as the first two techniques I mentioned above.

The shape borrowing technique can be used for the following outcomes in your project (or product):

You can get inspired by shapes/forms + function fitting [more correctly 'by nature' (animals, fish, insects or plants, any objects, etc.)] for their first principle functionality application.

Example 1: A bottle opener project. Inspired by the beak of a parrot and/or the like. With an end-product that resembles the functional shape of an inspired source - the 'hooked' beak as a leverage to pry open a bottle cap.

Example 2: Getting inspired by the construction site's piling machine. The action of 'piling' columns in the ground seems to fit the idea of a heavy rod slamming on my walnut / almond nut. Then think of what other objects or from nature that uses something to crack nuts or crack open anything.

Example 3: Getting inspired by the shape of a Beetle to an end product, say to the profile of a new car design - form fitting that meaningfully resembles the inspired source. Perhaps for aerodynamic properties or just simply aesthetics or the like.

An example of a shape borrowing project can be found by clicking 'here'.

One example of shape borrowing gone wrong is to fit a supposedly inspired shape to a potential product that does not have an obvious relationship. I am talking about 'meaningfully' inspired applications here. Think about this, how about an 'inspired' dolphin form as a coin box? How do you relate a dolphin to money? coin? storage? Weird isn't it? It will make a perfectly functional container but that is all you can say about it. You cannot tag along the following keywords on that like 'innovative', 'fun' 'interesting', 'novelty', 'funny', etc. It is a plain boring functional product.

(5) The S.C.A.M.P.E.R. technique
The S.C.A.M.P.E.R. technique is good for 'creating' your first idea and evolving that single concept into other hybrids or something else better later on. Used with varying level of details, the technique is excellent both for Idea Generation (S.C.A.M.P.E.R. used loosely at a macro level generating new raw broad concepts freely) as well as for Concept Refinement (S.C.A.M.P.E.R. used at a micro level focusing on generating options from confirmed concept parts and working towards final decision making as a whole).

I leave this technique for the last because if you really understood what this is,the S.C.A.M.P.E.R. technique covers (almost) all other existing techniques (including the others mentioned above) you can find. Maybe I should just sayALL other Idea Generation techniques falls under part of or a combination of the S.C.A.M.P.E.R. acronym.

Have a quick look:
  • "Attribute Listing" falls under mainly "Substitute". And as well as one or a combination of the following: "Combine", "Adapt" and "Modify".
  • "Morphological Analysis" falls under mainly "Substitute" & "C = Combine". And as well as one or a combination of the following: "A = Adapt", "M = Modify".
  • "Shape borrowing" falls under mainly "S = Substitue". And as well as one or a combination of the following: "Combine", "A = Adapt", "M = Modify", "P = Put to other use" and "R =Reverse/Rearrage".
  • The S.C.A.M.P.E.R. technique is everything above and includes explicitly "E =Eliminate" which is not part of the activities in the other techniques. How the S.C.A.M.P.E.R. technique can be used meaningfully can be found by clicking 'here'.

Conclusion
So, that wraps up my opinion and views on the various (textbook) idea generation techniques you will come across sooner or later if you chose (or did not choose) to do Design & Technology. 

Idea generation is a fun process. The process is addictive. I can loose sleep and food over this.At the same time, many students who are put off when they arrive at this stage claim that they have no idea, can't draw and/or don't know where to begin.

In order to be having the kind of fun and addiction in Idea Generating, it is necessary the idea generator
  • should have a reasonable level of sketching competency (technical competency)
  • is comfortable and fluid in his idea generating ability (cognitive competency) and 
  • wants to produce quality work (positive emotional presence). 
There are various drawing techniques and practices you can find in my blog as well as on the Design References label on the right hand side of the blog page which you can self-teach and practice. 

Your ability and confidence in generating ideas and communicating them through clear and readable sketches (and annotations) really depends on your willingness to upgrade you competency in drawing. There is no way you can achieve that without practice.

Finally, grow to like (if you did not) what you are doing in Design & Technology - especially to those who did not choose to do this subject or just found out that coursework requires a substantial commitment, effort and time to complete. I say so because I have met too many in my experience. 

To correct what I said about needing substantial effort and time required, if you (a) knew the design process well and (b) commit yourself in the beginning to identify a genuine need (or problem) that requires a solution, you will be able to complete the remainder of the coursework with minimum drag. You also have less of your teacher needing to bug you to produce work. 

The design process for your coursework is no rocket science. It's how everyone of us think everyday. We have a problem or a challenge (Design Need and Situation), we find solutions (generate ideas), we refine our solutions (develop the idea) so that it can eventually be made and put to good use (Realization, evaluation, testing and improvement).
------------------------------------------------------------------------------------------------------


P.S. Let me know if the information is useful or that you have been helped. Feedback and your opinions welcomed.