Design & Technology made teachable — practical strategies, visual thinking, and digital fabrication for modern D&T classrooms. Grounded in two decades of experience across mainstream, ASD, and international schools.
In this video I bring you through the steps of warm ups for sketching.
As usual I drop some nuggets of tips and tricks to help you make better progresses. You will learn about warm ups with lines, circles, ovals and curves. And how you can create intermediate variations along the way and on your own. For example varying spaces and line weights, and sizes, etc.
Feel free to pause after each warm up section so you can continue with more practices on your own, or simply just taking a break to digest the contents. Or if you are quick enough, follow me through the entire video without stopping.
At the end of the warm up practices, I’ll attempt to identify a meaningful profile from the ‘mess’ and turn it into something comprehensible and familiar. If you are adventurous enough, follow me through to creating a 3D form out of that.
Watch and learn with me about sketching “Warm Ups”
……………………………………………………..
Let me know in the comments what else you like to learn and watch.
It can be very exciting in a design process when ideas keep pouring in. But it can be frustrating if you cannot keep up with sketching those ideas on paper.
Just because you might not have acquired the competencies, confidences and the speed yet, what can you do to make sure you do not forget or miss out on those ideas, when it is time to sketch them on paper?
If you can identify with the above, this video is for you. In the video I described two ways you can manage this problem,
1) Jotting ideas on paper before drawing them.
2) Using references when you draw.
Watch the video on how the above points are elaborated with examples.
If you like this video and the contents I shared, LIKE, SHARE and SUBSCRIBE. And do let me know what else you like to watch and learn. And I’ll make them for you.
Let me know in the comments what else you like to learn and watch.
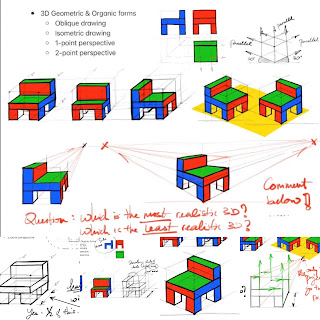
3-Dimensional drawings are as essential as 2-Dimensional ones in presenting ideas in the Ideation and the Development stage in the coursework.
They are also useful in helping research come alive where you can use them effectively, e.g. in illustrating how products works, etc. However, it is good to note that 2D sketches are quicker in presenting initial ideas in the beginning. the 3Ds can come in a little later to compliment and enhance the visualcommunication.
Types of 3-Dimensional Drawings
Which type of 3D drawings to use in your coursework depends on your ability to sketch them fluently. The 2-Point Perspective drawings are the most realistic amongst the rest, but they require more experience in sketching to be able to apply that technique quickly and. effectively. After all when you are actually DOING your coursework (especially if you are doing it as a graduating student) I don’t suggest you will be learning how to draw a 2-point perspective as you make your way through the journal.
The learning part must come well before you plan to employ them in your coursework. So if you are a graduating student and if the Isometric Drawing is the best you can perform, then use that. And forget about the 1-Point perspective. Leave the 2-Point out. Don’t even think.
However if you are a keen student and you knew about all these cool techniques you can use, the oblique drawing is one of the simplest BUT the least realistic. Next is the Isometric drawing. The 1-point perspective is one step better than the Isometric. And of course the ultimate will be the 2-point perspective drawing. Look at the image above. And see for yourself which is the most and the least realistic type of drawing. And which do you want to MASTER for your graduation coursework.
Above: Video and music ONLY
Below: Video, music AND Voice-Over
The voice-over edition you will hear me chat about common mistakes along with important tips & guides when you learn to draw these 3-D drawings
Learn all the basics and master them.
After that you can bend and break the rules, whichever you pleased.
Subscribe to the youtube channel if you think that is useful. Let me know what you wish to watch and learn.
If you like the video and my contents, please Subscribe, LIKE and Share.
Let me know in the comments what else you like to learn and watch.
In this post I will show you how you can practice and draw basic 2D Geometric and Organic Shapes. Drawing in 2-dimension is important as it helps you sketch an idea quickly without needing to go into 3D forms (yet). An orthographic projection is an example of 3 times of 2D views of the same object.
2D geometric shapes are shapes you can put an established geometrical name to it like a ‘square’ or a ‘triangle’.
2D organic shapes are simply a combination of 2 or more 2D geometric shapes, to make something no longer just a ‘square’ or a ‘triangle’.
Geometric shapes are not limited to a square, a triangle and an octagon. After you watched the video, go ahead practice and draw more variety of shapes on your own. Draw different size and proportions. Draw lots of them.
IMPORTANT NOTE: At this stage it is good to begin anything with a (lightly sketched) basic block. Of which you can use it to transform into other shapes of your choice. Make use of markers and guides to help you start and end a slope / curve, etc.
How you arrange those geometric shapes matters. You may end up something very random. Just having fun creating different shapes. Or you can skilfully plan those shapes to make up an image that you wish to draw, e.g. a bird, a chair or anything in 2-dimensions.
If you like the video and my contents, please Subscribe, LIKE and Share.
Let me know in the comments what else you like to learn and watch.
Isometric building blocks are essentials to create different forms.
In fact, if you can draw blocks of various sizes and proportions at ease, and in any orientation you wish, you can draw basically ANYTHING on earth. Yes. Really.
In the following examples you see how 3 basic blocks can be transformed into simple isometric furnitures you can easily find at home.
Do not worry about the details yet. If you are a beginner, it is good enough to be able to combine blocks to make anything up. If it looks like a chair you’ve got it. Leave the details and intricacies later.
Other details which you may notice in a real world furniture like textures, joints and curves, etc. These you will be able to slowly add them in. But for now, stick with the basics first.
If you like the video and my contents, please Subscribe, LIKE and Share.
Let me know in the comments what else you like to learn and watch.