Need Help?

Struggling with design work, sketching, or managing academic pressure? Whether you're a student balancing deadlines with creativity or an educator seeking clarity in your teaching approach, this blog offers focused, practical support in Design & Technology — from visual communication to process thinking and digital fabrication. Since 2007, Design Journal SOS has helped readers overcome real classroom challenges with grounded strategies and insight. 💬 Have a topic you're curious about? Or found something here that helped you? I welcome your questions and reflections — they keep this space alive and evolving. 🔗 Follow for updates: Facebook /designjournalsos (Copyright © 2007–2025 Daniel Lim)
Showing posts with label Drawing Practice. Show all posts

20 May 2022

The Obliques: Quick & Fun Practice Time Fillers

Need a filler to engage a class? This activity can easily use up an hour.

Nothing vey fanciful or complex. But an excellent opportunity to reinforce linework in drawing. That is light lines for drafts lines and finishing off with darker outlines. Good time to remind students to hold their tools firm but light. Relaxed.

A quick introduction to what an oblique drawing is if students are not familiar with it. You can do a quick demo showing first a 2D square. Then tell them you can magically turn it into a 3D object with a few more lines.

Otherwise if the students had already done it before, I am sure there will always be learning opportunities and techniques to correct. If the students are really quick, the teacher may proceed with building and ‘cutting’ blocks to produce replicas of daily objects like tables and chairs, etc. 

For the advanced maybe introduce shading techniques or shadows. 

So even the simplest of forms - the oblique - can be quite complex.

The following is a quick 1hr example:


Students often attempt a drawing without first drawing some guidelines. Which is fine actually if they student can product a decent drawing. (Who’s going to say what is right or wrong, if a student can product exactly what it should be using any techniques he wished, even if ‘wrong’ or not the type taught in class). However it is good practice to learn how to begin drawings with guides. Drawing blocks before adding details. 

In the above example, I showed (see bottom right) a typical attempt when one draws an oblique triangle profile ‘eyeballing’ the inclined lines. It is very difficult to get an accurate representation that way. (Again not that one cannot). My ‘wrong’ example ended up decent. But it could have been worst.

Drawing light blocks that will encompass the form (in this case a triangle) enables the points to be marked out on the sides of the ‘box’ or on any extra guides, so that start and end lines (or curves) can be connected accurately in a 3D form. Projected correctly.

The second half of the filler activity can be a little bit of fun. Slightly more advanced where students can start building up blocks like Lego. Build upwards, downwards and side ways. Using a variety of proportions.

The more advanced students may wish to shape the blocks making them into triangles or more complex ‘cuts’ like a “V” groove or a square depression, etc. Teachers may need to do a quick demo for them.

If you like the full course on how you can make use of Oblique Drawings for practice, head down to the video below.


Let me know in the comments what else you like to learn and watch.

FOLLOW and LIKE on Facebook to get updates as soon as a new post is up: https://www.facebook.com/designjournalsos

Support me, support my work? Buy me a Coffee? https://www.buymeacoffee.com/mrdanielsos


08 March 2022

Drawing & Sketching Practice “Introduction & Basics”. Watch them before you start any practices!

Here you will find videos and tutorials which you can watch, learn and practice together with me. I will be populating more videos whenever new ones are ready over the next few days or weeks. Make sure you come back to check out new updates.

In the following series of videos of “Sketching & Drawing Practice with Mr Daniel” you will be guided through Warm ups,  Basic 2D and 3D Geometric and Organic shapes and forms practices, and finally One & Two Point-Perspective practices

And before we even begin, let me share with you some essential “Drawing Basics” that is absolutely necessary for you to understand before you dive right into the rest of the tutorials and practices.

You don’t have do everything. You may choose one or two areas you wish to learn or develop on. In every video I will be providing you tips and guides on how you can draw more effectively and efficiently. 

But at the end of the day, how well and confidence you will draw, depends on how often you practice. 

First up in this post you will find a (1) Trailer Video, an (2) Introduction to Different Types of Practices and (3) Drawing Basics. Or watch them below:

Videos below:

(1) “Drawing & Sketching with Mr Daniel” (TRAILER)
Just an advertisement

(2) “Introduction to Types of Drawing Practices”
Warm Ups, 2D and 3D (Geometric & Organic) Shapes and Forms, One & Two-Point Perspectives, and more…

(3) “Drawing Basics”
Pen or Pencil? What type? How to handle or grip a pencil? Which to use? How to start laying lines? How light or ‘hard’ to draw? When? and more…

All the best. And look forward to your learning with me and your comments.

!Let me know in the comments what else you like to learn and watch.

FOLLOW and LIKE on Facebook to get updates as soon as a new post is up: https://www.facebook.com/designjournalsos

Support my work? Buy me a Coffee? https://www.buymeacoffee.com/mrdanielsos


04 March 2022

*New* Series: “Sketching & Drawing Practice with Mr Daniel” (TRAILER VERSION)

Cannot draw? I know right. But you got start somewhere. These videos will guide and help you kick start your progress from ZERO to HERO.

Sketching and drawing can be a very daunting activity for many people. Too often than not you will always hear people say “I cannot draw.” 

Trust me, everybody can draw. Draw me a square. See? You can.

The only problem is you may not draw them in the right proportion. That is where practice and awareness comes to play. Allow me to guide you through a series of practical drawing practices from warm ups, to 2D shapes and forms, to 3D forms. 

In every video I’ll also be dropping some PRO TIPS on how you can handle your tools and approach to a successful sketch - one that you eventually will tell yourself “I didn’t know I can sketch or draw!”.

However mastery takes practices. Not by the hours. Months maybe. But the really good dudes did it for years. Daily. So if you want to be good, it is not good enough just watching a video like this. You got to go practice. 

So practice with me. You may pause my videos for extra practices in between different techniques, or you may need more time to practice a technique before you move on to the next. 

There is no rule. The point is YOU PRACTICE. And you will surely get better.

Let me know in the comments what else you like to learn and watch.

FOLLOW and LIKE on Facebook to get updates as soon as a new post is up: https://www.facebook.com/designjournalsos

Support my work? Buy me a Coffee? https://www.buymeacoffee.com/mrdanielsos

07 January 2015

Secondary ONE - 2015 - "A (Simple) Wood Note Holder (Starter) Project" & Drawing Practice

......................................................................................................................

For 'N' and 'O' Level students looking for the complete Design Journal self-help links please click here or scroll down to "Design Journal 2015 | Complete Set of Post links for Design Journaling from Beginning to the End".

......................................................................................................................

Welcome to "A (Simple) Wood Note Holder (Starter) Project" for my 2015 Secondary ONE classes. Here I share my planning processes and what my students get to do from beginning to the end. 

If there must be a Lower Secondary Coursework to be done, I always like to begin with building the necessary skills and competency before the designing phase actually begin. Many students dread the Idea Generation stage because they struggle with drawing. When it comes to Development, students struggle again because they have no experiences of the challenges and limitations on working with tools and materials. Therefore could not develop their ideas meaningfully. Come the realization phase and the students are smacked with another completely new sets of skills which they had never acquired. As a result students had to learn alongside making attempts on their actual hand-in project. There is hardly any room for risk taking, making mistakes and learning from them.

In my class, I prefer to have my students experience making. To have a feel of the tools, machines and handy-skills required of their final individual project through kicking off a simple project. To prepare my students to be more competent and confident for the Idea Generation and Development phase, I get my students to learn and practice basic drawing skills.

PART A: First off "A (Simple) Wood Note Holder (Starter) Project"


Fig. 1

What you see in the image above (Fig. 1) is a mini note holder which I planned according to the necessary skills I wish my students to experience and learn in advance, and in turn to be useful before they begin Idea Generation. There is no way any student can appreciate design if he did not know first how materials are processed or how relevant tools are being used. Only when he had the experience, the designing stage can be done with its limitations and challenges in mind. 

Students get to learn the following skills as they make this project:

  1. Marking out. The image named as Fig. 2 below is an example I drew on the white board. The blue lines are added along the way as I show my students the stages of marking out on their piece of block. I draw on the board, then demonstrate on my little block. Students can refer either to the board for the marking positions or they can take a peek at my block once I am done. There is no need to mention any dimensions when I get my students to mark out. I simply use geometries. I say 'half of this'. Then 'another half of this', etc. as they mark out.
  2. Shaping (I). Students took turns to use the scroll saw to cut out two curved slots. I took this opportunity to explain why I designed the slots to be 'curved' instead of straight slots for holding a piece of paper in it.
  3. Shaping (II). A few steps forward, students learn to make use of a piece of Glass Paper (Sand Paper) to not only smooth the surfaces along the grain, they learn to use the glass paper alongside with blocks and/clamping on a vice to create curved edges to improve the overall aesthetics.
  4. Drilling. Due to time, I fixed the 3mm drill bits and adjusted its drill depth in advance. I then explained how a drill bit is fixed, how I get the depth of the hole fixed, and the relevant stuffs about drilling. Students get to use the drilling machine to drill a 3mm hole by learning to secure their work piece on a vice accurately, and in turn securing the vice with a F-Clamp. 
  5. Finishing (I): Students learn the names of the sand paper and the different grades of them. How to make use of other objects to achieve sanding in different parts and in various obstructed surfaces, etc. They'll learn about sanding along the grains and why it is preferred that way.
  6. Finishing (II). A few steps forward (again). Students learn the value of finishing their project either with (spray) paints or with Lacquer. I explain to them the process of finishing and when it is best done.
  7. Wire Bending: This may not be a critical skill in making. However, the students will learn about dexterity, hand-eye coordination to bend a piece of wire into the shape that is required - that will hold a piece of paper secure.Similar skills can be transferred if they wish to include wires in their personal projects later on.

Fig. 2


PART B: Drawing Practices

Fig. 3 shows a (WIP) sample set of progressing drawing skills which I planned to introduce to my students.

                             
Fig. 3

This will be a simplified drawing competency building for my Secondary One students this year. More updates later when I begin teaching them in class. That will be from week 4 onward. Basically the following are the steps:

Students learn progressively:
  1. Drawing parallel lines in all directions. (Fig. 4).
  2. Drawing parallel lines varying distances in all directions and all variations.(Fig. 4).
  3. Drawing blocks of various shape and orientation. Bearing in mind parallel lines. Bearing in mind also first off are light guide lines, followed by heavier lines to lock in shape.(Fig. 4).
  4. Drawing double parallel crosses. In preparation for Orthographic Projection placements. Double up as more practices for line drawing.(Fig. 4).
  5. Drawing in a block in Orthographic Projection.(Fig. 4).
  6. Drawing Oblique blocks in all possible sizes and orientation.(Fig. 4 & 5).
  7. Drawing Oblique miscellaneous shapes (Triangles, Rectangles, Squares, Octagons, etc.) in all possible sizes and orientations. Bearing in mind (again) parallel lines.(Fig. 5)
  8. [TEST] Drawing "A (Simple) Wood Note Holder" in Oblique. (Fig. 6).
  9. Making use of Oblique principles to draw complicated objects. (Fig. 7).
  10. Transforming Oblique into 1-Point Perspective Drawings. (Fig. 8).
Note: The baseline is that the slowest group must at least be competent up to skills shown from Fig. 4 to Fig 5a and able to draw the note holder show in Fig. 6Steps 9 & 10 (Fig. 7 & 8) onward should be reserved for classes that has proven to be ready for more and for fast learners only. 

      Fig. 4 
  
Fig. 5 


Fig. 6


    Fig. 7

Fig. 8

Ideally, once both Part A and B are completed, students will be more equipped and ready to tackle the requirement to sketch in the Idea Generation Phase, and have better ideas on 'how-to' develop and 'how-to' plan to make their idea and how much time is required. If the students already know how long it will take him to create a certain form using a certain method through the practices, he will be able to keep that in mind, and develop his idea according to his time allocated and how quickly he can finish them.

Till then, leave me a note if this is useful. Feel free to provide feedback or email me if you need any clarifications.

Classroom worksheets for 'Basic line work confidence and oblique drawing worksheet for upload' can be found here:


Please email mrdanielsos@yahoo.com.sg for a copy + terms and conditions for use.

24 January 2013

Drawing Basics - Isometric Drawing - Practice

Drawing Basics - Isometric Drawing -
4-Parts Practice Tutorial

----------------------------------------------------------------------------------------
Fig. 1: Types of Drawing Techniques

Introduction 

Fig. 1 shows a variety of drawing techniques you can find or use in most sketches or drawings. Everyone of them has its own role and function to play in an art work.

In this practice, we'll be concentrating only on the ISOMETRIC drawing technique.

A 'shape' is a two-dimensional (2-D) drawing. A 'shape' has an 'area'. Not a 'volume'. A triangle, a square, an oblong, a rectangle, an octagon, etc. are all examples of geometrical shapes. 

A 'shape' can also be 'organic'. An 'organic shape' cannot be described using a geometrical term like a 'square'. They are actually hybrids of many shapes joined together and sort of 'blended' using curves or lines to make up a final 'shape'. 

An example on how different geometrical shapes can be combined to form 'organic' shapes can be found here.

A three-dimensional (3-D) object is called a 'form'. A 'form' is an area with a third dimension - the thickness. Similar to 'shapes', a 'form' can both be 'geometrical' or 'organic', or a combination of both. 

A short video showing the difference between a 'shape' and a 'form' can be found here.


NOTE: The tutorial that follows assumes that the student is already able to construct an Isometric Block.
----------------------------------------------------------------------------------------

Part 1: BASICS
Stretch / Squeeze / Add / Subtract


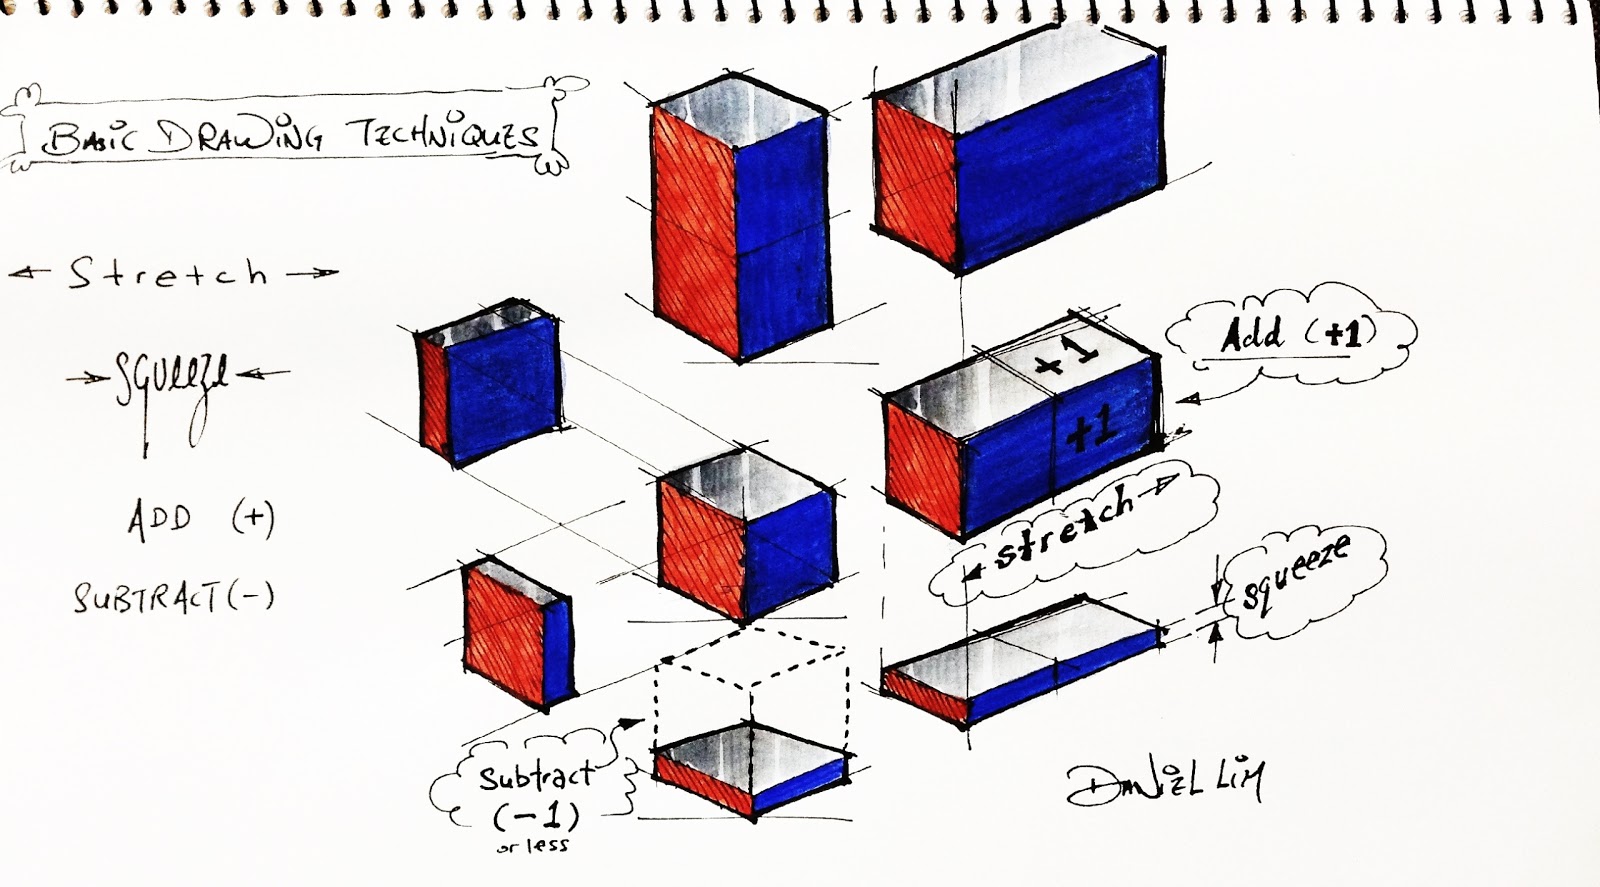
Fig. 2: Basic Drawing Technique (Part 1)

Fig. 2 shows the cube being transformed longer by adding more cubes or shorter by making cube 'thinner'. If you take away the lines that separate two or more cubes, you get a rectangular block! 

Steps:
  1. Begin by drawing a cube, 30mm each side, in the middle of the page.
  2. In the adjacent blank spaces in your sketchbook, draw another cube and make this 'longer' by adding another cube beside it. In a way it looks like you are 'stretching' the cube longer. You can add it from the front, back, on the left or the right hand side. Add more cubes in every direction (Up, Down, Left, Right) to make rectangular blocks of various lengths.
  3. Next, it is time to make your cube 'thin' by 'squeezing' it. Draw in every direction thin blocks. Draw long and thin blocks by adding another thin block beside it. Draw a various lengths of thin blocks in every direction. By making a block thinner than a cube, you are in a way 'subtracting' from the original size.
  4. Use your creativity to drawing more variety of blocks by stretching, squeezing, adding and subtracting a cube.
----------------------------------------------------------------------------------------


Part 2: BASICS
Stretch / Squeeze / Add / Subtract / Enlarge / Minimize / Combine & Creative Combinations

Fig. 3: Basic Drawing Technique (Part 2)

Fig. 3 shows an extension of Part 1 by not only adding or subtracting more cubes, but by combining two or more cubes together you make larger objects in a variety of forms. Similarly, by deliberately leaving out some cubes, you create a 'hole' or a 'hollow'. 

Steps:
  1. Begin by drawing a cube, 30mm each side, in the middle of the page.
  2. Draw your next cube larger. You can make your cube larger by adding more cubes surrounding a smaller one. Draw a variety of larger cubes of different sizes.
  3. Draw a group of cubes and deliberately 'miss out' one of them. When you created a 'space' by deliberately leaving some parts out, you just 'subtracted' a portion of it from the original mass.
  4. Use your creativity to drawing more variety of blocks by enlarging, minimizingstretchingsqueezingadding and subtracting a cube. Combine them to make more odd forms.
----------------------------------------------------------------------------------------


Part 3: INTERMEDIATE
Pyramids / Non-Isometric 'Cut' Surfaces / Through Holes / Recessed Shapes / Creative Combinations


 Fig. 4: Intermediate Drawing Technique (Part 3): Creative Combinations

Fig. 4 shows more advanced use of the techniques shown in Parts 1 & 2 and making use of them to create more complicated forms. Shapes can be used on the surface of a block to build a new form and when they are 'pushed' into the block, they create a through hole of any shape.

Note:
Notice the surfaces that are not colored? Do you know whey they are neither colored red nor blue, or even shaded grey like the top?

Those surfaces are called non-isometric surfaces. They do not belong to the rules of an Isometric Drawing. 

These slopes can be created accurately by first drawing a cube or a block, and then  'crated' using guide lines to show where the slope should start and end. If you tried drawing those non-isometric slopes or surfaces without first using an isometric block, it will be close to impossible to get a decent looking object.


Steps:
  1. Begin by drawing a cube, 30mm each side, in the middle of the page. Note: In Fig.4 I drew it at the top left hand corner.
  2. To create a PYRAMID is simple. If you can draw a cube in seconds, the pyramid will be out no slower than you can draw your cube.
  3. Here is how: You must locate the centre of the square at the top of the cube. That makes the 'tip' or the 'apex' of the pyramid. There are two ways you can do that. First method, you split the square into quarter smaller squares by drawing a 'cross'. Each line in the middle parallel to the edge of the square. Where the lines intersect, that is the middle point or apex of the pyramid. Second method, you draw two intersecting diagonal lines starting from the furthest four corners of the square. Where the lines intersect, that is the same middle point or apex of the pyramid.
  4. Next, you locate three points at the base of the pyramid where the 'tip' or 'apex' of the pyramid will join to make the edge of the sloping pyramid. 
  5. Note that since a pyramid has a square base, there must be a forth point. So yes, the fourth point is still there, but because the forth point will be at the back of the pyramid, and say we assumed the pyramid is opaque, we don't see it it from the front. So it is not necessary to show the back. However you can still use 'hidden' lines to show that it is there. But I am not going to talk about hidden lines here. 
  6. You should notice by now if you move the top 'point' of the pyramid anywhere else on the paper and join the three point bases to the 'point' you can draw a variety of 'funny' pyramids that are slanted. If you place the 'point' up high, you get a really 'tallpyramid. If you place the 'point' close to the ground, you get a 'stubby' pyramid. If you place the 'point' to the left or the right', the pyramid now looks like the "Leaning Tower of 'Pyramid' Pisa" which is kind of funny.
  7. Next 'Cut Surfaces'. A very quick recap: By now you should have read about non-isometric surfaces. The side walls of the pyramid are all non-isometric. But we can draw them accurately by placing a reference point. Recall point 3
  8. So for any 'cut-surfaces' that are non-isometric, we can do the same by drawing guidelines to show where the starting point of the 'cut' and where the 'surface-slope' will end.
  9. Begin at the top of a block. Draw a line to mark out a 'triangular' shape at a corner of the block. I drew it at the corner nearest to me. Next, you can decide where the 'slope' shall end. I picked a point that is touching the ground. You can choose a point anywhere along the vertical line.
  10. After you have located your 'point', you'll then locate the two ends from the first lines you drew in step 9, and join them to the 'point' at the bottom. Give it a light shade or hatch to show that there is a 'sloped' surface. And there you go. You just created a non-isometric 'cut-surface' on an isometric block! Isn't that painfully simple?
  11. Finally, creating 'through holes' using various shapes. Fortunately, drawing holes of any shape through a block is also very simple.
  12. Firstly, draw your isometric guide lines on the chosen surface of your block so that you can sketch your chosen shape on it. 
  13. Take the cube with a square hole example at the bottom left in Fig. 4. I have chosen the vertical surface on the left. Secondly, begin by drawing four lines offsetting from the four edges of the square. You still have an isometric square shape. You may end up with a square, or a rectangle, whatever. It does not matter. Mine is a smaller isometric square shape residing somewhere on the top left of the surface. See that?
  14. Finally, once you draw the shape on the surface, it is time to 'push' the shape 'inwards' INTO the block to create a 'hole'. Exciting isn't it? But how do we do it? Which line should we draw to create that illusion of a square hole? 
  15. You are just ONE line behind. Yes. Just ONE.
  16. If you use the example I show you, you'll notice there is only ONE more line to complete the 'through hole'. But how do you know which 'point' to pick to draw that final line?
  17. You'll need a little imagination here. Imagine, if there really was a square hole, and you've already drawn the 'square' on the vertical surface. And you are now looking at it from where you are. Where would the visible line that represents the edge of an internal square be? It should be at the back of the square. Once you locate the point, draw the final line 'in' the square to complete your very first 'through (square) hole'!
  18. Other variations of 'through holes' are 'recesses'. That means the 'holes' do not go through the block from one end to the other. Well they have flat 'bases' or 'bottoms'. 
  19. The example on the bottom right in Fig. 4 shows a pretty complex combo of randomly modified collection of blocks. Two of the 'holes' are examples of recesses. Can you spot them? Clue: They are rectangular 'recesses'.
  20. Make use of all possible combination you learned above to create beautiful block forms.
----------------------------------------------------------------------------------------


Part 4: Advanced

Elipse (Isometric Circles), Cones, Application of Circles and Arcs on Isometric Surfaces and Edges


Fig. 5: Advanced Drawing Technique (Part 3): Creative Combinations

Most products or objects that we see in our everyday lives are not simply made up of blocks. Otherwise it will be a very boring world. 

We learned from Parts 1-4 , starting from the very basic isometric cubes and blocks to more complicated modifications, to create complex forms like combining blocks, and subtracting parts from them. 

Part 4 serves to complete what we have learned so far and to bring us another step closer to drawing real world objects as they are. Round objects and curved surfaces makes up a great deal of all the shapes and forms around us. Not every thing are block and triangles. 

However, sketching the curves and circles right and accurately in isometric requires some knowledge in how those lines work. A circle is not a 'circle' when you need to draw them isometric. The circle becomes an 'elipse'. In Fig. 5, you'll find a tutorial on how to draw an 'elipse' using a pair of compass.

In step 4, you'll first need to learn how to draw Isometric 'Circles' from all surfaces off a cube. Then you'll learn how to draw curved edges along the corner of a block, hence introducing round edges. Its a very important drawing skill to learn since most of the products you design and make will have 'rounded' edges for added aesthetics value. And here you learn to draw them.


Steps:
  1. Begin by drawing a CUBE, 50mm each side, in the middle of the page.
  2. Practice drawing 'circles' (elipses) on each of the surface of the cube. A step-by-step example on how they can be done can be found at the bottom left of Fig. 5.
  3. Now that you are able to draw elipses efficiently on all sides of a block, you are ready to draw either a vertical or a horizontal cylinder.
  4. To draw a VERTICAL CYLINDERduplicate the elipse on both ends, top and bottom, on the surface of a tall block.
  5. After that you'll join the two outer most edges of the circle from top to bottom with vertical lines to form the edge of the cylinder. And you have a vertical cylinder.
  6. Note: To do steps 4 & 5, you need to construct the guidelines (see point 2) for drawing an elipse two times on the bottom surfacea and the top surface before you draw in the elipse.
  7. Do the same for a HORIZONTAL CYLINDER.
  8. To draw a CONEis extremely simple. First you draw an elipse at the base of a cube, or at the base of a tall square-based block. At the top of the square surface, split it in to square quarters. You will find a 'spot' in the middle of the square where the lines intercept.
  9. Next you join the lines from the 'apex' (the tip of the cone), downwards to the outermost left and right edges of the elipse at the bottom.
  10. Slightly more advance, you can draw a 'FLAT-TOPPED' CONE. The principle is the same as drawing a cylinder. When you draw a cylinder, say, your toilet roll, the top and bottom diameter is the same. However a 'Flat-topped' cone is like your regular cylinder, just that the top elipse is smaller. Once you draw the top elipse smaller than the one at the bottom and join them up like drawing a cylinder, you have a 'Flat-Topped' cone. Simple. You can now draw an inverted 'Flat-Topped' cone if you want. This time the base is the smaller elipse.
With all these skills you have learnt this far, you can create cylinders or cones, or simply blocks on top of a block or a cylinder and cylinders and blocks at the side of the blocks all over place. Draw them big and small. Combine shapes to make weird looking ones. 

You can also draw 'internal' holes of different shapes. Those 'internal' holes can be through holes, i.e. the hole goes through the block. Or the 'internal' holes can be a 'recess'. That means they stop at a certain distance from the surface creating a 'flat' hole, of whatever shape you can draw.

Make use your ability to draw elipses efficiently to introduce curves to the edges and corners of a block to make them look 'rounder'.

Use your creative licence to create objects you see around you by 'combining' or 'subtracting' different shapes and forms into bigger and more complicated shapes and forms. In this way you are also 'modifying' and 'morphing' shapes and forms to create your final art work. This is how things are drawn.


----------------------------------------------------------------------------------------

Finally, practice and practice and practice. Make mistakes and figure out why your drawing looks funny. Work it out and learn from mistakes. Draw loads of stuffs. And soon with enough perseverance your drawing will start to turn out more like what you wanted them to look like.

Without practice and determination and loving it, even the best techniques and tutorials available could not help you come close to producing a decent drawing. So start sketching now. Do them in a sketchbook. Do lots of them. Have FUN.