Need Help?

Struggling with design work, sketching, or managing academic pressure? Whether you're a student balancing deadlines with creativity or an educator seeking clarity in your teaching approach, this blog offers focused, practical support in Design & Technology — from visual communication to process thinking and digital fabrication. Since 2007, Design Journal SOS has helped readers overcome real classroom challenges with grounded strategies and insight. 💬 Have a topic you're curious about? Or found something here that helped you? I welcome your questions and reflections — they keep this space alive and evolving. 🔗 Follow for updates: Facebook /designjournalsos (Copyright © 2007–2025 Daniel Lim)
Showing posts with label Sketching & Drawing Tips & Guides. Show all posts

24 March 2023

How to Sketch Faster: Boost Your Ideation Process with These Techniques

Sketching is a fundamental part of the creative process, particularly in the field of design. However, it can often be time-consuming, especially when you need to generate multiple sketches quickly. In this article, we'll explore a simple yet effective technique that can help you sketch up to five times faster, enhancing your ideation process and overall efficiency.


1) Utilize Legends for Recurring Objects


During the sketching process, you might find yourself drawing the same objects over and over again. To save time, consider creating a legend for these objects. A legend is a basic drawing of the object accompanied by a label or name. Instead of redrawing the object each time, you can simply refer to the legend. This method will significantly speed up your work process.


2) Sketch the Object First to Determine Its Proportions


Before diving into the final sketch, make a rough sketch of the object to determine its proportions. This step will help you avoid having to erase and redraw your work, saving you valuable time. For example, a simple bear sketch might take you around 25 seconds, but with this technique, you can reduce that time.


3) Create a Boundary Box to Form a 'Legend'


For your object, create a boundary box to form a legend. You can add some text or alphabets inside the box to indicate what the object is. This process takes only about 5 seconds, and it will help you identify the object quickly when you need it again.


4) Use Symbols Instead of Sketching the Actual Object


Once you have created your legend, use a symbol instead of sketching the actual object when exploring different ideas. By using symbols, you can quickly generate ideas without having to redraw the same object repeatedly.


5) Use Saved Time to Generate More Ideas


The time you save by not having to redraw the same object repeatedly can be used to generate more ideas. This is particularly useful when you're working under a tight deadline and need to produce a lot of sketches in a short amount of time.

In conclusion, sketching is a vital part of the creative process. By using the techniques mentioned above, you can sketch faster without compromising the quality of your work. Remember to create legends for repeated objects, sketch the object first to determine its proportions, draw a boundary box to make a legend, use symbols instead of sketching the actual object, and use the saved time for more ideas. By implementing these techniques, you'll become more productive and efficient in your work.


Let us know in the comments what other topics you'd like to learn about. Don't forget to [follow and like us on Facebook](https://www.facebook.com/designjournalsos) for updates on new posts. If you find our content beneficial and would like to support us, consider [buying us a coffee](https://www.buymeacoffee.com/mrdanielsos).


______________________________________________________

Related Articles:


1) [Mastering Idea Evolution: Developing High-Quality Concepts](https://designjournalsos.blogspot.com/2023/03/evolution-of-idea.html)

2) [Practical Ideation Sketching Tips & Guides](https://designjournalsos.blogspot.com/search/label/Practical%20Ideation%20Sketching%20Tips%20%26%20Guides)

3) [Sketching & Drawing Tips & Guides](https://designjournalsos.blogspot.com/search/label/Sketching%20%26%20Drawing%20Tips%20%26%20Guides)

06 April 2022

Drawing & Sketching Practice - “Warm Ups”: Lines, Circles, Ovals and Curves, and more…

In this video I bring you through the steps of warm ups for sketching. 

As usual I drop some nuggets of tips and tricks to help you make better progresses. You will learn about warm ups with lines, circles, ovals and curves. And how you can create intermediate variations along the way and on your own. For example varying spaces and line weights, and sizes, etc. 

Feel free to pause after each warm up section so you can continue with more practices on your own, or simply just taking a break to digest the contents. Or if you are quick enough, follow me through the entire video without stopping.

At the end of the warm up practices, I’ll attempt to identify a meaningful profile from the ‘mess’ and turn it into something comprehensible and familiar. If you are adventurous enough, follow me through to creating a 3D form out of that.

Watch and learn with me about sketching “Warm Ups

……………………………………………………..

Let me know in the comments what else you like to learn and watch.

FOLLOW and LIKE on Facebook to get updates as soon as a new post is up: https://www.facebook.com/designjournalsos

Support me, support my work? Buy me a Coffee? https://www.buymeacoffee.com/mrdanielsos

13 March 2022

(5) Drawing & Sketching Practice - 2D Geometric & Organic Shapes

Drawing 2D Geometric & Organic Shapes; They are just about as fundamental as drawings can get.

What’s the difference between the two? And how do we make the best out of practices?


In the video I’ll explain to you how you can draw various 2D shapes. With lots of just-in-time tips to help you supercharge your progress. I’ll also be explain why I chose to do certain things or draw in a certain way

Feel free to “Paused” in between shapes to practice on your own, or create your own variations. You will also find tips on how to create a variety of shapes on your own. 

We end with the finale by interpreting the ‘mess’ from the practices and create cool & fun shapes.

Watch and learn with me about sketching “2D Geometric & Organic Shapes

……………………………………………………..

Let me know in the comments what else you like to learn and watch.

FOLLOW and LIKE on Facebook to get updates as soon as a new post is up: https://www.facebook.com/designjournalsos

Support me, support my work? Buy me a Coffee? https://www.buymeacoffee.com/mrdanielsos

09 March 2022

Have ideas but cannot sketch fast enough? This video is for you.

It can be very exciting in a design process when ideas keep pouring in. But it can be frustrating if you cannot keep up with sketching those ideas on paper. 

Just because you might not have acquired the competencies, confidences and the speed yet, what can you do to make sure you do not forget or miss out on those ideas, when it is time to sketch them on paper?


If you can identify with the above, this video is for you. In the video I described two ways you can manage this problem,

1) Jotting ideas on paper before drawing them.

2) Using references when you draw.


Watch the video on how the above points are elaborated with examples.

If you like this video and the contents I shared, LIKE, SHARE and SUBSCRIBE. And do let me know what else you like to watch and learn. And I’ll make them for you.

Let me know in the comments what else you like to learn and watch.

FOLLOW and LIKE on Facebook to get updates as soon as a new post is up: https://www.facebook.com/designjournalsos

Support me, support my work? Buy me a Coffee? https://www.buymeacoffee.com/mrdanielsos

24 February 2022

Three Easy Ways to Copy 2D Images, Shapes and Photo References

If you have problems drawing / sketching or copying something you like and never seem to get its proportions right, you’ve come to the right place. 

The ability to copy shapes of a reference effectively is a skill everybody can learn. 

Three Painless Ways to Copy an Image or Photo Reference

You can of course use your own trial and error approach. With some luck you may end up something decent. If that is what you want, this tutorial is not for your.

“I cannot draw”. Really? Not even a square? A triangle? A rectangle? A circle or an oval? If you can draw these, you can draw practically almost anything.

Everybody can sketch and draw. You cannot, because you have not yet learn how

In this video tutorial I show you three easy ways you can learn immediately and start copying something. You will not believe suddenly you can actually sketch or draw. All you need to have is someone who will give you some tips and secrets of the trade. And this is what I am doing here.


Watch the video. Follow the steps and practice once on your own. You may cry out loud, “Why didn’t anybody tell me about these before.” Well, now you can. 

You will learn about

1) The Geometric Shape Method

2) The Grid Method, and

3) The Negative Space Method

Extra comments:

The Geometric Shape Method is most useful in the Design & Technology Coursework Journaling context. Very versatile and quick approach that does not limit you to only copying a reference, it enables you to also be able to produce new sketches very quickly.

The Grid Method is good for transferring a final Developed 2D profile on a work piece. You see, after development with all proportions and dimensions confirmed, you want to plot an exact copy of the profile on the work piece. The Grid Method does that perfectly. You may also use the Grid Method to quickly transfer a profile to the next for refinement or development.

The Negative Space Method is practically unheard of in the Design & Technology world because it is more ART related method. This method is perfect both for outdoor sketching and for copying an image quickly without loosing too much control over accuracies. 

The Negative Space Method allows the sketcher or artist to quickly block out external spaces outside the focus area. To quickly establish the proportions and shapes of the focus, without actually drawing them. The Negative Spaces almost instantly create the profile within. Details can then be added after that.

But there is nothing that stops you from using the Negative Space Method in the context of D&T. You need to have a good repertoire of skills. Then you will know when to employ which.

If you like the video and my contents, please Subscribe, LIKE and Share. 

Let me know in the comments what else you like to learn and watch.

FOLLOW and LIKE on Facebook to get updates as soon as a new post is up: https://www.facebook.com/designjournalsos

Support my work? Buy me a Coffee? https://www.buymeacoffee.com/mrdanielsos

20 February 2022

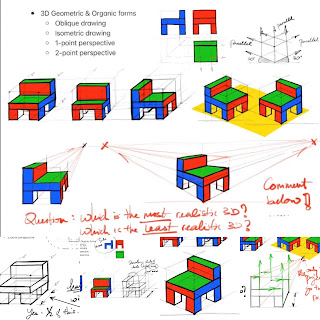
Introduction to 3D Drawings for Coursework: Oblique | Isometric | 1-Point & 2-Point Perspective Drawings

FOLLOW and LIKE on Facebook to get updates as soon as a new post is up: https://www.facebook.com/designjournalsos

.............................................................

3-Dimensional drawings are as essential as 2-Dimensional ones in presenting ideas in the Ideation and the Development stage in the coursework. 

They are also useful in helping research come alive where you can use them effectively, e.g. in illustrating how products works, etc. However, it is good to note that 2D sketches are quicker in presenting initial ideas in the beginning. the 3Ds can come in a little later to compliment and enhance the visual communication.


Types of 3-Dimensional Drawings

Which type of 3D drawings to use in your coursework depends on your ability to sketch them fluently. The 2-Point Perspective drawings are the most realistic amongst the rest, but they require more experience in sketching to be able to apply that technique quickly and. effectively. After all when you are actually DOING your coursework (especially if you are doing it as a graduating student) I don’t suggest you will be learning how to draw a 2-point perspective as you make your way through the journal.

The learning part must come well before you plan to employ them in your coursework. So if you are a graduating student and if the Isometric Drawing is the best you can perform, then use that. And forget about the 1-Point perspective. Leave the 2-Point out. Don’t even think.


However if you are a keen student and you knew about all these cool techniques you can use, the oblique drawing is one of the simplest BUT the least realistic. Next is the Isometric drawing. The 1-point perspective is one step better than the Isometric. And of course the ultimate will be the 2-point perspective drawing. Look at the image above. And see for yourself which is the most and the least realistic type of drawing. And which do you want to MASTER for your graduation coursework.

  
Above: Video and music ONLY

Below: Video, music AND Voice-Over 

The voice-over edition you will hear me chat about common mistakes along with important tips & guides when you learn to draw these 3-D drawings 

Learn all the basics and master them. 

After that you can bend and break the rules, whichever you pleased.

Subscribe to the youtube channel if you think that is useful. Let me know what you wish to watch and learn.

If you like the video and my contents, please Subscribe, LIKE and Share. 

Let me know in the comments what else you like to learn and watch.

FOLLOW and LIKE on Facebook to get updates as soon as a new post is up: https://www.facebook.com/designjournalsos

Support my work? Buy me a Coffee? https://www.buymeacoffee.com/mrdanielsos

18 February 2022

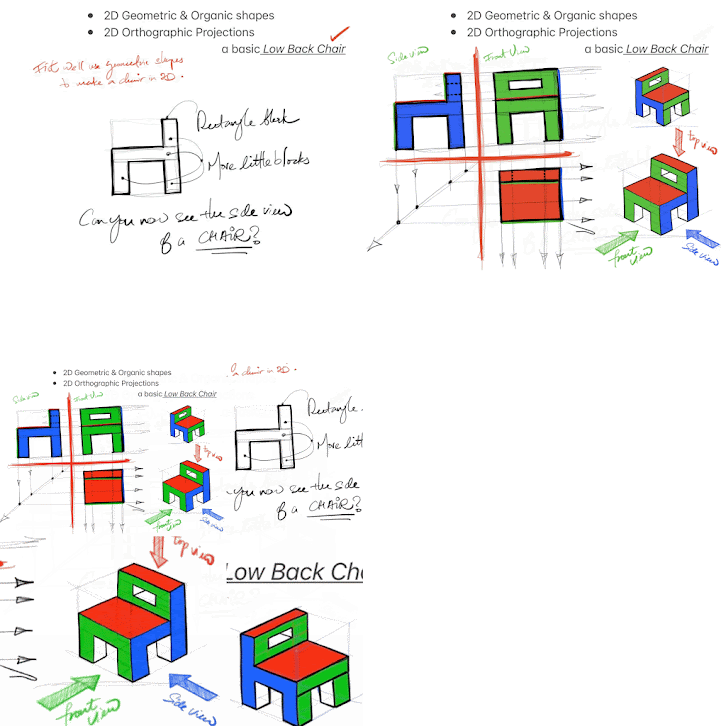
Sketching & Drawing 2: Basic 2D Orthographic Projection (example: A Low Back Chair)

The need for an orthographic projection is a slightly more advance step into the design process. However the orthographic projection can also be very effectively used to  quickly illustrate an idea in different views. 


Using a 2-dimension approach to do that can speed up the process of drawing, yet achieve a similarly good objective. This approach to using orthographic projections at the early stage of design may be useful for students who may not be able to sketch in 3D quickly yet. 

So putting on paper in 2D views to illustrate an idea first is a good strategy. Once that is done the student may wish to work out later how a 3D presentation can be done.


To produce an orthographic projection, since you will notice it is a 2D sketch or drawing, you will require again various combination of blocks to help you establish the relationship between parts of the objects before you draw the object as a whole. The need for guidelines cannot be further emphasised. 

Many students draw without using any guidelines. These sketches were never good. If there are they will be VERY rare.


Subscribe to the youtube channel if you think that is useful. Let me know what you wish to watch and learn.

If you like the video and my contents, please Subscribe, LIKE and Share. 

Let me know in the comments what else you like to learn and watch.

FOLLOW and LIKE on Facebook to get updates as soon as a new post is up: https://www.facebook.com/designjournalsos

Support my work? Buy me a Coffee? https://www.buymeacoffee.com/mrdanielsos

Sketching & Drawing 1: Drawing and Practicing 2D Geometric and Organic Shapes

In this post I will show you how you can practice and draw basic 2D Geometric and Organic Shapes. Drawing in 2-dimension is important as it helps you sketch an idea quickly without needing to go into 3D forms (yet). An orthographic projection is an example of 3 times of 2D views of the same object.

2D geometric shapes are shapes you can put an established geometrical name to it like a ‘square’ or a ‘triangle’.

2D organic shapes are simply a combination of 2 or more 2D geometric shapes, to make something no longer just a ‘square’ or a ‘triangle’. 


Geometric shapes are not limited to a square, a triangle and an octagon. After you watched the video, go ahead practice and draw more variety of shapes on your own. Draw different size and proportions. Draw lots of them.

IMPORTANT NOTE: At this stage it is good to begin anything with a (lightly sketched) basic block. Of which you can use it to transform into other shapes of your choice. Make use of markers and guides to help you start and end a slope / curve, etc.


How you arrange those geometric shapes matters. You may end up something very random. Just having fun creating different shapes. Or you can skilfully plan those shapes to make up an image that you wish to draw, e.g. a bird, a chair or anything in 2-dimensions.


If you like the video and my contents, please Subscribe, LIKE and Share. 

Let me know in the comments what else you like to learn and watch.

FOLLOW and LIKE on Facebook to get updates as soon as a new post is up: https://www.facebook.com/designjournalsos

Support my work? Buy me a Coffee? https://www.buymeacoffee.com/mrdanielsos

17 February 2022

Basic Isometric Tutorial: Using Isometric Blocks to Build and Cut: Basic 3D Forms

Isometric building blocks are essentials to create complex forms.

In the following examples you see how basic blocks can be transformed into a more complex block structure. This is imaginary of course. But there is no rules here when it comes to practicing drawing blocks. The point is to have some fun doing it.


Use guide points and lines to help you locate the start and end of a slope or a curve/rounded edge. This is the ONLY way you can plot an accurate slope on an isometric plane. Add a little bit of dimensions in your creation by adding in some shades. You need to know where your light is coming from. And then shade the side where the light does not fall directly on.


If you like the video and my contents, please Subscribe, LIKE and Share. 

Let me know in the comments what else you like to learn and watch.

FOLLOW and LIKE on Facebook to get updates as soon as a new post is up: https://www.facebook.com/designjournalsos

Support my work? Buy me a Coffee? https://www.buymeacoffee.com/mrdanielsos

Basic Isometric Tutorial: How to combine Isometric Blocks & make them Meaningful - Basic Isometric Furnitures

Isometric building blocks are essentials to create different forms.

In fact, if you can draw blocks of various sizes and proportions at ease, and in any orientation you wish, you can draw basically ANYTHING on earth. Yes. Really.

In the following examples you see how 3 basic blocks can be transformed into simple isometric furnitures you can easily find at home. 


Do not worry about the details yet. If you are a beginner, it is good enough to be able to combine blocks to make anything up. If it looks like a chair you’ve got it. Leave the details and intricacies later.


Other details which you may notice in a real world furniture like textures, joints and curves, etc. These you will be able to slowly add them in. But for now, stick with the basics first.


If you like the video and my contents, please Subscribe, LIKE and Share. 

Let me know in the comments what else you like to learn and watch.

FOLLOW and LIKE on Facebook to get updates as soon as a new post is up: https://www.facebook.com/designjournalsos

Support my work? Buy me a Coffee? https://www.buymeacoffee.com/mrdanielsos

15 February 2022

Improve my SKETCH!

One of the most common problems students have: Coming up with a decent sketch of anything. 

Does that sound like you?

Have difficulty working out proportions and perspectives?

Always cannot get your sketches or drawings right?

See what can be done to SUPERCHARGE your drawing(s)


If you like the video and my contents, please Subscribe, LIKE and Share. 

Let me know in the comments what else you like to learn and watch.

FOLLOW and LIKE on Facebook to get updates as soon as a new post is up: https://www.facebook.com/designjournalsos

Support my work? Buy me a Coffee? https://www.buymeacoffee.com/mrdanielsos


Three Ways to effectively Copy an Image - the D&T way and the Art way

THREE SUPERCHARGE ways to copy an image for SHAPE BORROWING

Some general comments on each of them and how useful they are for various applications like for copying and for creating new sketches. Some are best for D&T and some are for ART. But all of them are interchangeable to be best of your advantage if you know how to do everyone of them well.

1. the Geometric Shape Method (GSM) 
3. the Negative Space Method (NSM)  1. The gsm is most versatile for dt. 2. The gm is not so good for new sketches, otherwise the second most versatile for dt. 3. The negative space is one of the quickest way to copy. But not for creating new sketches. Best for copying artistic organic references, not entirely useful for dt application.

Examples of Shape Borrowing using the Geometric Shape Method:

Example of using Negative Space:


A video of the process on how the Negative Space method can be used for copy an image.


If you like the video and my contents, please Subscribe, LIKE and Share. 

Let me know in the comments what else you like to learn and watch.

FOLLOW and LIKE on Facebook to get updates as soon as a new post is up: https://www.facebook.com/designjournalsos

Support my work? Buy me a Coffee? https://www.buymeacoffee.com/mrdanielsos