Need Help?

For students managing design work, sketching, deadlines, and creative pressure — and for educators seeking greater clarity in their teaching — this blog offers focused, practical support in Design & Technology, from visual communication and design process thinking to digital fabrication. For those seeking more tailored support, I am also available for student consultations and teacher workshops. Since 2007, DesignJournalSOS has helped readers navigate real classroom challenges with grounded strategies and insight. Have a question or topic you’d like explored? Your reflections are welcome — they help keep this space alive and growing. Copyright © 2007–2026 Daniel Lim

26 April 2012

Idea Generation & "Back to Perspective"

The idea of sketching ideas back in their contextual perspective is not new. I talked about this many many posts back. Just in case you might not have seen or know about it... here is another one.

.......................................................................................................................................
During the stage of idea generation (or development), it is common for students to sketch the proposed solution as it is being explored or refined (if any) with no reference to the object it is intended to hold or the user who is supposed to be using it. It is like idea generating a pencil holder without any pencils in view. Note: Coincidentally, the three examples below did not show the user at all in order not to complicate this post.
.......................................................................................................................................

But you should observe that all three examples I have below, 1) an Umbrella Stand, 2) a Satay Sticks Monouverer, and 3) a Mobile Phone stand for a Bike, all have TWO things in common.

FIRSTLY, up to a certain stage in the idea generation process, 1) an Umbrella is sketched in, followed by a few,  2) a Satay stick sketched in, and 3) a Mobile Phone sketched in - all of them to get a 'feel' of the proposed solution when it is in use with the object they are intended for. 

SECONDLY, up to a certain stage in the idea generation process, 1) a Shop is sketched in, 2) a BBQ pit is sketched in, and 3) a Bike handle bar is sketched in.

What for?  To get a 'feel' of the proposed solution when it is in use with the object they are intended for. Why? Because ultimately these products got to be used in those proposed contexts!

 Umbrella Stand

Satay Sticks Monouverer

Mobile Phone stand for a Bike

Another reason why you ought to be doing so is so that you would be able to be sure that the proposed solution is likely to look right (or not) or likely to work (or don't work) in its rightlful context. To be dead sure, you may even want to move on to make a quick mock-up and place it there or start 'using' it in context.

In conclusion,
Idea Generation without including and evaluting the intended objects as it is being used or the user who will eventually be interacting with it, is like talking about the adrenaline rush you get on a roller coaster ride - and this is what you see:  there is no one on it, no sight of the coaster rails and the roller coaster is just aesthetically pleasingly sitting on concrete ground.

24 April 2012

Idea Generation - Focusing on Alternative Functionality


Here is a simplified presentation on how I meant in class when I say,

"Generate ideas focused on the functions first. i.e. think and sketch different ways to make it work. Make use of your list of design specifications that mentions functions. Generate alternative ideas. Assess them. Evaluate them. Combine, modify and improve the ideas that you have. Do a quick mock-up and test out your ideas. A certain point of time, draw the hand in; draw the target user in. Remember to draw your more or less refined idea to be used in context to get a feel of how it may work. Use various drawing techniques to present your ideas. Annotate them to communicate how the idea is intended to work, etc.".

The example above shows you only two alternatives to secure cables to a table. The first one was in fact... well... literally my first thought of using a little blob of blu-tack to simply 'stick' the cable to the table. That was nevertheless an idea wasn't that? Then later what seems like a 'hook' idea came to mind and you have on the right side sketches of how a 'hook' may be used to secure the cable. You should notice that in all cases I sketched in a cable. 

Continue in a clockwise fashion, you notice some development going on. I have started to stretch the hook and make it slightly longer so that now I can secure up to three cables. Addition features at the ends of the hook to provide stability, etc.

At the bottom, assuming the idea was sort of developed, I began taking a step back and sketch in hands interacting with the hook cable securing idea. Sketching the hands in is a good way to visualize and appreciate how large (or small) the product may be. Good for sizing at the later stages. Good also if I decided to disappear in the workshop for a mock-up or two cause I have a good idea on its possible size and the diameter just by looking at my sketch. I could have further modified the hook's diameter and lengths so that it looks more proportionate or asymmetrical or 'balanced'. 

So you see, the idea generation process is very lively. Its very free. It doesn't condemn a bad idea. In fact there is no bad idea. If an idea doesn't look good, it can always be modified so that it works.

------------------------------------------------------------------------------
Notice also that every proposed idea is extended via presenting them with a) additional perspectives and b) human interaction to show success of functionality and usability, i.e. shown being viewed in different angles and using multiple drawing techniques, e.g. a combination of 2D and 3D drawings and exploded views when necessary. 

This important step serves two purposes: 
  1. It helps to present the proposed solution clearly by helping the designer (and the reader) 'see' the solution in an all rounded manner. And
  2. Because the proposed solution is shown sufficiently in as many views as necessary, any problems or 'faults' can be easily picked up and that enables the designer to make effective improvements or propose alternative solutions to make it better.
(Included and updated on 28 August 2013)
------------------------------------------------------------------------------

One common problem in a student's attempt in idea generation is to sketch an idea. Somehow it either looked funny or will not work. Then make a comment that it doesn't work. Then move on to another entirely different idea. That is not the way to work with ideas. 

You just killed one potential idea that could have been modified and developed so that it will now work instead of abandoning it.


The second example above show another idea generation starter. This time is an attempt to start generating ideas on the different ways to connect individual photo frames vertically and how they can be detached and add on easily. Not much detailing but you do see some development going on. For example you may see some details on how a magnet may be fixed into a 'cap' like structure for the magnetic connection idea. This is sometimes necessary because I would need have a 'feel' how how that might work. And one way to do that is to sketch them in exploded views and 'visualize' how each parts interact.

If I chose this concept for refinement or development, then I will move on to generate better ideas that works, decide on materials and making methods, etc.

--------------------------------------------------------------------------------
(First edition of this post on 24 Arpil 2013)
(Second edition on 20 August 2013)

12 April 2012

Presentation & Working Drawing - A Simple Version

First of all, let me clarify why the title reads '... Simple Version'. In the GCE 'N' and 'O' Level Requirement, students are expected to produce a presentation drawing that is drawn in context. That is to say the product illustrated with user interactions within the proposed environment.

However, for my students in Secondary Two, the requirement for their presentation drawing is much simpler. As long as they can illustrated their design showing clearly the product in use, that is a good job done.

Below are examples which I showed my students in class what the hand-in quality of their presentation drawing and the working drawings should be like.

I did not follow use the students' theme 'Dining Experiences' cause I didn't want them to 'copy' my demonstrations. Rather to learn to design independently and with full autonomy.
A Sample of a Fish Note Holder Presentation Drawing

Nothing special here. Just the proposed product. Holding what it is intended for - business card or notes. Presented on a table. The students are free to add colors to it to enhance their presentation.


A Sample of a Fish Note Holder Working Drawing

Nothing special here again. In fact that is almost a complete working drawing. Shown in the example above are the basic essentials of a working drawing. 1) An Isometric View of the product with all the parts labeled, 2) An Orthographic Projection of the product to show the various dimensions and finally 3) A Material List.

Noticed in the Working Drawing sample I added a base to it. I did this because there are some students with more than one part to their design. So in the demonstration, I hope to cater to their needs by simulating an additional piece.

IMPORTANT:
The material list shown above is not entirely correct. It was deliberate.
Why not you spot what is wrong?

3D Drawings - Oblique and Isometric Drawing Practices


Classroom demonstrations on Oblique and Isometric Drawings.

Practice, Practice and Practice.
The only way to improve your drawing skills. There is no short cut.

20 March 2012

How Does a Facilitation on Processes for Making Look Like?

I've begun afternoon consultations for my Secondary TWO students.

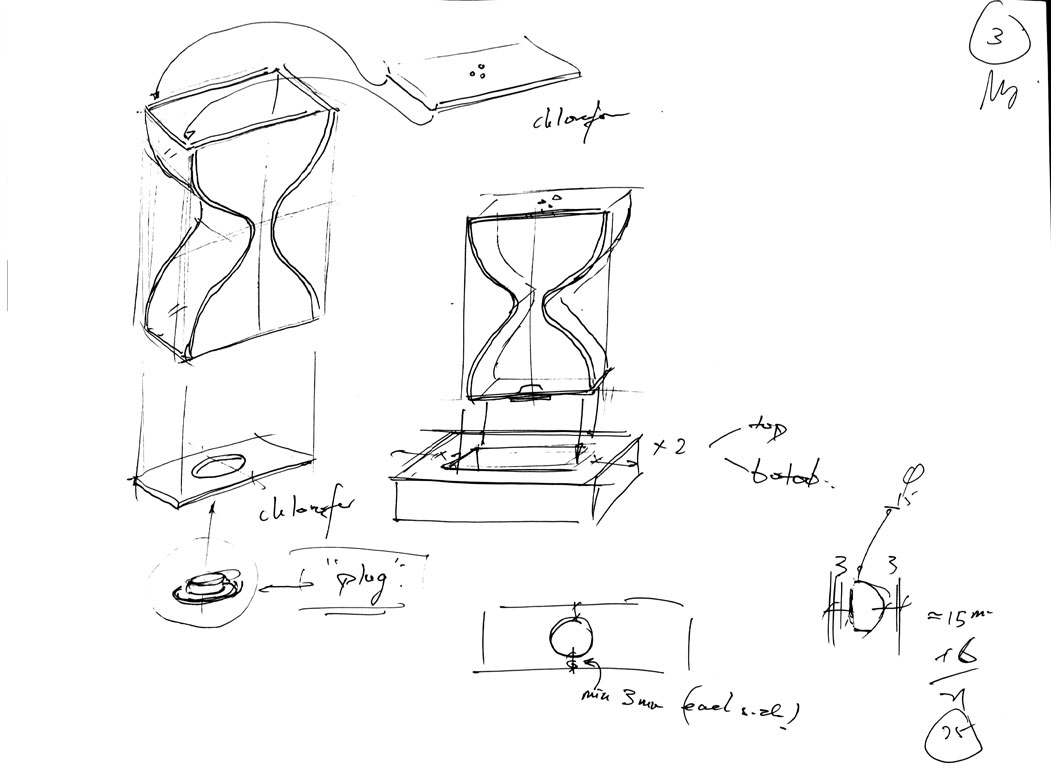
Below you'll see how I facilitated 2N1 Angeline Salt & Pepper Storage over a time period of 30 minutes or so. Angeline final concept (not shown), was a skinny (side-view) 'hour-glass' shaped holder made of acrylic, and wood at the top and bottom as support. However there were difficulties in working out how to develop the parts to dispense Salt or Pepper, for re-fill and to able to keep all the little parts intact all the time.

Page 1:

My first task was to help Angeline understand different possible ways to construct the 'hour-glass' concept. She already had it worked out from a series of idea generation and refinement rounds to come out with the two flat 'hour-glass' panels cut out from a single acrylic sheet and covered using a formed acrylic strips at both open-ended sides.

At Secondary TWO, I would expect she might have some technical difficulties in actually making it work. So in the example above, I started clarifying how the base of the holder may be constructed from a single piece of Jelutong wood, which in turn depends on the width of the 'hour-glass' design. And put a note for her that we need to consult the Workshop Instructors to see if 'cutting' a rectangular slot in the wood is possible.

We also discussed that the allowance left after 'cutting' from the slot to the edge of the wood cannot be too thin as that would make the stucture weak. We need to work out the width of the 'hour-glass first'.

Page 2:

Forming the curved acrylic strip shape to fit the sides of the 'hour-glass' needs to be planned carefully. Making use of Angeline's original process to construct the 'hour-glass' the process was further refined including other possible ways to construct it. Throughout page 2, the emphasis is on how formers (a male and a female) could be used to create the exact curve she needs for both sides of the 'hour-glass'.

When you see #1, #2, and so on in page 2, those were referring to the steps I drew on paper as I described how each process can be completed to create the formers needed, and at the same time aims to cut-out the 'hour-glass' shaped design - all in a single process.

It is important to make sure that the shape of the former has exactly the same curvature on both ends on the 'hour-glass' shape. That is why the wooden former and the acrylic 'hour-glass' shape is cut together. Both the former wood and acrylic can be secured together using double-sided tape.

Page 3:

Finally we come to the part to talk about Salt or Pepper dispensing and how to go about making that. The simplest soluton is to find some sort of 'plug' which can be found in some medication bottles, e.g. the PiPa Gao bottle (in Chinese 枇杷膏). That can go to the bottom part. The top part is another similar acrylic strip with tiny drilled holes for 'dispensing'.

Measuring the diameter of the 'plug' will lead you to the width of the bottom 'plug' acrylic strip. After explaining the rationales about giving allowances from the drilled hole to the edge of the acrylic, the width of the bottom 'plug' acrylic strip is quickly worked out.

The rest of the dimenions on the hour-glass body is left to Angeline to work out on her own.

Conclusion:

That was one happy successful consultation session. Angeline was able to show her understanding from the discussion and this is possible because she had already been working on the processes of making for some time. A lot of thoughts were evident through her design journal especially at the refinement phase. The details of measurements and how a single acrylic sheet could be subdivided to maximize material usage, etc is impressive for a 13 year old.

My job was to help her refine and shorten the processes by introducing alternative techniques and approaches that she might not have thought of. Sometimes radically changing the processes.

In the end, Angeline still got to make a decision on the final processes.

Those were my drawings all right... but Angeline would need to bring that home, recall our discussions and come out of her own version.

That's quite a challenge. But I believe with Angeline's keen attitude, the Hour-Glass Salt & Pepper Holder will surely turn out just as designed.

07 March 2012

D&T Field Trip 2012 to Ngee Ann City & Orchard Central

Trip #1
TUE, 13 March 2012
9 students = 7*4N2 + 2*5N1/2

Aeneas, Baowen, Nicholas, Toh Hao, Sabrina
Amalina, Farhana, Bernice, Shu Yun

Trip #2
WED, 14 March 2012
9 students = 8*3A2 + 1*5N2

Hafiz, Gubera, Haziqah, Addistia, Eileen
Wendy, Adeline, Xiu Yi, Li En

!! Please make sure you know which trip you are in. Not sure please ask !!

Meeting Place
Bukit Batok MRT Station @ 1200hrs

Field Trip Duration:
1200hrs - 1630hrs

Teacher-in-Charge:
Mr Daniel Lim

Itinerary
Ngee Ann City & Orchard Central

[How about MUJI in ION first, then...]
1st -stop: The Better Toy Store
2nd -stop: ArtFriend
3rd -stop: Books Kinokuniya
4th -stop: Takashimaya Department Store
5th -stop: Molecule Living @ Orchard Central

What to Bring:
  • A little notebook to sketch or jot down notes + writing stationeries
  • Some $$$ ($5-10$ is enough) as we might be stopping over Foodcourts for discussions and to chill out.
  • Umbrella. We'll be walking and walking and walking.
  • Lots of enthusiasm. That will make the day GREAT.
What to do, look out for and note:

@ the Better Toy Store
  • Category of Toys (e.g. educational, for amusement or entertainment, etc.)
  • Age Group vs. Type of Toys (e.g. functions, movements and mechanisms, size, number of parts, choice of material and color, etc.)
  • Gender vs. Types of Toys (e.g. color choices, shapes and aesthetics, etc.)
  • Age Group vs. Educational Toys (e.g. learning contents, level of difficulty, etc.)
  • etc.
@ the Molecule Living Store
  • Innovative Concepts (e.g. common stuffs turned innovative, etc.)
  • Clever Concepts (e.g. different/alternative ways to achieving common functionalities, etc.)
  • Clever Forms and Aesthetics (e.g. clever and meaningful adaptations of forms to functions, inspirations from nature, etc.)
  • etc.
Be prepared to write reflections after the trip. =)

IMPORTANT
Due to some unforeseen circumstances, if you cannot make it on the day, please make sure you inform your friend or alert me the day before via Facebook or email.


Additional Information


For those who did not register for the field trip for some reasons, below are websites to the places we are going for your reference and research. Very good information about children toys in The Better Toy Store.

http://www.thebettertoystore.com/
http://www.moleculeliving.com/

Design Coursework - A Bird's Eye View on the Process

An overall view of the design process and how your design journal journey may look like.
Use this as a reference. Read the other posts for more detailed explanations on the different parts of the design process.

28 February 2012

How to Use S.C.A.M.P.E.R. for Idea Generation (Concept Borrowing) and Development

2012 Secondary 2N1 Project:

Dining Accessories

@ the idea generation and development stage

I taught the students the technique I called 'Concept Borrowing' for idea generation. The first step is to start off with lots of innovative concepts for 'borrowing'. The table concept (in red) is one existing innovative product. This table top idea is a colored-paper storage which is designed to double up as a drawing table for children. That is VERY CLEVER! The idea of multi-color and layering table top can be adapted and transformed into an idea for a possible dining table. In this way an idea can be quickly generated and ready to be refined and modified to suit the needs for the current design situation.

NEXT... the S.C.A.M.P.E.R. technique in Action

The SCAMPER Technique in Brief

I taught my students the S.C.A.M.P.E.R. technique to generate ideas with the focus on 'Adapt' to kick-off ideas. Students are required to research on various general type of storages. Different from when they have chosen to design and make.


A Quick Example on using the S.C.A.M.P.E.R. Technique

The example is an example of 'concept borrowing'. What it means is to identify innovative functional concepts of various storage solutions and 'adapt' their functionality to their intended project. By using 'concept borrowing' the student generating ideas can basically turn any existing concepts literally into anything they want. This not only helps a great deal in starting the ideas generating process, it also enables high quality concepts to begin with as initial ideas. These ideas can be accessed, combined, etc, selected and developed at a later stage.


Idea Generation and Development focusing on FUNCTIONALITY

The above example shows an existing (drawn) Key Storage Concept. Notice how exactly the way it holds the key tag is 'copied' and 'adapted' as a note holder? The borrowed concept is then further worked on, improved and modified to make sure the idea works and works well as intended.

Idea Generation and Development focusing on FUNCTIONALITY then AESTHETICS

The example above shows again a summary on generating ideas focusing on Functionality. It is important to think about how to design things that will truly work. At this stage, I will expect to be commuting frequently to the workshop to work on models and prototypes to test my assumptions. To make sure my ideas do work.

At the lower half of the example, you'll notice I've started toying with shapes and forms. Adjusting the solutions proportion and further modifying its overall appearance. It is normal for ideas to keep flowing in as you think and thinker with ideas and improvements. Sketch and note everything down. And have lots of fun doing so.

=) Let me know if you liked this section. =)

A follow up for the  S.C.A.M.P.E.R. Technique, click 'HERE'.

16 February 2012

Design Journaling Common Mistakes to Avoid


.......................................................................


you can avoid as you work on your design journal.

.......................................................................

Good and Not-so-Good (Yet) Design Journal


Good Piece of Work
A good piece of work is meaningful. It is clear and is produced with clear objectives. The process from 'need' identifications to the completion of the product or a prototype is informative and lively. The piece of work shows the unique character of the person and his approach to solving the design challenges or opportunities he has identified.

To do this, you need to first have the desire for quality work, and secondly, in addition with adequate dialogues with your teachers, to continuously refine the best approach for your coursework. You may end up having to do less that you expected.

Difference between Facilitation and Spoon-Feeding

You also need to understand the difference between being 'facilitated' and being 'spoon-fed'.

Spoon-feeding is easy. Being 'facilitated', you need to do some thinking and analysis on your own for things to work.

You will expect questions being asked about your approach, your rationale of doing things in a certain way, etc. The objective is to tease out your understand and your 'style' and approach and then to lead you to make progress. Basically, you are being 'helped' to arrive at 'what is right or wrong, 'what to do now', 'what to do next' or 'some possible solutions' on your own through 'facilitation'.

Not-so-Good (yet) Piece of Work
On the other hand, mediocre pieces of work usually lacked rationales and evidences on why things are done they way it is. Researches and contents are touch and go - with the mindset of doing work just to get by. Usually the sections within the journals from one design stage to the other hardly flow from one to the next. Nor are they being 'arrived at' from the previous sections. The requirement to think to work things out is quite a chore.

Download a copy of common Design Journaling Mistakes which you can avoid as you work on your design journals.

16 January 2012

Definition: Design + Opportunity

de‧sign

1. [uncountable] the art or process of making a drawing of something to show how you will make it or what it will look like
The new plane is in its final design stage.
the design process

2. [uncountable and countable] the way that something has been planned and made, including its appearance, how it works etc
The car's design has been greatly improved

3. [countable] a drawing that shows how something will be made or what it will look like
the design for the new sports centre


op‧por‧tu‧ni‧ty plural opportunities

1. [uncountable and countable] a chance to do something
2. [countable] a chance to improve an existing situation at work