
Every students’ first idea about what they want to design and make.
But how can pencil holders be out of the ordinary, not the usual box and slot type?
Ideas Generation


First steps to ideas generation is always the exploration stage.
Nothing fanciful at this stage. I’m just exploring how to hold a piece of papers starting with a simple block. It’s not a time to think about shapes and forms now unless the challenge is ‘form before function’, which is not the case now.
Using block as a starter helps me focus better on the function - about how to make things work. About how to make holding a piece of papers effective, easy, and maybe fun.
Ideas about using curved slots to hold paper is not new in my experience. I’ve explored ways to hold notes quite extensively 10 years back. I will not be repeating them here but you can find various posts related to note holders here.
But I’ll give you a quick summary about the curved slot concept.
Paper tends to want to stay flat when you bend it.

That’s the elasticity in the structure of paper. Making use of this principle, I figured out if I have a narrow curved slot compared with a straight one, the paper can be held in place as it tries to straighten out but couldn’t. It’ll remain ‘stuck’. On the other hand, it’ll slide out easily if it’s a straight slot.
Exploring more Ideas into the Refinement and Development Phase

Before this students’ work in D&T had been craft like, mainly functional ornamental works which I find lacking thoughts, emotions, and any fun at all.
The Final Concept Ready for Rapid Prototyping

I drafted the final concept in various perspectives while working out if the idea would work in real life. By this time I’ve already gotten the critical dimensions of a typical pencil. Worked out a rough form and proportion of the design.
I’ve always emphasised with my students it is very important to include the items to be held when presenting their ideas. Most students would draw a holder, but without the items they are intended to hold. This way of designing has several problems:
- You cannot gauge if the holder will be the right size without the items drawn in, proportionately.
- You cannot tell if the product would work because there is no context to the holder. It is holding nothing.
- You will always have the illusion that it will work.


To build the form of the dog, building it one block at a time will take too long. Making slots at the mouth will involve multiple steps that require many steps with negative cuts. With the ‘Sketch’ tool, the profile of the dog can be sketched out easily.
The image on the left shows shadows (translucent orange) of ‘hole’ shapes used to cut the other slots in the design.
Tinkercad Model Breakdown


Above Left: Here you can see the 3D model of the dog profile and its respective ‘hole’ shapes for the pencil and paper slots.
Above Right: That is another variation using the same dog profile from the left. In this design I cut a circular top for a pencil to rest on, instead of putting it through a vertical slot.
In this example I’ve shown that once you have a base design, you can then copy and modify it later into other variation. This step is useful if you want to test different design configurations or to find out which works best.
Contextual Presentation


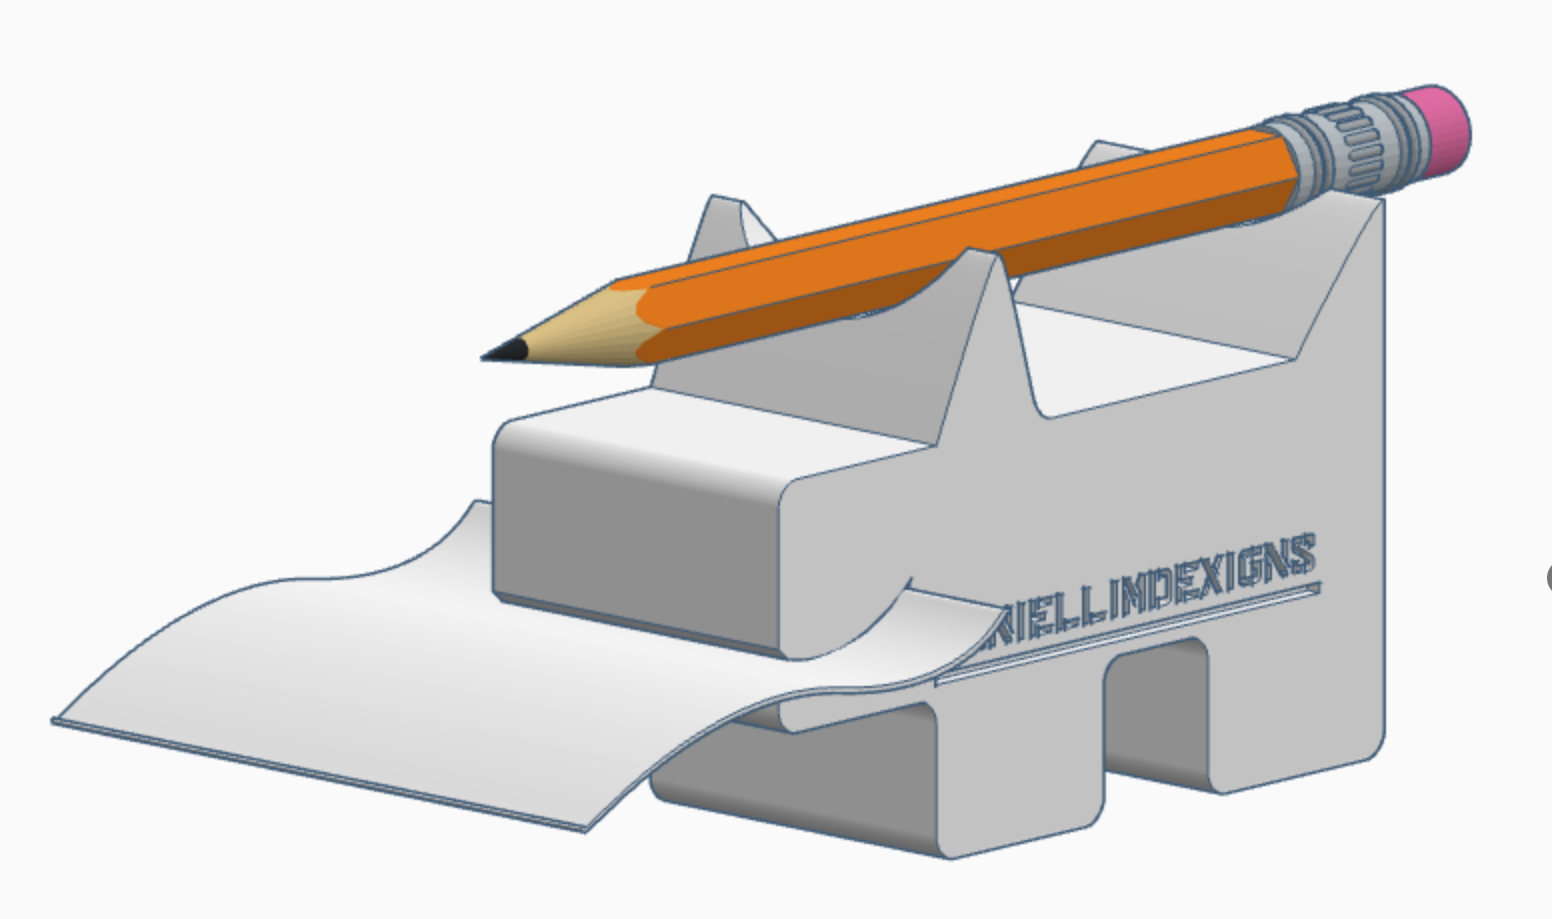
A quick model mock up of how the holder may look like with its respective items. I found the pencil from the search function. And I used the sketch function to draw the paper.


Two variations of the Doggy Note & Pencil Holder
The moment of truth - if the idea or concept works or not - is in the 3D print out.
I made a couple of iterations to the gap of the mouth to make the paper ‘stick’ better and not slide out too easily. A curved gap of about 1mm is good but printing the holder vertically posed challenges to the horizontally orientated mouth. The top curve will need to be supported. I chose the ‘tree’ support from the print bed.
The larger curved slot at the back are for additional papers, and that too cannot be too wide. If the gap is too wide the stack of papers will feel loose on the holder. Mine is about 4mm wide at the back. Trying to store a few pieces of papers on any gaps more than 4mm wide, even if it is curved, will feel weak as far as grip is concerned.
Overall, the prints turned out quite well. What I need to work on next are 3D printing settings to optimise print time and print quality.
I hope you like this post. Let me know what you think. Or share with me what you would like to see in my future posts.
#3Dprint #tinkercad #productdesign #pencilholder #noteholder #innovation
Like my contents? Support me, support my work? Buy me a Coffee? https://www.buymeacoffee.com/mrdanielsos


In 2025, businesses are experiencing an unprecedented transformation as artificial intelligence becomes the cornerstone of IT service integration. With global IT spending projected to reach $5.75 trillion, representing 9.3% growth over 2024, CompTIA Deloitte Insights, companies are moving beyond pilot AI deployments to embed intelligent systems directly into their business workflows.
ReplyDeleteLeveraging IT Services for Business Growth
IOSBET | Agen Resmi Slot Thailand Gacor dengan Akses Login Terbaru
ReplyDeleteIOSBET hadir sebagai agen slotThailand resmi gacor dengan akses login terbaru, layanan cepat, anti lag, dan peluang maxwin konsisten.
Digital transformation reshapes businesses. page
ReplyDeleteTechnology plays a key role in scientific research. resource
ReplyDelete