Need Help?

For students managing design work, sketching, deadlines, and creative pressure — and for educators seeking greater clarity in their teaching — this blog offers focused, practical support in Design & Technology, from visual communication and design process thinking to digital fabrication. For those seeking more tailored support, I am also available for student consultations and teacher workshops. Since 2007, DesignJournalSOS has helped readers navigate real classroom challenges with grounded strategies and insight. Have a question or topic you’d like explored? Your reflections are welcome — they help keep this space alive and growing. Copyright © 2007–2026 Daniel Lim
Showing posts with label Isometric Drawing. Show all posts

11 December 2025

Isometric Drawings Basics and Applications

Welcome back to the basics. In this post, let's talk about ISOMETRIC drawing ... (again). 

(For past posts about isometric drawings, tips, techniques and practices, click >> ISOMETRIC)

The Isometric drawing is one of many 3D drawing techniques you can use to present your ideas. They are both useful and easy to produce, but they are not the best 3D simulation of an object.


Easy-Peasy

Easy because a basic block is simply three pairs of parallel line (see the gif presentation above). 

However, a simple as it may sound, most students struggle with getting the pairs of parallel lines right -- as a result, they often end up with distorted blocks. Look, this can get pretty mental, especially when one sincerely thinks he's got the parallel line orientations the right way, when in reality, they diverge in different directions. You can call that 'sleeping', or unconsciousness.

Unfortunately, the only way to get past this frustration is to develop a sense of awareness that the lines have strayed, and to be able to correct its path - and an intention to practice (getting them right). Which means sketching, and more sketching practices.

I have students who never seem to get past decent. The only reason seems to be -- no practice.

Usefulness

Definitely one of the most effective (and commonest) 3D drawing technique around. One isometric perspective shows all three views of a single object. 

The downside is when you have a looooooog object, this is where it begins to look funny. You know that when an object is far away, visually, they get smaller. Not that they become physically smaller, but perspectively, due to distance, they appear smaller. But that is not the case at all with an isometric drawing. You can have a full kilometer long 20mmx20mm cross section bar drawn full-scale on paper, the end of the rod will look just as big (or tiny) as the front. 

If you must solve that problem of forever-parallel-lines, the close cousin of isometric is the 2-point perspective. Just in case you might be curious about who's the cousin of 1-point perspective -- that's the oblique drawing.

Applied Isometric Drawings 

In the real world of objects and products, things are more than just three pairs of parallel lines.

In addition to learning how to draw a basic 3D isometric block (long, short, wide, narrow, fat, skinny, and so on), you've got to be able to manage slopes, curves, slots, holes, debosses and embosses too (see here >> ISOMETRIC). Have a look around you. Identify how many things you have that is a square block. Probably none.

The example (below) shows the evolution of ONE basic 3D isometric block, expanding into an infinite surficial possibilities. Generally, the following list are three extras mixed into and/or added to a block, to make any known or imagined forms: 

1. block cuts and add-ons (stack ups)

2. slope cuts (non-isometric lines)

3. ellipse (holes, fillets)

One VERY IMPORTANT (or rather, INTERESTING) point to note, is that, each of the three extras listed above MUST (or preferably) be generated from ... an exactly proportioned isometric block.

Look closely at each drawing. You'll notice in every cut, slot, hole, slope, and so on, is a guide-box. A square (or rectangular) cut is another wire-framed box within or outside (stacked or extended). A non-isometric slope is derived from two points marked on two isometric edges. An ellipse (the isometric perspective of a 2D circle) - from an isometric surface - on both ends of a block makes a cylinder, or a flat-topped cone.

Isometric Drawing, Isometric Sketch, Drawing Technique, Technical Drawing

Conclusion
The isometric drawing technique is a useful tool both in sketching and drawing, throughout the design process. They can be used for quick ideation sketches to detailed working drawings. Anyone can learn how to sketch and draw an isometric. But a decent and convincing sketch is more than just technical proficiency. Sketching and drawing is an ART - a line has flow and life. Every stroke is significant line from light drafts, to pin-point guides, to the last finished line.

For more examples, look here > ISOMETRIC). You may find something relevant and useful for your learning and exploration. Email me if you wish to see an expansion or demonstration on how to draw any of the isometric drawings you see above.

#IsometricDrawing #TechnicalDrawing #DesignSketching #3DSketching #ProductDesign #DrawingBasics #DesignEducation #DTeducation #VisualCommunication #SketchPractice #IndustrialDesign #EngineeringDrawing #PerspectiveDrawing #DesignSkills #SketchTips

If you like my contents and wish to support me, 
Support me, support my work? Buy me a Coffee? https://www.buymeacoffee.com/mrdanielsos


01 March 2022

Three-Point Perspective Objects into Simple Manageable 3D Isometric Forms

It is always a challenge for students to copy a real world object especially if these images come in the form of a photograph of a product. Or they might have taken a photograph of an object. The real world is always presented in its natural three-point perspective

To reproduce these references onto paper, students often tries too hard to copy the real thing in its entirety realistically. This is not necessary. And it takes up too much time. 

It will be good enough to be able to capture it’s essence, it’s general shape and form. Only later to study it’s function and features. From the simplified version and perspective. 

In this case, we attempt to represent the real thing in simple 3D Isometric blocks. You don’t need to include the minor curvatures and texture and patterns on the real thing.

Omitting these details do not affect the quality of your explorations on their functionality.

Watch the video to find out how you can do this. You may wish to follow the video and practice it on your own. Pause anywhere you wish along the video as you follow through the steps.


Three-Point Perspective Objects into Simple Manageable 3D Isometric Forms

In this video I show you the steps of getting this done with an example of a bar stool chair:

  • First we interpreted the real world three-point perspective image of the chair by drawing major blocks over the reference. 
  • Then we present it on 2D Front and Side Orthographic views. 
  • Finally  we use these references to produce a 3D Isometric version of the real thing.

  • If you like the video and my contents, please Subscribe, LIKE and Share. 

    Let me know in the comments what else you like to learn and watch.

    FOLLOW and LIKE on Facebook to get updates as soon as a new post is up: https://www.facebook.com/designjournalsos

    Support my work? Buy me a Coffee? https://www.buymeacoffee.com/mrdanielsos

    20 February 2022

    Introduction to 3D Drawings for Coursework: Oblique | Isometric | 1-Point & 2-Point Perspective Drawings

    FOLLOW and LIKE on Facebook to get updates as soon as a new post is up: https://www.facebook.com/designjournalsos

    .............................................................

    3-Dimensional drawings are as essential as 2-Dimensional ones in presenting ideas in the Ideation and the Development stage in the coursework. 

    They are also useful in helping research come alive where you can use them effectively, e.g. in illustrating how products works, etc. However, it is good to note that 2D sketches are quicker in presenting initial ideas in the beginning. the 3Ds can come in a little later to compliment and enhance the visual communication.


    Types of 3-Dimensional Drawings

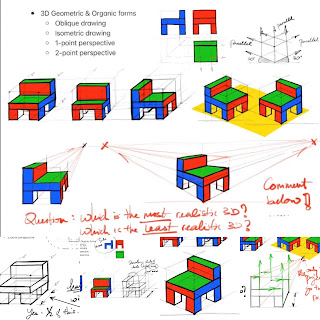
    Which type of 3D drawings to use in your coursework depends on your ability to sketch them fluently. The 2-Point Perspective drawings are the most realistic amongst the rest, but they require more experience in sketching to be able to apply that technique quickly and. effectively. After all when you are actually DOING your coursework (especially if you are doing it as a graduating student) I don’t suggest you will be learning how to draw a 2-point perspective as you make your way through the journal.

    The learning part must come well before you plan to employ them in your coursework. So if you are a graduating student and if the Isometric Drawing is the best you can perform, then use that. And forget about the 1-Point perspective. Leave the 2-Point out. Don’t even think.


    However if you are a keen student and you knew about all these cool techniques you can use, the oblique drawing is one of the simplest BUT the least realistic. Next is the Isometric drawing. The 1-point perspective is one step better than the Isometric. And of course the ultimate will be the 2-point perspective drawing. Look at the image above. And see for yourself which is the most and the least realistic type of drawing. And which do you want to MASTER for your graduation coursework.

      
    Above: Video and music ONLY

    Below: Video, music AND Voice-Over 

    The voice-over edition you will hear me chat about common mistakes along with important tips & guides when you learn to draw these 3-D drawings 

    Learn all the basics and master them. 

    After that you can bend and break the rules, whichever you pleased.

    Subscribe to the youtube channel if you think that is useful. Let me know what you wish to watch and learn.

    If you like the video and my contents, please Subscribe, LIKE and Share. 

    Let me know in the comments what else you like to learn and watch.

    FOLLOW and LIKE on Facebook to get updates as soon as a new post is up: https://www.facebook.com/designjournalsos

    Support my work? Buy me a Coffee? https://www.buymeacoffee.com/mrdanielsos

    18 February 2022

    Sketching & Drawing 2: Basic 2D Orthographic Projection (example: A Low Back Chair)

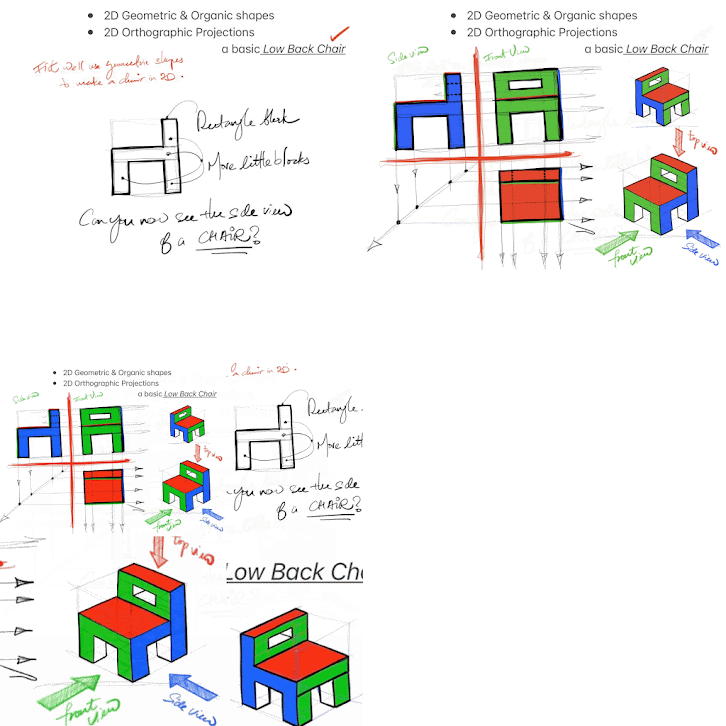
    The need for an orthographic projection is a slightly more advance step into the design process. However the orthographic projection can also be very effectively used to  quickly illustrate an idea in different views. 


    Using a 2-dimension approach to do that can speed up the process of drawing, yet achieve a similarly good objective. This approach to using orthographic projections at the early stage of design may be useful for students who may not be able to sketch in 3D quickly yet. 

    So putting on paper in 2D views to illustrate an idea first is a good strategy. Once that is done the student may wish to work out later how a 3D presentation can be done.


    To produce an orthographic projection, since you will notice it is a 2D sketch or drawing, you will require again various combination of blocks to help you establish the relationship between parts of the objects before you draw the object as a whole. The need for guidelines cannot be further emphasised. 

    Many students draw without using any guidelines. These sketches were never good. If there are they will be VERY rare.


    Subscribe to the youtube channel if you think that is useful. Let me know what you wish to watch and learn.

    If you like the video and my contents, please Subscribe, LIKE and Share. 

    Let me know in the comments what else you like to learn and watch.

    FOLLOW and LIKE on Facebook to get updates as soon as a new post is up: https://www.facebook.com/designjournalsos

    Support my work? Buy me a Coffee? https://www.buymeacoffee.com/mrdanielsos

    17 February 2022

    Basic Isometric Tutorial: Using Isometric Blocks to Build and Cut: Basic 3D Forms

    Isometric building blocks are essentials to create complex forms.

    In the following examples you see how basic blocks can be transformed into a more complex block structure. This is imaginary of course. But there is no rules here when it comes to practicing drawing blocks. The point is to have some fun doing it.


    Use guide points and lines to help you locate the start and end of a slope or a curve/rounded edge. This is the ONLY way you can plot an accurate slope on an isometric plane. Add a little bit of dimensions in your creation by adding in some shades. You need to know where your light is coming from. And then shade the side where the light does not fall directly on.


    If you like the video and my contents, please Subscribe, LIKE and Share. 

    Let me know in the comments what else you like to learn and watch.

    FOLLOW and LIKE on Facebook to get updates as soon as a new post is up: https://www.facebook.com/designjournalsos

    Support my work? Buy me a Coffee? https://www.buymeacoffee.com/mrdanielsos

    Basic Isometric Tutorial: How to combine Isometric Blocks & make them Meaningful - Basic Isometric Furnitures

    Isometric building blocks are essentials to create different forms.

    In fact, if you can draw blocks of various sizes and proportions at ease, and in any orientation you wish, you can draw basically ANYTHING on earth. Yes. Really.

    In the following examples you see how 3 basic blocks can be transformed into simple isometric furnitures you can easily find at home. 


    Do not worry about the details yet. If you are a beginner, it is good enough to be able to combine blocks to make anything up. If it looks like a chair you’ve got it. Leave the details and intricacies later.


    Other details which you may notice in a real world furniture like textures, joints and curves, etc. These you will be able to slowly add them in. But for now, stick with the basics first.


    If you like the video and my contents, please Subscribe, LIKE and Share. 

    Let me know in the comments what else you like to learn and watch.

    FOLLOW and LIKE on Facebook to get updates as soon as a new post is up: https://www.facebook.com/designjournalsos

    Support my work? Buy me a Coffee? https://www.buymeacoffee.com/mrdanielsos