Need Help?

For students managing design work, sketching, deadlines, and creative pressure — and for educators seeking greater clarity in their teaching — this blog offers focused, practical support in Design & Technology, from visual communication and design process thinking to digital fabrication. For those seeking more tailored support, I am also available for student consultations and teacher workshops. Since 2007, DesignJournalSOS has helped readers navigate real classroom challenges with grounded strategies and insight. Have a question or topic you’d like explored? Your reflections are welcome — they help keep this space alive and growing. Copyright © 2007–2026 Daniel Lim

22 June 2025

Dog Note and Pencil Holder – From Sketch to 3D Print with Tinkercad


Every students’ first idea about what they want to design and make. 

But how can pencil holders be out of the ordinary, not the usual box and slot type?

Ideas Generation


First steps to ideas generation is always the exploration stage. 

Nothing fanciful at this stage. I’m just exploring how to hold a piece of papers starting with a simple block. It’s not a time to think about shapes and forms now unless the challenge is ‘form before function’, which is not the case now.

Using block as a starter helps me focus better on the function - about how to make things work. About how to make holding a piece of papers effective, easy, and maybe fun.

Ideas about using curved slots to hold paper is not new in my experience. I’ve explored ways to hold notes quite extensively 10 years back. I will not be repeating them here but you can find various posts related to note holders here. 

But I’ll give you a quick summary about the curved slot concept. 

Paper tends to want to stay flat when you bend it. 


That’s the elasticity in the structure of paper. Making use of this principle, I figured out if I have a narrow curved slot compared with a straight one, the paper can be held in place as it tries to straighten out but couldn’t. It’ll remain ‘stuck’. On the other hand, it’ll slide out easily if it’s a straight slot.

Exploring more Ideas into the Refinement and Development Phase

In this series of sketches I’ve ventured into shapes and forms. Borrowed from the profile of a dog and the idea that the dog is bringing the owner ‘newspapers’ from the door, this is the familiar “Meaningful Design” design teaching approach back in 2009 where I presented in the MOE Design & Technology Conference 2009 to share the concept of bringing ‘meaning’ into ‘designs’ - where design tells a story. You can find the post here.

Before this students’ work in D&T had been craft like, mainly functional ornamental works which I find lacking thoughts, emotions, and any fun at all.

The Final Concept Ready for Rapid Prototyping


I drafted the final concept in various perspectives while working out if the idea would work in real life. By this time I’ve already gotten the critical dimensions of a typical pencil. Worked out a rough form and proportion of the design. 

I’ve always emphasised with my students it is very important to include the items to be held when presenting their ideas. Most students would draw a holder, but without the items they are intended to hold. This way of designing has several problems:
  1. You cannot gauge if the holder will be the right size without the items drawn in, proportionately.
  2. You cannot tell if the product would work because there is no context to the holder. It is holding nothing.
  3. You will always have the illusion that it will work.


To build the form of the dog, building it one block at a time will take too long. Making slots at the mouth will involve multiple steps that require many steps with negative cuts. With the ‘Sketch’ tool, the profile of the dog can be sketched out easily.

The image on the left shows shadows (translucent orange) of ‘hole’ shapes used to cut the other slots in the design.

Tinkercad Model Breakdown


Above Left: Here you can see the 3D model of the dog profile and its respective ‘hole’ shapes for the pencil and paper slots.

Above Right: That is another variation using the same dog profile from the left. In this design I cut a circular top for a pencil to rest on, instead of putting it through a vertical slot.

In this example I’ve shown that once you have a base design, you can then copy and modify it later into other variation. This step is useful if you want to test different design configurations or to find out which works best.

Contextual Presentation
 

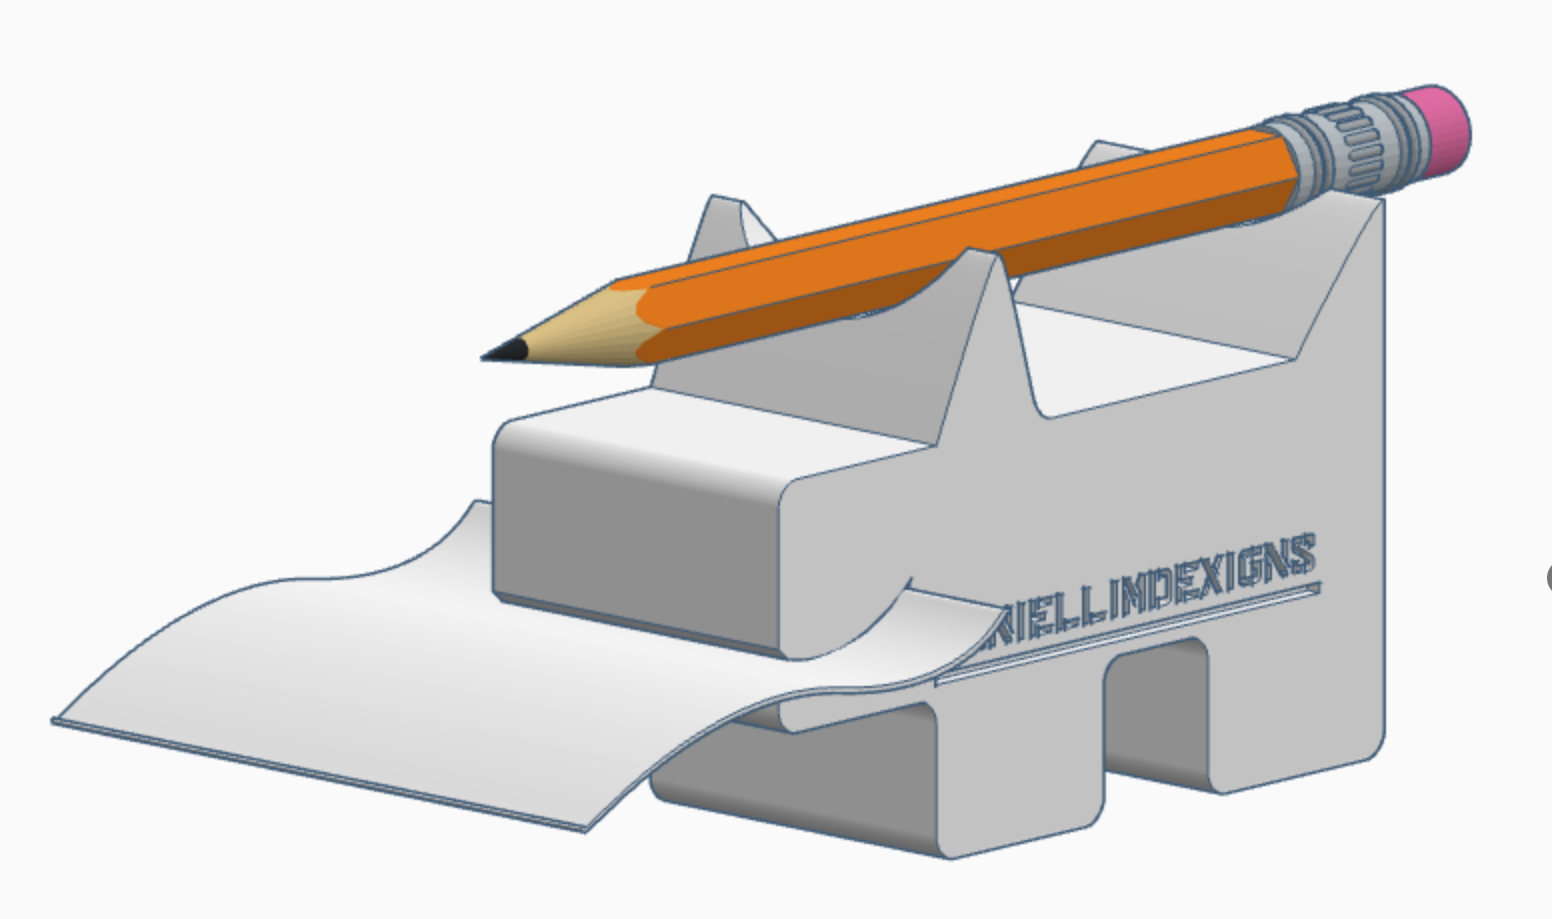
A quick model mock up of how the holder may look like with its respective items. I found the pencil from the search function. And I used the sketch function to draw the paper.


Two variations of the Doggy Note & Pencil Holder

Conclusions

The moment of truth - if the idea or concept works or not - is in the 3D print out. 

I made a couple of iterations to the gap of the mouth to make the paper ‘stick’ better and not slide out too easily. A curved gap of about 1mm is good but printing the holder vertically posed challenges to the horizontally orientated mouth. The top curve will need to be supported. I chose the ‘tree’ support from the print bed. 

The larger curved slot at the back are for additional papers, and that too cannot be too wide. If the gap is too wide the stack of papers will feel loose on the holder. Mine is about 4mm wide at the back. Trying to store a few pieces of papers on any gaps more than 4mm wide, even if it is curved, will feel weak as far as grip is concerned.

Overall, the prints turned out quite well. What I need to work on next are 3D printing settings to optimise print time and print quality.

I hope you like this post. Let me know what you think. Or share with me what you would like to see in my future posts.

#3Dprint #tinkercad #productdesign #pencilholder #noteholder #innovation

Like my contents? Support me, support my work? Buy me a Coffee? https://www.buymeacoffee.com/mrdanielsos

20 June 2025

Design a Snail Cup Coaster with Tinkercad with the "Sketch" Tool

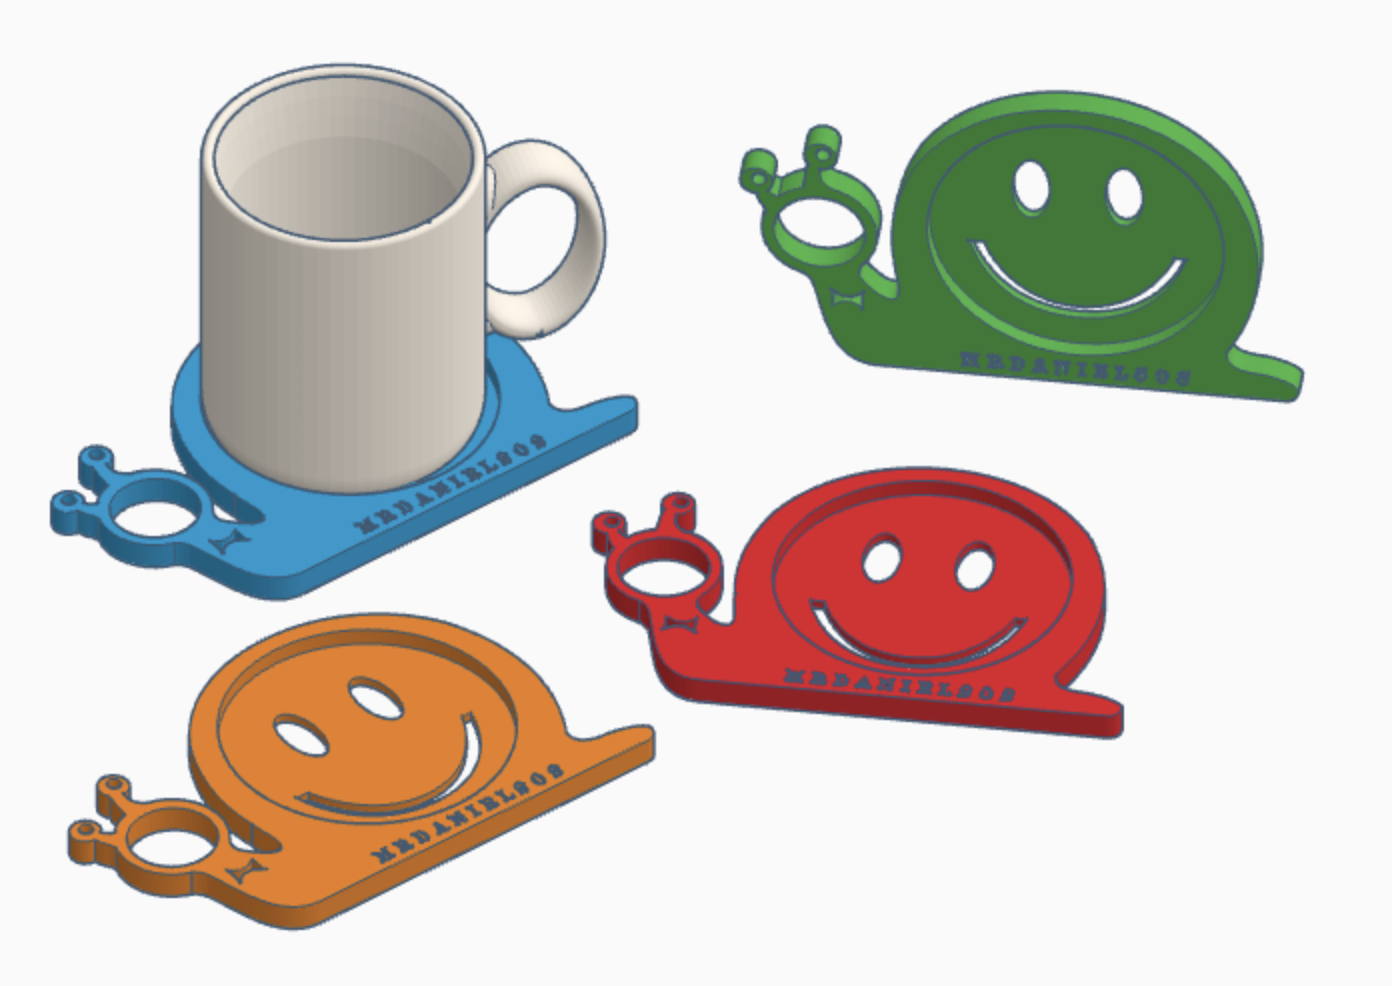
SNAILS Coaster Design on Tinkercad

The thought about making a snail coaster is not new. About a decade or more ago I designed a snail coaster and had it cut out with a laser cutter. Which was used a a door gift to all the participants in a Design & Technology teachers conference. 

SNAILS again

Here again I thought of snails when I begin tinkering with Tinkercad. Some things never change.

Don't they look so cute when you have a family of them?


TOP VIEW

45 Degrees View


How Do I Make This Profile in TInkercad? 

I am guessing you want to know how I made this. If you used Tinkercad you'll quickly understand that this snail profile will be extremely tricky if you use the basic combining shapes method. Not only that - you may go crazy.


Glad that I found the "Sketch" tool. This tool is an incredible feature. I cannot NOT use it as soon as I learned about what it is and what it can do in Tinkercad. While it's features with the pen tool cannot be compared with the likes in Adobe Illustrator - however once it's limitation & simplicity is understood - more complex shapes can easily be created.

Several layers of "sketch" took place to create the final snail coaster profile I was looking for. 

Something that was impossible for me in Tinkercad is now possibilities only limited by my imagination. 

------------

Want to learn Tinkercad and start designing? Feel free to contact me at mrdanielsos@yahoo.com.sg for more details.

Like my contents? Support me, support my work? Buy me a Coffee? https://www.buymeacoffee.com/mrdanielsos
 

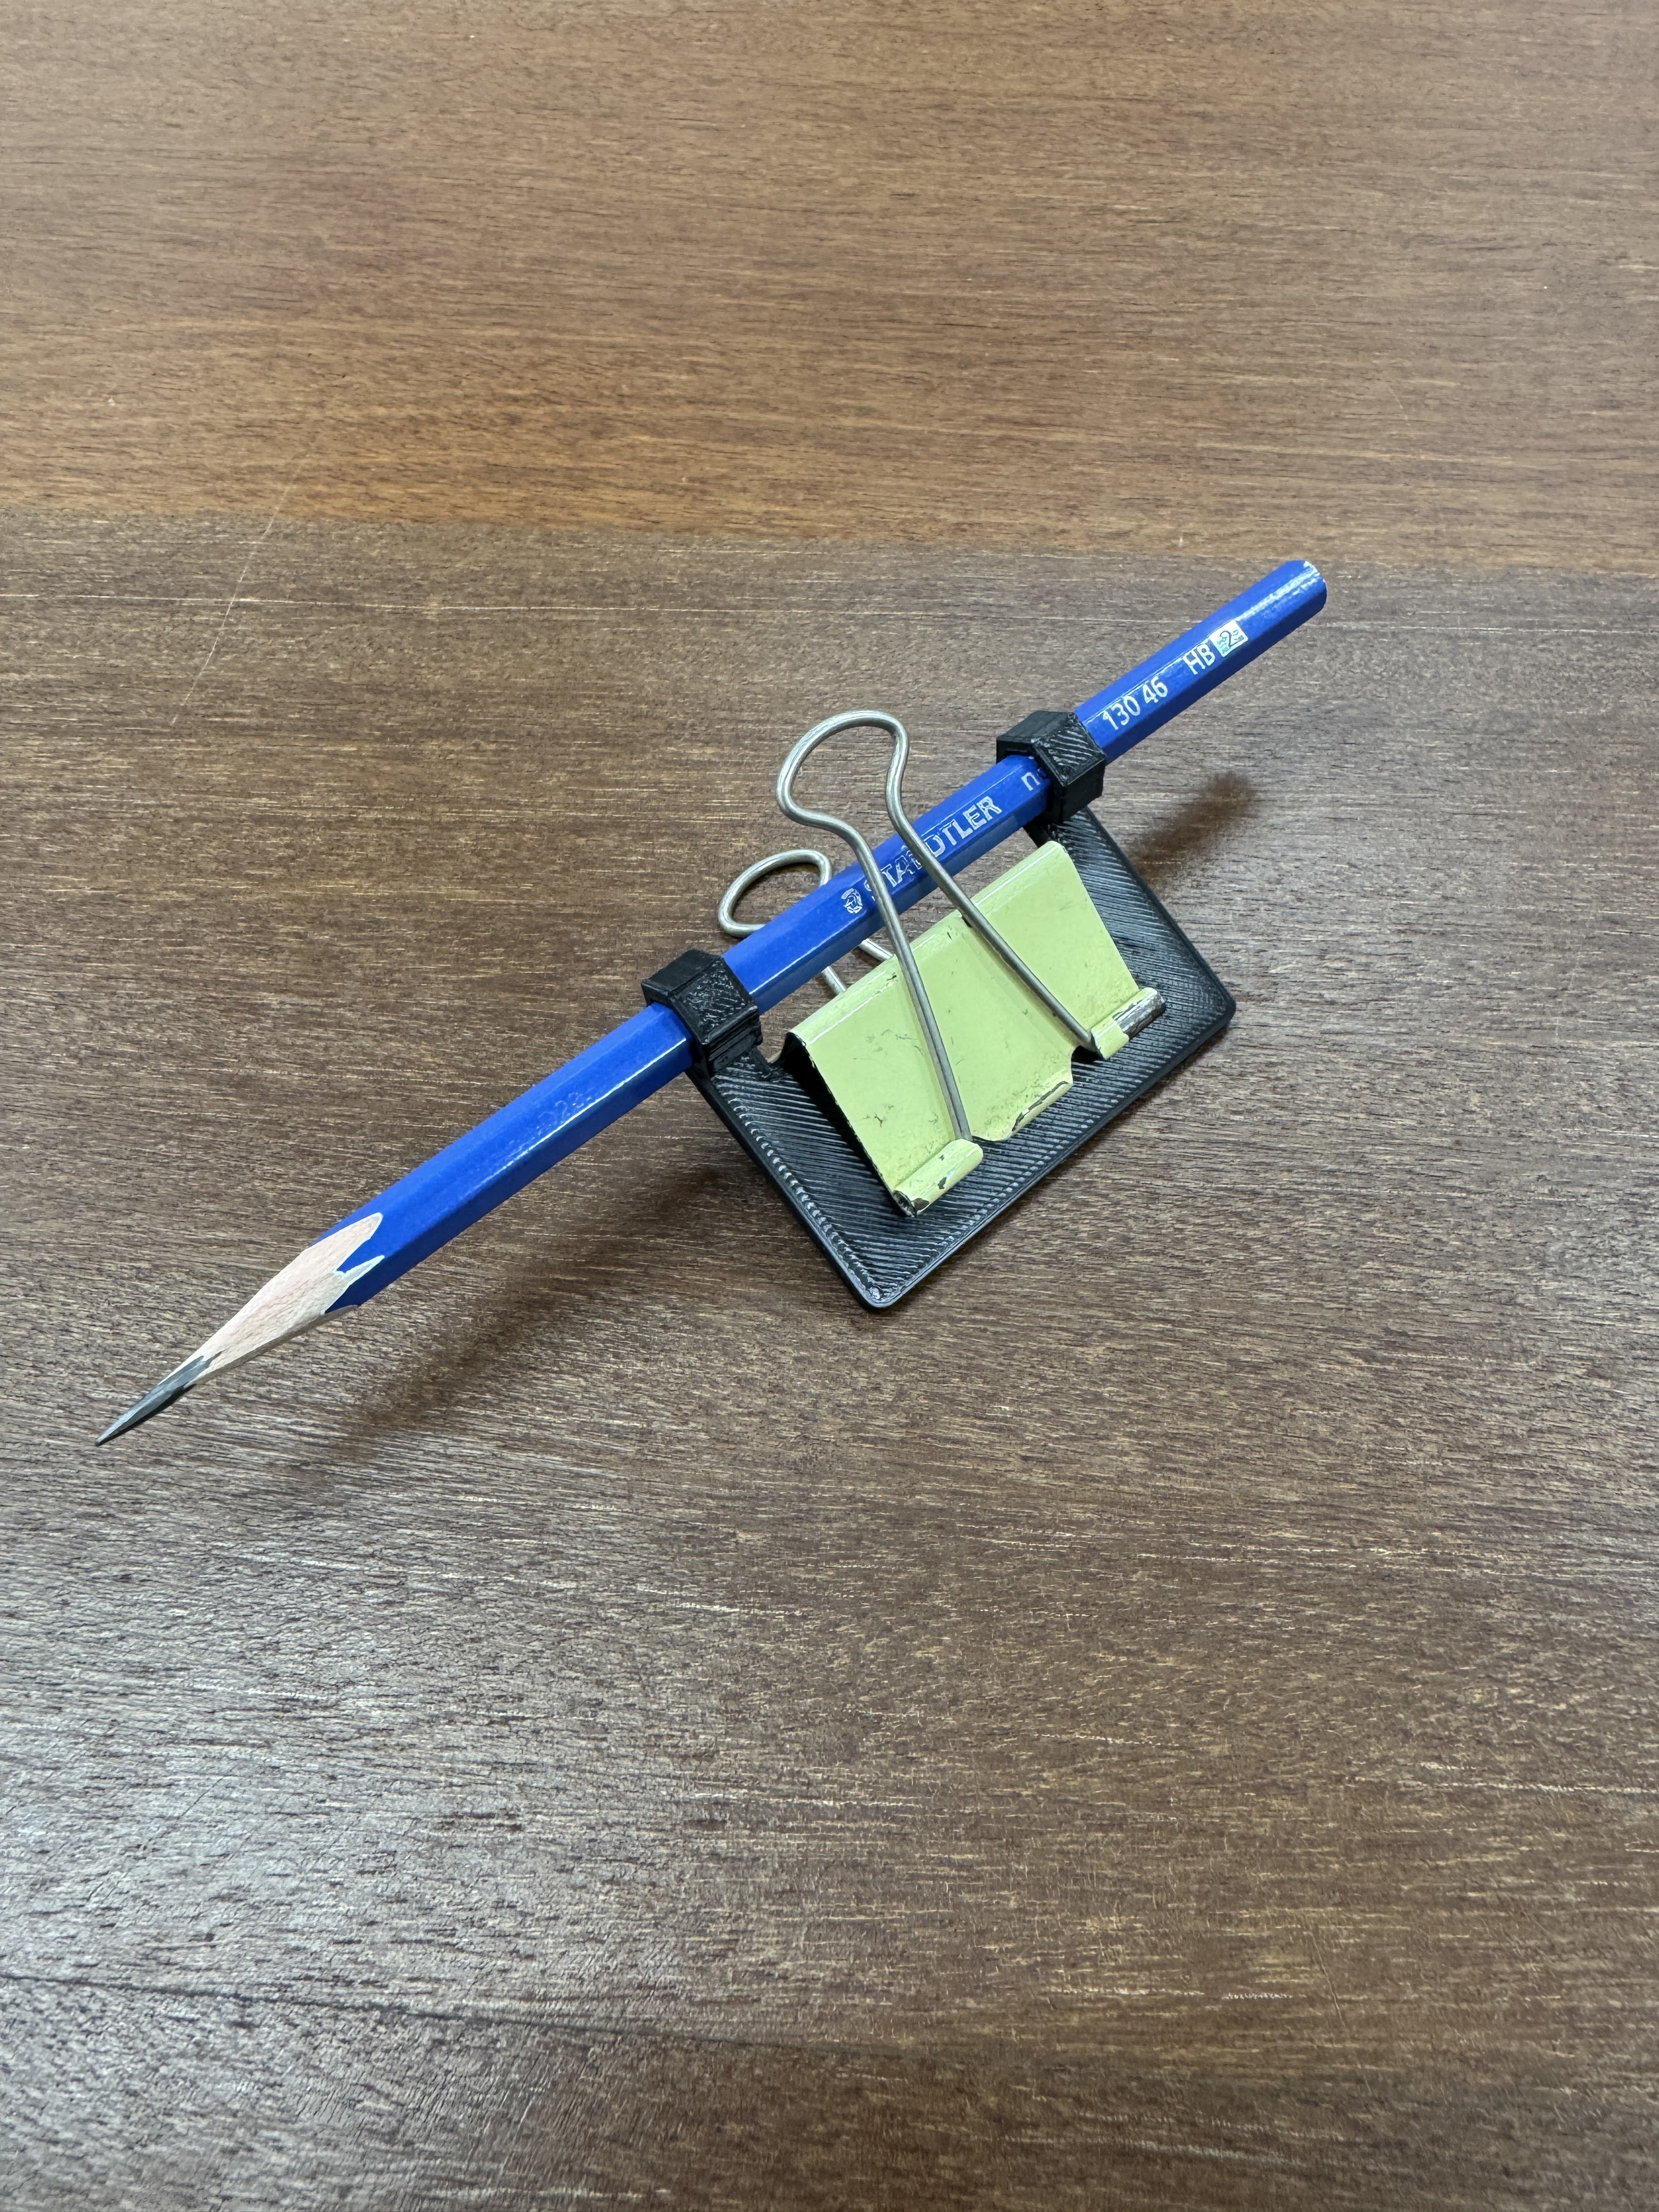
How to Design & Print a Clipboard & Pencil Holder with Tinkercad

What do you do with a clipboard?

You write.

What do you write with? A pen or a pencil.

Since I often draft my work with a pencil, I thought—why not make my own clipboard pencil holder?


Modelling the Idea

In the example above, you’ll see how I like to model my designs. I copy and paste each iteration as I go, partly to document the process and partly to save time—if I need an edit, a spare part or want to revisit an earlier design, it’s just a copy-paste.

It also makes for a clean presentation. You can easily follow the steps of the clipboard pencil development.


Functional Iteration: Add a Grip Gap

One of the key refinements was adding a gap to improve the pencil’s grip. Unfortunately the PLA filament does not have the elasticity to flex. And so I ended up with a full ring design.

Put to Other Use?

Interestingly, I  also played around with placing it in different locations—on the side of the table, for example—where it worked surprisingly well.


Let's get that thing to work. The Hexagon Problem

Here’s where things got tricky.

The pencil slots were intentionally designed as hexagonal meant to match the cross-section of a typical pencil. I accounted for the exact dimensions of the pencil in my 3D model—but forgot about tolerance.

The 3D printer has a 0.4mm nozzle. That means it will print 0.2mm both sides of the printer head. As a result, the pencil didn’t fit, the hole was too small. After widening the hole by 0.4mm and more, it fit but was still a little loose. 

If I were to redesign the slot, I’ll make it round.


This clipboard pencil holder works just as expected. It fitted perfectly with the double clip. It’s magical when the pencil seem to float behind the spine of the double clip. Taking the pencil out and putting it back is a breeze. Overall I quite like the outcome. 


Above: Close-ups of the back view

Lesson Learned: Prototype the Pencil Slots First

Here’s a key insight from the process:

Next time, I’ll isolate and print just the part that holds the pencil—and do it in a range of slightly different profiles (round, hexagon, and so on) and sizes. That way, I will be able to test all the options at once and pick the best fit before embedding it into the full design. This will save filament, time, and frustration.


Your Turn

I hope you enjoyed this creation.

If it sparked your curiosity, why not try designing your own clipboard pencil holder? It doesn’t have to be based on mine—but feel free to borrow the idea and evolve it into something that fits your way of working.

And if you do, I’d love to see what you come up with. Share your designs with me! 

------------

Want to learn Tinkercad and start designing? Feel free to contact me at mrdanielsos@yahoo.com.sg for more details.

Like my contents? Support me, support my work? Buy me a Coffee? https://www.buymeacoffee.com/mrdanielsos

12 June 2025

3D Printing in Design & Technology: Simple Classroom Projects That Work

3D Design and Print – Pencil Extender

Why buy something when you can design and print it yourself?

That was the question I asked when I first encountered 3D printing.

I’ve always enjoyed designing and making little things that work—objects with a purpose. From pencil holders to organisers for tools and stationery, I’ve built a variety of items to keep my workspace neat and functional. My making experience, until recently, had been grounded in traditional resistant materials using hand tools and machines. That changed when I started using 3D printing—not by choice, but by necessity (and I mean that in the best way). 

At my current school, 3D printing has become integral to the design process, especially when fast, precise prototyping is required.


Rapid Prototyping

Rapid prototyping is a powerful strategy to test, evaluate, and iterate design ideas quickly. CAD/CAM technologies—once limited to industrial use since their emergence in the 1950s and 60s—have now evolved into accessible platforms for both professionals and hobbyists. Today, they sit at the heart of modern design education and rapid iteration.


Learning CAD/CAM

Coming from a traditional background, I initially found learning CAD/CAM challenging. I’ve always believed that before I can teach, I must first reach a respectable level of proficiency myself. But time rarely affords the luxury of long learning curves. So I did what any good designer would: I experimented. I failed, adjusted, relearned, and practiced again.

Now, I’ve grown comfortable enough to confidently use Tinkercad, a highly intuitive platform perfect for quick and simple designs. It’s not about mastering every feature—it's about knowing enough to think and act in the medium.


Examples of My Designs

Dollar Coin Holder Key Tag

A compact keychain attachment that fits a dollar coin—ideal for unlocking shopping trolleys without needing to fumble through your wallet.


Pencil Extender
Designed to give short pencils a second life—simple, minimal, and effective.


Clipboard Pencil Holder
A small add-on that clips directly onto a clipboard, holding your pencil securely in place.


Other ways to use Clipboard Pencil Holder


Reflection

I’m far from an expert in 3D design, and there are many advanced features I’ve yet to explore. But the deliberate hours I’ve invested—tinkering (pun intended), refining, troubleshooting—have all been worth it. Now, I can edit and improve student designs on the spot. Many of them assume I’m an expert. Maybe that’s good enough—for now.

One of the most rewarding moments in class is when a student sees their finalised design materialise—layer by layer—on the 3D printer. That moment of awe, when their idea becomes a physical object, never gets old. It validates the entire process.


Final Thoughts

I encourage every Design & Technology teacher and student to embrace 3D design and printing—not just as a skill, but as a mindset. Even if your national syllabus, like Singapore’s MOE D&T curriculum, doesn’t formally include it, there’s still space to experiment. Use it to make small components, product features, or even hardware substitutes you’d otherwise have to buy off the shelf.

Here’s to more designs, more prints, and more possibilities.


Go, go, go.

#DesignAndTechnology #3DPrinting #Tinkercad #CADCAM #RapidPrototyping #STEMEducation #ClassroomProjects #TeacherMaker #DigitalFabrication #ProductDesign #TechEd #HandsOnLearning #StudentInnovation #EducationTechnology #DIYDesign

Like my contents? Support me, support my work? Buy me a Coffee? https://www.buymeacoffee.com/mrdanielsos


20 January 2025

LATEST Gantt Chart 2025 | Comprehensive Planning Tool for D&T Teachers & Students

Planning is the backbone of every successful project.

The LATEST Gantt Chart 2025, now available in both PDF and editable Excel formats, is my most updated and most comprehensive version to date—designed to revolutionize how teachers and students manage their time and tasks.

Why Use a Gantt Chart?

A Gantt chart is more than just a schedule—it's a visual roadmap that breaks your project into manageable chunks, showing what needs to be done, when, and by whom. For D&T students, it ensures clarity on milestones like Needs Analysis, Ideas Conceptualization, Development, and Prototyping. For teachers, it’s a powerful teaching tool to demonstrate real-world time management and guide students toward organized workflows.

How Teachers Benefit

  1. Simplified Teaching: Use the chart to explain the design process step-by-step, reinforcing key attributes like planning and monitoring.
  2. Interactive Learning: The editable Excel version lets you customize the template to match your lesson plans, making teaching more engaging.
  3. Time-Saving Tool: With a pre-made structure, you can focus on guiding students rather than creating schedules from scratch.

How Students Benefit

  1. Stay Organized: Students can visually track their progress, ensuring no deadlines or stages are missed.
  2. Build Independence: With the editable Excel version, they can adjust the chart to suit their project needs, fostering ownership of their work.
  3. Focus on What Matters: By breaking down tasks, students stay on task and avoid last-minute panic.

Why Choose the LATEST Gantt Chart 2025?


Whether you’re teaching or learning, this tool bridges the gap between planning and execution. As my most updated and comprehensive version, it’s been fine-tuned to meet the needs of modern D&T classrooms. The PDF format is great for printing and classroom discussions, while the editable Excel version empowers students to customize their projects and adapt the timeline as needed.

By using the LATEST Gantt Chart 2025, both teachers and students can keep focused, stay on task, and excel in their design projects. Let this chart be your ultimate guide to better planning and project success!

Get your copy today and experience the difference!

02 October 2024

Setting a Design Direction: Avoid Redundant Work and Maximize Efficiency

When designing a product, the most critical factors are the concept, functionality, and whether it solves the intended problem. 

If the product is also attractive and reasonably priced, it could become highly desirable and even profitable. 

To turn a design idea into a working prototype efficiently, good time management is essential—as the saying goes, "Time is money."

Design revisions and product iterations are inevitable, but it's crucial to minimize unnecessary mistakes and revisions. 

This post will guide you in focusing early on your target audience, design concept, and overall aesthetics without wasting time on irrelevant ideas and unnecessary decision-making.

Step 1: Define Your Target Audience and Location

Determine who your target audience is and where your product will be used. 

These factors directly influence the design concept, style, material selection, textures, shapes, colors, and safety features. 

Keeping your target audience and environment in mind throughout the process will help you focus on the most relevant research and design choices. 

This ensures that your design decisions are well-informed and practical.

Step 2: Identify Whether You’re Solving a Problem or Tackling a Design Challenge

Is your task solving a "problem" or addressing a "design challenge"?

  • Problem (Need): A solution to a genuine issue or necessity.
  • Design Challenge (Want/Luxury): An opportunity to innovate or create something that isn’t essential but enhances an experience or adds value.

Being clear on this distinction is crucial. The process of designing a luxury item will differ significantly from solving a functional problem. 

For instance, creating a playful watering can for a 5-year-old involves a different approach than designing a luxury home appliance. 

This step ensures you're engaging the most appropriate design methods from the beginning.

Step 3: Decide on the Desired Product Outcome

Choose the emotional and functional appeal of your product:

  • Fun
  • Clever
  • Innovative
  • Minimalist
  • Functional
  • Cool
  • A combination of attributes

This step narrows your design vision to a specific outcome. 

For example, if your product is intended to be "fun," all design choices should center around this theme. If a combination of attributes is chosen, such as "clever and minimalist," every design decision should align with both concepts.

Step 4: Ideate and Develop

Once you’ve set the direction, write down the following key markers in your design sheet:

  1. Target Audience
  2. Location
  3. Problem or Design Challenge
  4. Need, Want, or Luxury
  5. Desired Outcome (Fun, Clever, Minimalist, etc.)

Stick to these markers throughout ideation, modeling, development, and prototyping. 

Stay focused on these core elements to avoid wasting time on unnecessary ideas or features that don't align with your design direction. 

This approach will help you move efficiently from concept to prototype while ensuring a high-quality product that meets its intended purpose.

Conclusion

Setting a clear design direction from the beginning is key to producing a successful product. By defining your target audience, clarifying whether you're solving a problem or addressing a design challenge, and focusing on specific emotional and functional outcomes, you can streamline your design process and avoid unnecessary revisions. 

Use this guide to keep your efforts focused and efficient, leading to better designs with fewer setbacks.


#DesignDirection #DesignProcess #TargetAudience #ProductDesign #InnovativeDesign #DesignThinking #Prototyping #EfficientDesign #DesignConcepts #CreativeDesign #DesignRevisions #UserExperience #DesignAesthetics #ProductDevelopment #ProblemSolving #LuxuryDesign #MinimalistDesign #DesignStrategy #TimeManagement

01 October 2024

Start Solving Any Problem with Any Entry Point

Getting started is often the hardest part. 

We’ve all felt the pressure of staring at a blank page, unsure of where to begin our design journal or project. It’s easy to fall into the trap of thinking that every design process must start from the beginning—the so-called “proper” way to do things. But that’s not always necessary. 

The truth is, you can start solving a problem from any entry point. Whether it’s halfway through the process or after you've identified a small piece of the puzzle, what matters is obtaining the context and information needed to get moving. This post will help you break through the hesitation and give you the steps to jump right in and make progress—no matter where you are in the process.

Broad Points Overview:

  1. Identify the Intention
  2. Identify the “Who,” “What,” and “Where”
  3. Ask the “Five Whys” to Find the Root Cause
  4. Verify the “Why”—Identify the Circle of Influence
  5. Move Forward with Confidence

Examples:

1. Identify the Intention

Start by clarifying your intention. This can be anything from solving a common problem, like "I often lose my keys," to creating something completely new, like "I want to design an innovative pencil holder." Knowing exactly what you want to achieve helps narrow your focus.

  • Example: Let’s say your intention is to organize your workspace. Your statement could be, “I want a system that keeps my desk tidy.”


2. Identify the “Who,” “What,” and “Where”

Next, establish the context. Ask yourself: Who will use this solution? What is the specific problem or need? Where will this solution be applied? Understanding these elements provides the full picture, ensuring you don’t miss key details.

  • Example: For your tidy desk system, the “who” might be yourself or people who share your workspace, the “what” could be reducing clutter, and the “where” would be your desk area.


3. Ask the “Five Whys” to Find the Root Cause

Dig deeper by asking why the problem exists. The Five Whys method helps you uncover the root cause of the issue rather than just treating its symptoms. This step is critical to ensure you're solving the right problem.

  • Example: If your desk is always messy, ask why five times. You might find that the root cause isn’t the lack of storage, but the habit of not putting things back where they belong.


4. Verify the “Why”—Identify the Circle of Influence

Check if the problem resonates with others. Understanding the scale of the problem and whether it affects a larger group helps validate your idea. This step helps you gauge the potential impact of your solution.

  • Example: If you’re designing the desk system only for yourself, ask whether others in your household or office would benefit too. If the solution only works for you, it might have limited appeal.


5. Move Forward with Confidence

Once you have clarity and validation, it's time to act. Share your solution or problem with others for feedback. If everyone agrees that it’s worth pursuing, you’re on the right track. Now, go ahead and dive in with confidence, knowing that you’re solving a real, validated problem.

  • Example: After verifying the need for a desk organizer, you design a model and share it with your friends. Their feedback helps you refine the design, ensuring that the final product meets broader needs.


Conclusion:

In design, it’s easy to feel pressured to start from the beginning, but the truth is, you can start anywhere. When you can jump in from any entry point and still move forward, you become more adaptive, innovative, and resilient. 

Follow these principles, and you'll be ahead of the game, ready to tackle any design challenge with confidence and purpose.

#DesignAndTechnology #ProblemSolving #DesignThinking #CreativeProcess #DesignTips #Innovation #DTEducation #FiveWhys #DesignSolutions #IndependentLearning #DTEducators