Need Help?

Facing hurdles in design or sketching? As a student, do you grapple with balancing schoolwork and creative pursuits? This blog provides in-depth, tailored advice, directly tackling issues in design, sketching, and academic management. It's a place where you may find the necessary support and guidance to overcome these challenges. (Copyright © 2007-2024 Daniel Lim) Feel free to share the topics you're eager to explore in this blog. Additionally, if my content has inspired or aided you, I'd love to hear about it. Your feedback is invaluable. Follow me on Facebook for more updates: https://www.facebook.com/designjournalsos/

23 September 2022

SA1 & 2 | PRELIMs | National EXAMS - How to do Revision? I’ve got it COVERED for you.

It’s September 2022. The examinations are round the corner. All your graduating class seniors have completed and submitted their coursework. Everybody should be preparing for the exams and the major exams.

If you haven’t watch any of my self-help videos you can following this “link” to a series of playlist which includes topics on preparing for exams and the attitudes to learning and living in general.

Revision need not be just like how you had been doing. It can be done slightly differently. Especially if you are fond of doing 10 year series. In fact if you did last year’s national examination question and got it all correct, I will ask “So what?”. Since they will certainly NOT appear again this year.

A very common activity is to get students practice on papers after papers. But that can be quite limiting too. Taking exam papers from other schools, you will face the problem with quality of questions. And practicing on papers after papers may not be the most optimum way to ensure you have an excellent coverage on all the topics you need to know.

Before you look at the image below “TWO Different Ways to Revise” I need you to understand that no matter what happened or what your teachers did in class with regards to learning and all the fanciful fun strategies to make you learn or to ‘motivate’ you, ultimately the examination is about how much you can recall. 

You are on your own. You and the paper. That’s all. Full Stop.

You read the questions, you cannot recall the information. ZERO. Full Stop.

The following is NOT magic. The following is just common sense.

To recall, you need repetition. Of course understanding helps a lot too with memory. So it is still necessary that you actually understand those concepts which you need to know. Otherwise if time is not on your side, memorising them could be your next best bet to get some marks.

Committing everything to recallable memory at an instant, is what  you need right now.

We’ll leave holistic learning and life-skills aside for the moment. We are talking about taking the EXAMINATION NOW.


Have a look at the above image with the TWO ways you can revise your work. (1) Working with existing past examination questions, and (2) working with a textbook or a guidebook.

I won’t be explaining how you can do it because the diagram should be self-explanatory. More importantly you need to know why you are spending the time studying and revising. 

The “TWO Different Ways to Revise” would be a nice fresh alternative way you can use to revise your work. Otherwise another way is to use the internet as your learning platform. Watch some good videos on the topics you wish to learn.

Cheers. And all the best for your exams.

……………………………………………………..

Let me know in the comments what else you like to learn and watch.

FOLLOW and LIKE on Facebook to get updates as soon as a new post is up: https://www.facebook.com/designjournalsos

Support me, support my work? Buy me a Coffee? https://www.buymeacoffee.com/mrdanielsos


18 July 2022

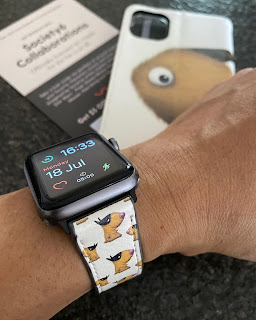
Furdog & FurFish | Just Arrived!

So cute. Seriously! Just arrived today.

I bought my own design from Society 6. A new FurDog Apple Watch Wrist Band and a FurFish iPhone Wallet Case.


Felt them with my own hands and saw them with my own eyes. Really high quality stuffs.

If you haven’t got one you are really missing out on the good stuffs. 🙂

https://society6.com/product/the-furdog-series6810734_apple-watch-band?sku=s6-23734377p125a278v931a279v933

https://society6.com/product/furfish-series_iphone-wallet-case?sku=s6-23273187p126a280v1068

20 May 2022

The Obliques: Quick & Fun Practice Time Fillers

Need a filler to engage a class? This activity can easily use up an hour.

Nothing vey fanciful or complex. But an excellent opportunity to reinforce linework in drawing. That is light lines for drafts lines and finishing off with darker outlines. Good time to remind students to hold their tools firm but light. Relaxed.

A quick introduction to what an oblique drawing is if students are not familiar with it. You can do a quick demo showing first a 2D square. Then tell them you can magically turn it into a 3D object with a few more lines.

Otherwise if the students had already done it before, I am sure there will always be learning opportunities and techniques to correct. If the students are really quick, the teacher may proceed with building and ‘cutting’ blocks to produce replicas of daily objects like tables and chairs, etc. 

For the advanced maybe introduce shading techniques or shadows. 

So even the simplest of forms - the oblique - can be quite complex.

The following is a quick 1hr example:


Students often attempt a drawing without first drawing some guidelines. Which is fine actually if they student can product a decent drawing. (Who’s going to say what is right or wrong, if a student can product exactly what it should be using any techniques he wished, even if ‘wrong’ or not the type taught in class). However it is good practice to learn how to begin drawings with guides. Drawing blocks before adding details. 

In the above example, I showed (see bottom right) a typical attempt when one draws an oblique triangle profile ‘eyeballing’ the inclined lines. It is very difficult to get an accurate representation that way. (Again not that one cannot). My ‘wrong’ example ended up decent. But it could have been worst.

Drawing light blocks that will encompass the form (in this case a triangle) enables the points to be marked out on the sides of the ‘box’ or on any extra guides, so that start and end lines (or curves) can be connected accurately in a 3D form. Projected correctly.

The second half of the filler activity can be a little bit of fun. Slightly more advanced where students can start building up blocks like Lego. Build upwards, downwards and side ways. Using a variety of proportions.

The more advanced students may wish to shape the blocks making them into triangles or more complex ‘cuts’ like a “V” groove or a square depression, etc. Teachers may need to do a quick demo for them.

If you like the full course on how you can make use of Oblique Drawings for practice, head down to the video below.


Let me know in the comments what else you like to learn and watch.

FOLLOW and LIKE on Facebook to get updates as soon as a new post is up: https://www.facebook.com/designjournalsos

Support me, support my work? Buy me a Coffee? https://www.buymeacoffee.com/mrdanielsos


22 April 2022

Drawing & Sketching Practice - 3D Oblique Geometric & Organic Forms

This is the the simplest of all 3D forms. The oblique drawing. If you can draw a shape, you can draw oblique. Simply adding a third dimension at 45 degrees to the horizontal. 


In this video I’ll show you how you can learn about the concept of an Oblique Drawing and how to practice with a variety of oblique blocks. Then we move on to drawing oblique shapes and forms. 


For the last bit, we always need some fun. I’ll show you how you create 3D Oblique building block structures.

Full “Drawing & Sketching” YouTube Playlist HEREhttps://youtu.be/wwgXIVYCeuY

……………………………………………………..

Let me know in the comments what else you like to learn and watch.

FOLLOW and LIKE on Facebook to get updates as soon as a new post is up: https://www.facebook.com/designjournalsos

Support me, support my work? Buy me a Coffee? https://www.buymeacoffee.com/mrdanielsos


06 April 2022

Examination! Everybody’s Anxiety. “Study” or “Revision”? What’s the BEST Strategy?

The examination is everybody’s anxiety. However it can also be stress-free. You CANNOT wait for weeks or days to the examination day and then start thinking how you should study or revise. You want stress-free? You just need to know what it is, how it works and you find a way to make the best of your time and effort, and find a strategy to make it work to your advantage.

In this video I defined what “Examination” is and it’s main intention. This concept is important for you to understand the topics that follows.

Then I shared my personal experiences on how I overcame and managed to score close to a 100% for a subject I knew almost nothing about in my graduation year. Just few weeks before the major examination. I am not encouraging anybody to leave everything to the last of the minutes. But I am sharing with you that if you knew such strategies exists, you will do so much better. 


Finally I went into great length describing what to me is the ‘Ultimate Revision Strategy” for examination. Making the best use of the principles of memory retention and time. And how you will surely know you are ready for the examination. Because too often than not we hear people say, “I already studied. I read and I understood everything. But I still failed.” Something very important is missing. And I’ll reveal to you what that is.

Watch the video till the end. You’ll learn a thing or two.

……………………………………………………..

Let me know in the comments what else you like to learn and watch.

FOLLOW and LIKE on Facebook to get updates as soon as a new post is up: https://www.facebook.com/designjournalsos

Support me, support my work? Buy me a Coffee? https://www.buymeacoffee.com/mrdanielsos

Drawing & Sketching Practice - “Warm Ups”: Lines, Circles, Ovals and Curves, and more…

In this video I bring you through the steps of warm ups for sketching. 

As usual I drop some nuggets of tips and tricks to help you make better progresses. You will learn about warm ups with lines, circles, ovals and curves. And how you can create intermediate variations along the way and on your own. For example varying spaces and line weights, and sizes, etc. 

Feel free to pause after each warm up section so you can continue with more practices on your own, or simply just taking a break to digest the contents. Or if you are quick enough, follow me through the entire video without stopping.

At the end of the warm up practices, I’ll attempt to identify a meaningful profile from the ‘mess’ and turn it into something comprehensible and familiar. If you are adventurous enough, follow me through to creating a 3D form out of that.

Watch and learn with me about sketching “Warm Ups

……………………………………………………..

Let me know in the comments what else you like to learn and watch.

FOLLOW and LIKE on Facebook to get updates as soon as a new post is up: https://www.facebook.com/designjournalsos

Support me, support my work? Buy me a Coffee? https://www.buymeacoffee.com/mrdanielsos
14 March 2022

MODeling for Design Situation & Ideation

MODeling = MODEL + model. How to pose? How do you get the best and most effective photo of your model for coursework? Who should be the photographer (aka the DIRECTOR) and who should be the model(s)?

While it may seem like common sense that the person taking the photographs should be the director and owner of the project. The opposite is actually true. All the time. It is not rare to see students playing the role of the MODEL, modeling their own solution, while their friends take the photographs for them.

More often than not you get very lousy quality photos that does not show well the intention of the activity. The person taking the photo (if not the creator of the solution) will not know the best angle or perspective the photo should be. And will not be able to advice the ‘MODEL’ as so. And will never be able to.


In the video I’ll explain who the MODEL(S) should be and why it should not be the owner of the solution / model. And will attempt to explain to you the best possible types of scenario you should strive for. One that best describes the intention of the action of the model, by the user, in the right context.

Hope you liked the video and learned a thing or two.

……………………………………………………..

Let me know in the comments what else you like to learn and watch.

FOLLOW and LIKE on Facebook to get updates as soon as a new post is up: https://www.facebook.com/designjournalsos

Support me, support my work? Buy me a Coffee? https://www.buymeacoffee.com/mrdanielsos

13 March 2022

Examination! When do I start Studying or Revising? How do I work that out?

How do I know how to determine when I should start my revision? Should I rely on my teacher’s template or wait for my friends? Am I revising or studying? Should I do it fast or slow? What attitudes should I have? If I don’t understand something or cannot solves problem what do I do?

By the time you hear about examination planning from your teacher, it is usually too late.


In the previous video on “Examination! Everybody’s Anxiety. “Study” or “Revision”? What’s the BEST Strategy? and more…” I mentioned about starting the last subject first. 

But what does it mean? How early is early? How do I know if I have allocated enough time?


All these and more in the video where I elaborate on the topic on ‘how do I know when to start studying or revising’ and many more important tips to help you become more effective.

……………………………………………………..

Let me know in the comments what else you like to learn and watch.

FOLLOW and LIKE on Facebook to get updates as soon as a new post is up: https://www.facebook.com/designjournalsos

Support me, support my work? Buy me a Coffee? https://www.buymeacoffee.com/mrdanielsos


(5) Drawing & Sketching Practice - 2D Geometric & Organic Shapes

Drawing 2D Geometric & Organic Shapes; They are just about as fundamental as drawings can get.

What’s the difference between the two? And how do we make the best out of practices?


In the video I’ll explain to you how you can draw various 2D shapes. With lots of just-in-time tips to help you supercharge your progress. I’ll also be explain why I chose to do certain things or draw in a certain way

Feel free to “Paused” in between shapes to practice on your own, or create your own variations. You will also find tips on how to create a variety of shapes on your own. 

We end with the finale by interpreting the ‘mess’ from the practices and create cool & fun shapes.

Watch and learn with me about sketching “2D Geometric & Organic Shapes

……………………………………………………..

Let me know in the comments what else you like to learn and watch.

FOLLOW and LIKE on Facebook to get updates as soon as a new post is up: https://www.facebook.com/designjournalsos

Support me, support my work? Buy me a Coffee? https://www.buymeacoffee.com/mrdanielsos

10 March 2022

Four-Levels of Responsibilities & Quality Works. What are they? Why are they important life-skills, and more…

This video is perhaps one of the most important ones I’ve created, that is closely related to coursework. It addresses attitudes and motivation towards the coursework and generally about why and how you chose to behave, and do the things you are doing right now.

There is nothing more important than leaving a legacy when you know that potentially one day your voice will never be heard again. 

Before anything else can be meaningfully proposed and executed, the types of Responsibilities you chose to function on, and they definitions of Quality, needs to be understood.

In this video I talked about 

  1. Four-Levels of Responsibilities’ and
  2. defined what “Quality Work” means, and described how “Quality Work” looks like. 
The two major principles which I discovered, influenced the way I think and work & teach, and modeled since I first became an educator more than 2 decades ago.

All opinions are mine and mine own. You don’t have to believe or follow them. But take time to listen, think, and make your own conclusions how you wish to live your life.

……………………………………………………..

Let me know in the comments what else you like to learn and watch.

FOLLOW and LIKE on Facebook to get updates as soon as a new post is up: https://www.facebook.com/designjournalsos

Support me, support my work? Buy me a Coffee? https://www.buymeacoffee.com/mrdanielsos

09 March 2022

Have ideas but cannot sketch fast enough? This video is for you.

It can be very exciting in a design process when ideas keep pouring in. But it can be frustrating if you cannot keep up with sketching those ideas on paper. 

Just because you might not have acquired the competencies, confidences and the speed yet, what can you do to make sure you do not forget or miss out on those ideas, when it is time to sketch them on paper?


If you can identify with the above, this video is for you. In the video I described two ways you can manage this problem,

1) Jotting ideas on paper before drawing them.

2) Using references when you draw.


Watch the video on how the above points are elaborated with examples.

If you like this video and the contents I shared, LIKE, SHARE and SUBSCRIBE. And do let me know what else you like to watch and learn. And I’ll make them for you.

Let me know in the comments what else you like to learn and watch.

FOLLOW and LIKE on Facebook to get updates as soon as a new post is up: https://www.facebook.com/designjournalsos

Support me, support my work? Buy me a Coffee? https://www.buymeacoffee.com/mrdanielsos

Stress-Free Coursework is NOT a Dream. Learn more about this and how this can be YOU in this post.

Stress-Free coursework? Yes it is totally possible. But you say the coursework is often stressful and time-consuming for many students, it is time this must change.

In this video I’m going to show you that a stressful coursework need not be so, and how you can achieve a relatively Stress-Free coursework for yourself. 

I will not guarantee a 100% stress-free coursework because there got to be some degree of tension and challenges.

By being stress-free, essentially that meant not needing the unnecessary ‘stress’ like a regular student who does not know what is going on in coursework.

All you need is to understand a few things on how the coursework works. And the objectives of each and every design process steps. Make sure you get your objectives clear and complete, before you move on to the next step or design phase. If you do that I can almost guarantee you a Stress-Free journey.


Learn how you can be Stress-Free in the video above

And if you like the video and the contents I produce for you, let me know in the comments below what else you like to watch and learn. And I’ll make them for you.

Let me know in the comments what else you like to learn and watch.

FOLLOW and LIKE on Facebook to get updates as soon as a new post is up: https://www.facebook.com/designjournalsos

Support me, support my work? Buy me a Coffee? https://www.buymeacoffee.com/mrdanielsos


08 March 2022

Drawing & Sketching Practice “Introduction & Basics”. Watch them before you start any practices!

Here you will find videos and tutorials which you can watch, learn and practice together with me. I will be populating more videos whenever new ones are ready over the next few days or weeks. Make sure you come back to check out new updates.

In the following series of videos of “Sketching & Drawing Practice with Mr Daniel” you will be guided through Warm ups,  Basic 2D and 3D Geometric and Organic shapes and forms practices, and finally One & Two Point-Perspective practices

And before we even begin, let me share with you some essential “Drawing Basics” that is absolutely necessary for you to understand before you dive right into the rest of the tutorials and practices.

You don’t have do everything. You may choose one or two areas you wish to learn or develop on. In every video I will be providing you tips and guides on how you can draw more effectively and efficiently. 

But at the end of the day, how well and confidence you will draw, depends on how often you practice. 

First up in this post you will find a (1) Trailer Video, an (2) Introduction to Different Types of Practices and (3) Drawing Basics. Or watch them below:

Videos below:

(1) “Drawing & Sketching with Mr Daniel” (TRAILER)
Just an advertisement

(2) “Introduction to Types of Drawing Practices”
Warm Ups, 2D and 3D (Geometric & Organic) Shapes and Forms, One & Two-Point Perspectives, and more…

(3) “Drawing Basics”
Pen or Pencil? What type? How to handle or grip a pencil? Which to use? How to start laying lines? How light or ‘hard’ to draw? When? and more…

All the best. And look forward to your learning with me and your comments.

!Let me know in the comments what else you like to learn and watch.

FOLLOW and LIKE on Facebook to get updates as soon as a new post is up: https://www.facebook.com/designjournalsos

Support my work? Buy me a Coffee? https://www.buymeacoffee.com/mrdanielsos


04 March 2022

MindMap - How to use the Mindmap Strategy to Kick Start a Design Theme Effectively

How to do a mindmap

How do I start? How do I end? Should I know the purpose and objective of creating a

I’ll share with you why you should, and much more in this video.

In this video I describe what is the quickest, most effective way to construct a mindmap beginning from a design theme, that will end up with some good genuine practical Design Opportunities.

Let me know in the comments what else you like to learn and watch.

FOLLOW and LIKE on Facebook to get updates as soon as a new post is up: https://www.facebook.com/designjournalsos

Support my work? Buy me a Coffee? https://www.buymeacoffee.com/mrdanielsos

*New* Series: “Sketching & Drawing Practice with Mr Daniel” (TRAILER VERSION)

Cannot draw? I know right. But you got start somewhere. These videos will guide and help you kick start your progress from ZERO to HERO.

Sketching and drawing can be a very daunting activity for many people. Too often than not you will always hear people say “I cannot draw.” 

Trust me, everybody can draw. Draw me a square. See? You can.

The only problem is you may not draw them in the right proportion. That is where practice and awareness comes to play. Allow me to guide you through a series of practical drawing practices from warm ups, to 2D shapes and forms, to 3D forms. 

In every video I’ll also be dropping some PRO TIPS on how you can handle your tools and approach to a successful sketch - one that you eventually will tell yourself “I didn’t know I can sketch or draw!”.

However mastery takes practices. Not by the hours. Months maybe. But the really good dudes did it for years. Daily. So if you want to be good, it is not good enough just watching a video like this. You got to go practice. 

So practice with me. You may pause my videos for extra practices in between different techniques, or you may need more time to practice a technique before you move on to the next. 

There is no rule. The point is YOU PRACTICE. And you will surely get better.

Let me know in the comments what else you like to learn and watch.

FOLLOW and LIKE on Facebook to get updates as soon as a new post is up: https://www.facebook.com/designjournalsos

Support my work? Buy me a Coffee? https://www.buymeacoffee.com/mrdanielsos

Ideas Generation and Three Broad Areas you MUST note

Why the three broad points to note for Ideas Generation is important in this series of “Design and Coursework Chat’

“What are you doing?” “Why are you doing this now?” “You meant this for a kid 5 year old? You kidding me?” What is going on in this page? “Why is this so tiny? etc. When someone looks at your work and if these are often the questions asked, then this video may really be for you.

The Ideas Generating portion of the coursework is one of the most important part of the coursework. This is where your idea / solution begins; actually this began way before this; the moment you drafted the Design Brief

However the Ideas Generation part enables you to document and illustrate the solution(s) visually, communicating the intentions of a solution in the form of graphics and illustrations. 

The idea(s) can be further manipulated and evaluate via a series of modeling, and working iteratively simultaneously on paper.

Today’s chat I listed THREE board areas everybody ought to note:

1) Adding in a “Sub-Title” (i.e. the Design Specification) to your Title (‘Ideas Generation’),

2) Noting without fail the “User and the Environment” every moment of the ideation (and development) attempt, and

3) Including the “User and Hands/Body Parts” in your solutions.

These notes if applied, may make a big difference to the way you present your work. Making them accurate and focus, comprehensible without/minimal external questioning and clarification to find out what is going on, and helps you with sizes, proportions, materials and jointing methods, as early as at the Ideas Generation phase.

If you like the video and my contents, please Subscribe, LIKE and Share. 

Let me know in the comments what else you like to learn and watch.

FOLLOW and LIKE on Facebook to get updates as soon as a new post is up: https://www.facebook.com/designjournalsos

Support my work? Buy me a Coffee? https://www.buymeacoffee.com/mrdanielsos

01 March 2022

Will you ‘Buy Me A Coffee’?

You like my contents and benefitted from my posts, videos and sharing?

It has not been easy producing them. And I plan to do this regularly. So more people and students will continue to benefit from my insights and experiences in the arts, drawing and design coursework contents.

To do this in a sustainable way, I would love to continue sharing these information for free. But I also need to make a living. And to cater for my family.

Please support my art. My design related contents. My drawing tutorials and demos and more.

Support me @ “Buy me a Coffee” so I will be able to continue to produce great contents, great and cute Art, insightful Drawing Tutorials, and Design & Coursework Chats, etc.

When you support me, you also support my family with two young kids.


Let me share with you my Art. Enjoy looking at them on Social Media. Learn a thing or two about drawing from my videos

Buy Cute & Practical mrdanielsos merchandise or gift them to your friends. 


Or just simply buy me a coffee. A little bit will go a long way for me and my family.

Thank you very much. Visit the link below on how you can start buying me coffee. And keep the posts and videos alive.

https://www.buymeacoffee.com/mrdanielsos


Three-Point Perspective Objects into Simple Manageable 3D Isometric Forms

It is always a challenge for students to copy a real world object especially if these images come in the form of a photograph of a product. Or they might have taken a photograph of an object. The real world is always presented in its natural three-point perspective

To reproduce these references onto paper, students often tries too hard to copy the real thing in its entirety realistically. This is not necessary. And it takes up too much time. 

It will be good enough to be able to capture it’s essence, it’s general shape and form. Only later to study it’s function and features. From the simplified version and perspective. 

In this case, we attempt to represent the real thing in simple 3D Isometric blocks. You don’t need to include the minor curvatures and texture and patterns on the real thing.

Omitting these details do not affect the quality of your explorations on their functionality.

Watch the video to find out how you can do this. You may wish to follow the video and practice it on your own. Pause anywhere you wish along the video as you follow through the steps.


Three-Point Perspective Objects into Simple Manageable 3D Isometric Forms

In this video I show you the steps of getting this done with an example of a bar stool chair:

  • First we interpreted the real world three-point perspective image of the chair by drawing major blocks over the reference. 
  • Then we present it on 2D Front and Side Orthographic views. 
  • Finally  we use these references to produce a 3D Isometric version of the real thing.

  • If you like the video and my contents, please Subscribe, LIKE and Share. 

    Let me know in the comments what else you like to learn and watch.

    FOLLOW and LIKE on Facebook to get updates as soon as a new post is up: https://www.facebook.com/designjournalsos

    Support my work? Buy me a Coffee? https://www.buymeacoffee.com/mrdanielsos

    ‘Practical’ & ‘Luxury’ Innovative Design Directions

    “What the heck is that?”

    Never mind, I hear you.

    I bet you have not heard of anyone talking about “Practical & Luxury” Innovation as Design Opportunities. There is no point presenting to you what every body can tell you. I’ll be nothing more than an echo chamber. 

    However I do not purposely create these weird stuffs, so I have something different to tell you.

    But they must have its purpose. I’ve consolidated two decades of thinking about this, and came to the conclusion that there may just be two broad categories of Design Opportunities you can think about. And decide which of them you wish to take on, for your Coursework.

    Chat on Practical & Luxury Innovations

    The former is your typical common good and meaningful value-added function project, combined to an existing product, to it’s primary function. To create an innovation.

    The latter is a solution to an existing function; but the difference is that this innovation; “Luxury”, is luxury, because it is really not needed. It’s WANT, rather than NEED. It’s designed primarily for fun and entertainment. Not really enhancing or adding useful practical functionality. For the sake of being different or offering an alternative way of functionality. Nothing really wrong with that. It can be a very challenging design challenge. And very fun to work on. And it’s not an easy challenge compared to the ‘Practical’ innovation type of design. But this direction can be very fulfilling.

    Hear more about this in the video.

    The previous video I talked about earlier on in the chat here: https://youtu.be/b5wN6B5di-M

    If you like the video and my contents, please Subscribe, LIKE and Share. 

    Let me know in the comments what else you like to learn and watch.

    FOLLOW and LIKE on Facebook to get updates as soon as a new post is up: https://www.facebook.com/designjournalsos

    Support my work? Buy me a Coffee? https://www.buymeacoffee.com/mrdanielsos

    28 February 2022

    How to Copy ANYTHING 2D using the Grid Method

    The Grid Method is one of the best method to copy a final 2D design onto a 2D workpiece. 

    Or practically of ANYTHING on ANYTHING.

    Some examples are for common mini-projects like a candy dish, a coaster, or some simple profile designs like a Pencil Holder etc.


    Why it is important to copy a final design accurately? Why can’t we just draw it on the workpiece directly. 

    You see, you spent a great deal of time and effort developing and fine-tuning your design. To where it is right now. How your design looked now is probably it’s best. The next best kindest thing you can do for yourself is to copy it as accurately as possible. So you end up with a design profile how you exactly want it. Not something out of shape or inaccurate.

    Watch the demonstration on how to use the Grid Method:

    Extra Notes:

    • The Grid Method is therefore your best bet. 
    • NOT the Geometric Shape Method
    • The Negative Space Method ‘may’ be somewhat applicable. 
    • But the Grid is the best for this application.

    Geometric Shape and Negative Shape Method: Three Easy Ways to Copy 2D Images, Shapes and Photo References

    If you like the video and my contents, please Subscribe, LIKE and Share. 

    Let me know in the comments what else you like to learn and watch.

    FOLLOW and LIKE on Facebook to get updates as soon as a new post is up: https://www.facebook.com/designjournalsos

    Support my work? Buy me a Coffee? https://www.buymeacoffee.com/mrdanielsos

    Design Need and Design Opportunity. What are they? Is an Identified “Problem” = Design “Need”?

    Design Needs and Opportunities: Commonly attempted as “Problem(s) Situation”. 

    Design Needs and Opportunities, are they they same? Or are they not.

    I’ve gone well past the way of identifying Design Needs with problems, but I won’t be surprised this might still be what everybody else is doing. I find this not fruitful. 

    So what is the problem when one tries to identify Design Needs, but treats it as identifying problems? The problem with this is there is hardly any ‘problems’ you can identify today.

    At least not so easy. If you do, you WIN big time. Otherwise what can we do if we don’t go around searching for problems? 

    Follow this video chat to find out more:


    We innovate. We strive to change things a little bit here and there. Make some improvements from the previous versions, etc. We find things to innovate, or further innovate. 

    If you find a Need for an improvement (a genuine one), you have a meaningful Design Opportunity. This will lead to a meaningful project, for yourself.

    If you like the video and my contents, please Subscribe, LIKE and Share. 

    Let me know in the comments what else you like to learn and watch.

    FOLLOW and LIKE on Facebook to get updates as soon as a new post is up: https://www.facebook.com/designjournalsos

    Support my work? Buy me a Coffee? https://www.buymeacoffee.com/mrdanielsos